Share this
Part Two: Deploying High Available Applications in Oracle Cloud Infrastructure: Application Machine
by Fernando Salgado on Aug 30, 2021 12:00:00 AM
This is the second in a series of blog posts that covers the details to deploy a high available setup of Oracle Enterprise Manager 13.5 using Oracle Cloud Infrastructure’s resources.
Recap
This series will demonstrate how to deploy a high available installation of OEM 13.5 using OCI’s services.
This setup will comprise the following resources:
- A two-node RAC VM database
- A data guard standby database
- Two application hosts
- A load balancer
- Shared storage area
The first post of this series demonstrated the initial Oracle Cloud setup (compartment and VCN) and the creation of the two-node VM RAC repository database.
This post will cover the requirements and the setup of the first application machine.
General notes
As this is just an experimental implementation that will not be used once it’s completed, I’ve overlooked some important network security and licensing aspects. This section will address the most important ones.
Licensing
Oracle Enterprise Manager includes a restricted license that may apply to basic configurations. For advanced configurations, such as the one discussed in this series, consult the Oracle licensing documents or your Oracle account manager to ensure that all components are sufficiently licensed.
Security
As this is just a test environment and the idea is to give an overall look at the main features available at Oracle’s Cloud Infrastructure, I’ll overlook some important security aspects of an actual setup, such as:
- Utilization of bastion hosts
- Security lists
- Security groups
- Properly configured firewalls
For an actual deployment, you should have a network engineer review your VCN and tighten its security as much as possible.
Application machines
Besides the repository database, Oracle Enterprise Manager (OEM) also requires at least one application machine. This machine will host the Middleware (WebLogic), as well as the OEM application itself, called Oracle Management Service (OMS).
To reach the third level of High Availability for OEM, you’ll require at least two application machines running in active-active mode.
The CPU and memory capacity for each machine depends on the size of your deployment, according to the following rules:
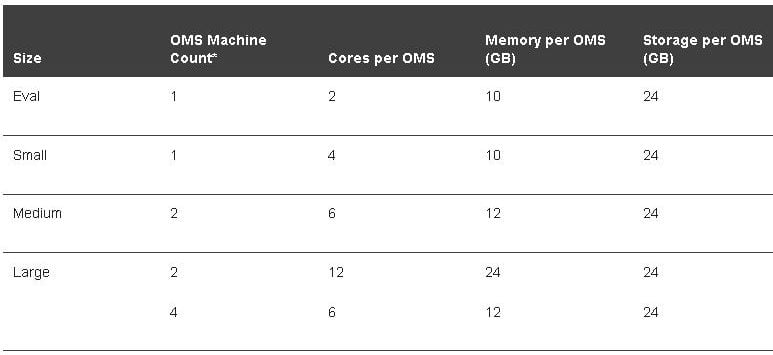
Source: https://docs.oracle.com/cd/E63000_01/EMADV/sizing.htm#EMADV11829
To standardize the installation, the following nomenclature will be used:
Resources nomenclature (uppercase): {AD}X{RE}XX{NAME}XX
{AD}   - Availability Domain, plus the number of the AD.
{RE}   - Resource with 2 letters (BV - Block Volume, CI - Compute Instance, DB - Autonomous DB), plus the number of the resource, when there could be more than one.
{NAME} - Name, plus number, of the resource.

Examples:

AD3BV01APPOEM01
AD3CIAPPOEM01
Host names nomenclature (lowercase): {type}{os}{app}{#}
{type} - Type with 1 letter (V - Virtualized, B - Bare metal)
{os}   - OS Identification with 1 letter (L - Linux, W - Windows, U - Unix)
{app}  - Application specific denomination with up to 6 letters, Example: oemapp
{#}    - Number with 2 digits in case there are multiple servers with the same purpose:
Note that for ease of access each application machine will have its own Public IP Address, in an actual deployment you should avoid having public IPs exposed, as well as review the network security rules, and use a Bastion host to keep your environment safe.
Launch the instance
To launch the first virtual machine that will be used as the host for OMS, head to the “Instances” subsection within the “Compute” section, as shown below:
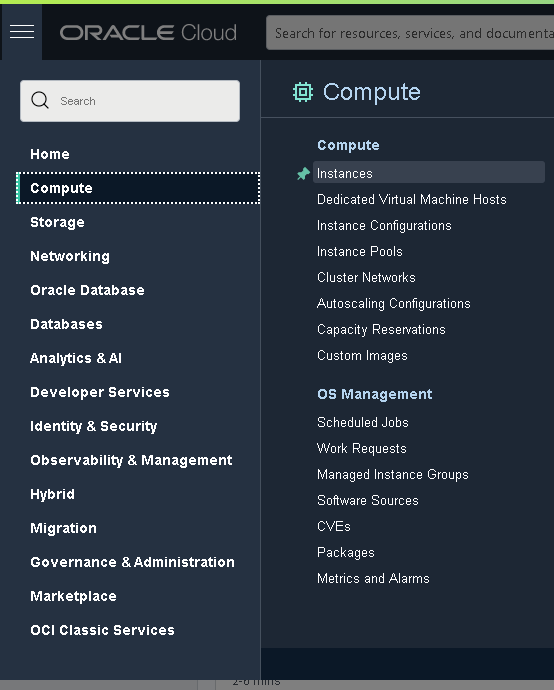
Now click on the “Create Instance” button and fill in the details as follows:
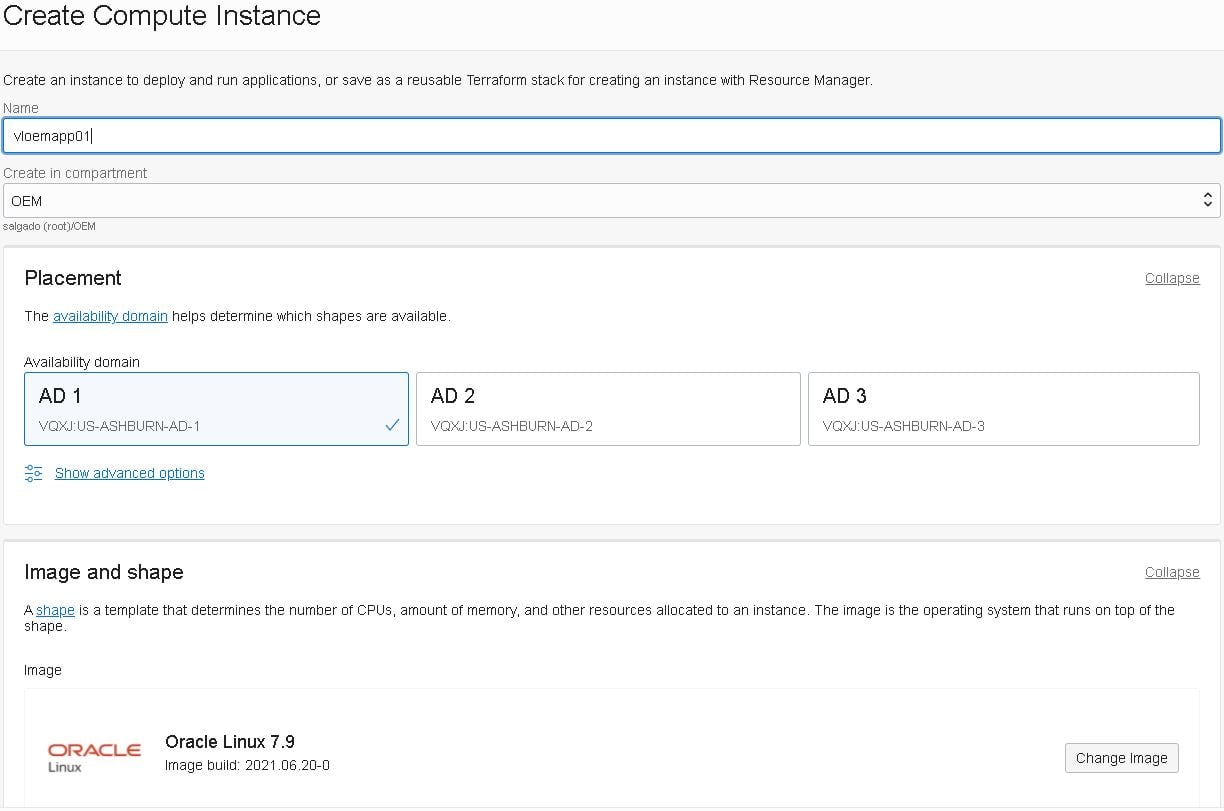
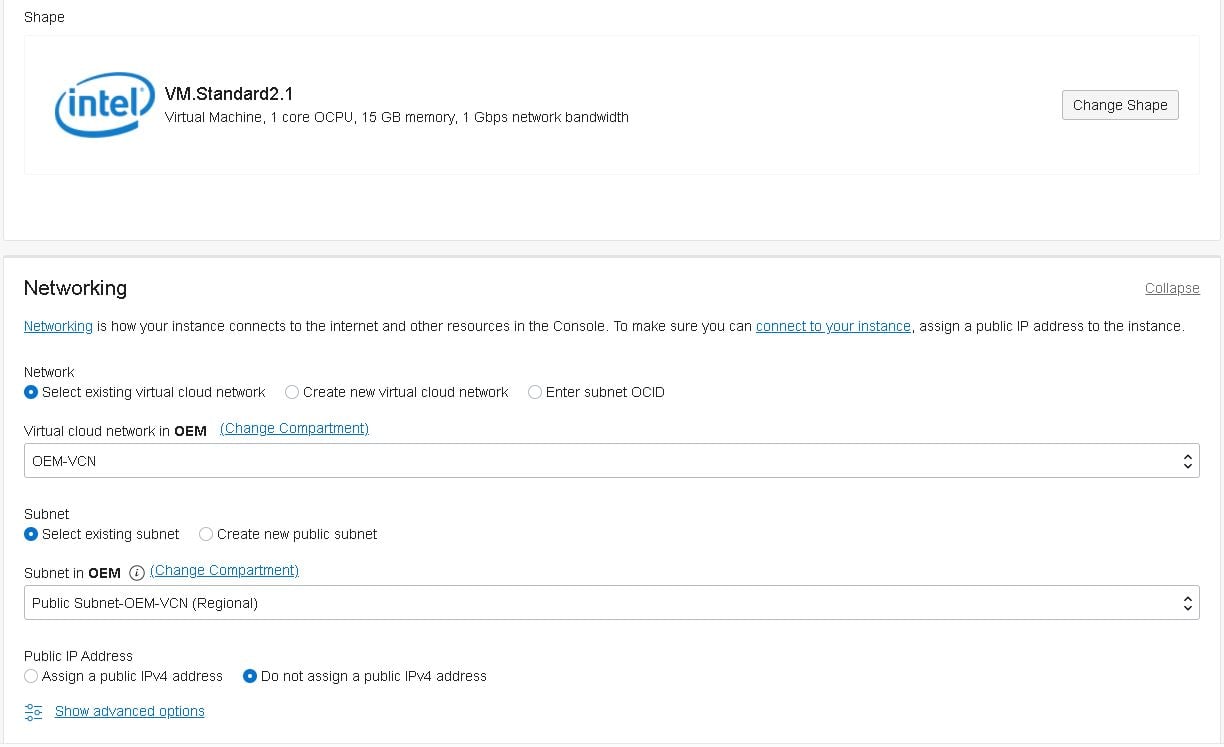
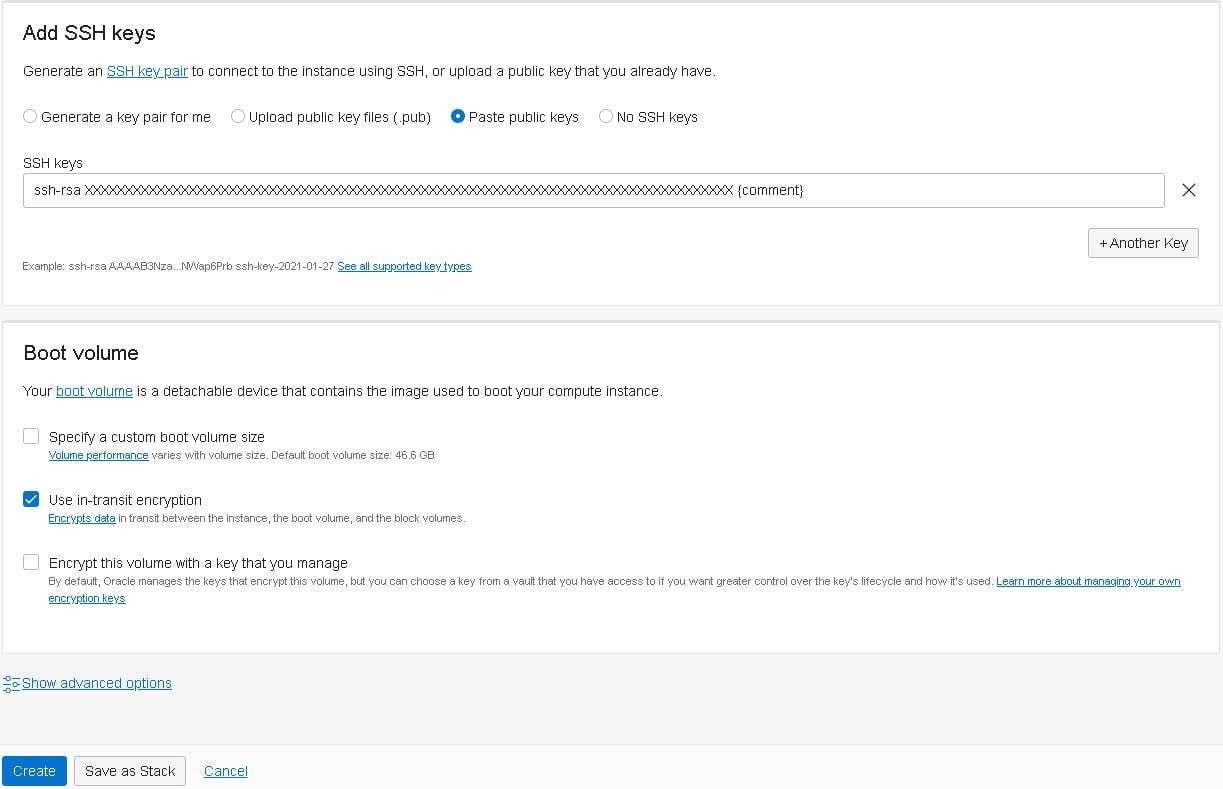
- Note: If you don’t know how to create the SSH keys, follow this guide.
When the new instance shows as running, it’s time to assign one of the reserved public IPs to this instance. Click on the newly created instance, then click on “Attached VNICs” and finally on the “vloemapp01(02) (Primary VNIC)”:
Note: During my tests I launched vloemapp02 first, that’s why some screenshots show 02 instead of 01.

On the “VNIC Details” page, click on the “IPv4 Addresses” link located in the left-bottom of the page:

Next click on the three buttons at the end of the first line and select “Edit”, then select the following options and click on “Assign”:
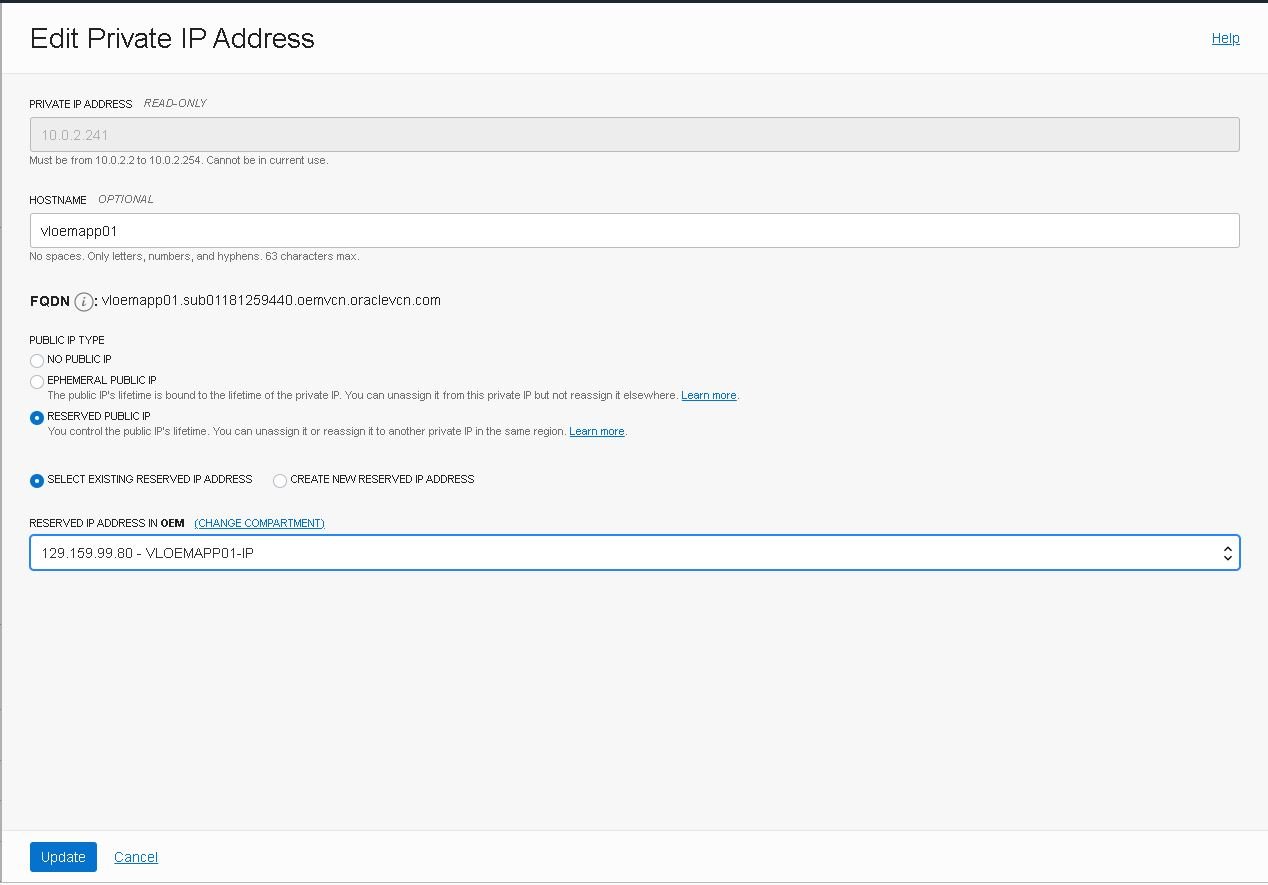
- Note: As this is just a test environment I’m not going through a bastion host, but in a real-world scenario you should not expose your network like that. Learn more about bastion hosts.
Connect to the instance and install required packages
You should now be able to connect to the new instance using SSH and the key provided during its creation. If you’re using PuTTY, just put in the public IP assigned above and use your private SSH key file in the ”Private key file for authentication” filed, on the “Connection -> SSH ->Auth”:
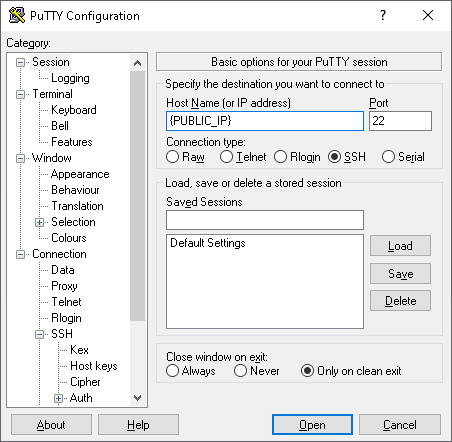
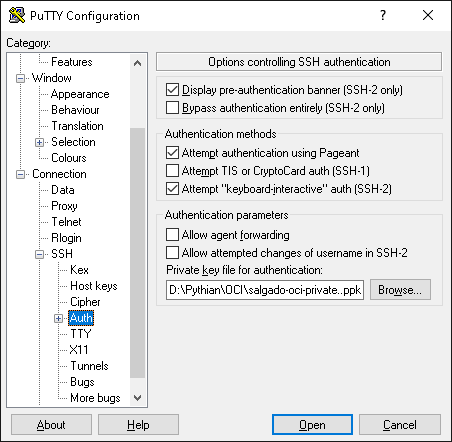
The default username is OPC, so if everything went according to plan, when you type in the username it should log in without prompting for a password:
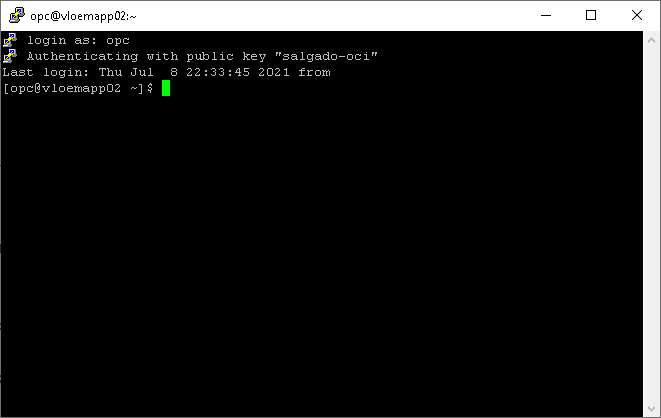
- Note: Take good care of your SSH Key files. Without them, you won’t be able to log in. It’s also recommended that you set up user equivalence to at least one other machine as a fail-safe login feature.
Now that the first application machine is up and running, it is time to set it up. First, we’ll need to create the required group and user:
- Create group and user:
[root@vloemapp01 ~]# groupadd dba -g 1001
[root@vloemapp01 ~]# useradd -d /home/oracle -g 1001 oracle
- Ensure that you set the default file mode creation mask (umask) to 022 in the shell startup file.
- Add the following in oracle’s .bash_profile:
[root@vloemapp01 ~]# echo "umask 022" >> /home/oracle/.bash_profile
- Install the packages required by OEM:
yum -y install binutils compat-libcap1 compat-libstdc++.x86_64 compat-libstdc++.i686 gcc gcc-c++ glibc.x86_64 glibc.i686 glibc-devel.x86_64 libaio.x86_64 libaio-devel.x86_64 libgcc.x86_64 libgcc.i686 libstdc++.x86_64 libstdc++.i686 libstdc++.x86_64 dejavu-serif-fonts ksh make sysstat numactl.x86_641 numactl.x86_642 motif.x86_643 motif.x86_644 redhat-lsb.x86_64 redhat-lsb-core.x86_64 openssl
- The required packages are:
binutils-2.23.52.0.1
compat-libcap1-1.10
compat-libstdc++-33-3.2.3.x86_64
compat-libstdc++-33-3.2.3.i686
gcc-4.8.2
gcc-c++-4.8.2
glibc-2.17.x86_64
glibc-2.17.i686
glibc-devel-2.17.x86_64
libaio-0.3.109.x86_64
libaio-devel-0.3.109.x86_64
libgcc-4.8.2.x86_64
libgcc-4.8.2.i686
libstdc++-4.8.2.x86_64
libstdc++-4.8.2.i686
libstdc++-devel-4.8.2.x86_64
dejavu-serif-fonts
ksh
make-3.82
sysstat-10.1.5
numactl-2.0.9 for x86_641
numactl-devel-2.0.9 for x86_642
motif-2.3.4-7 for x86_643
motif-devel-2.3.4-7 for x86_644
redhat-lsb-4.1-27.0.1.el7 for x86_64
redhat-lsb-core-4.1-27.0.1.el7 for x86_64
OpenSSL 1.0.1e
Note: Some packages require both architectures (x86_64 and i686).
Attach a block volume
Now we’ll need to create and attach a block volume to this instance, which we’ll be used to host the OMS application. Note that block volumes should be created on the same AD as the compute instances to which they will be attached.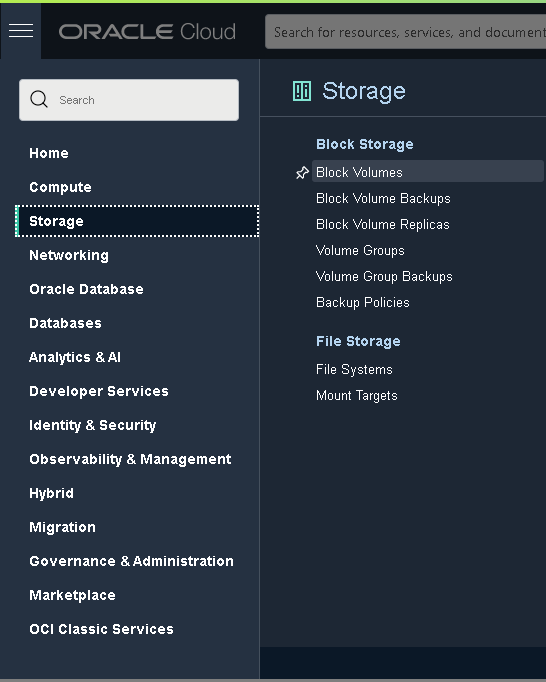
Click the “Create Block Volume” button and fill in the details as follows:
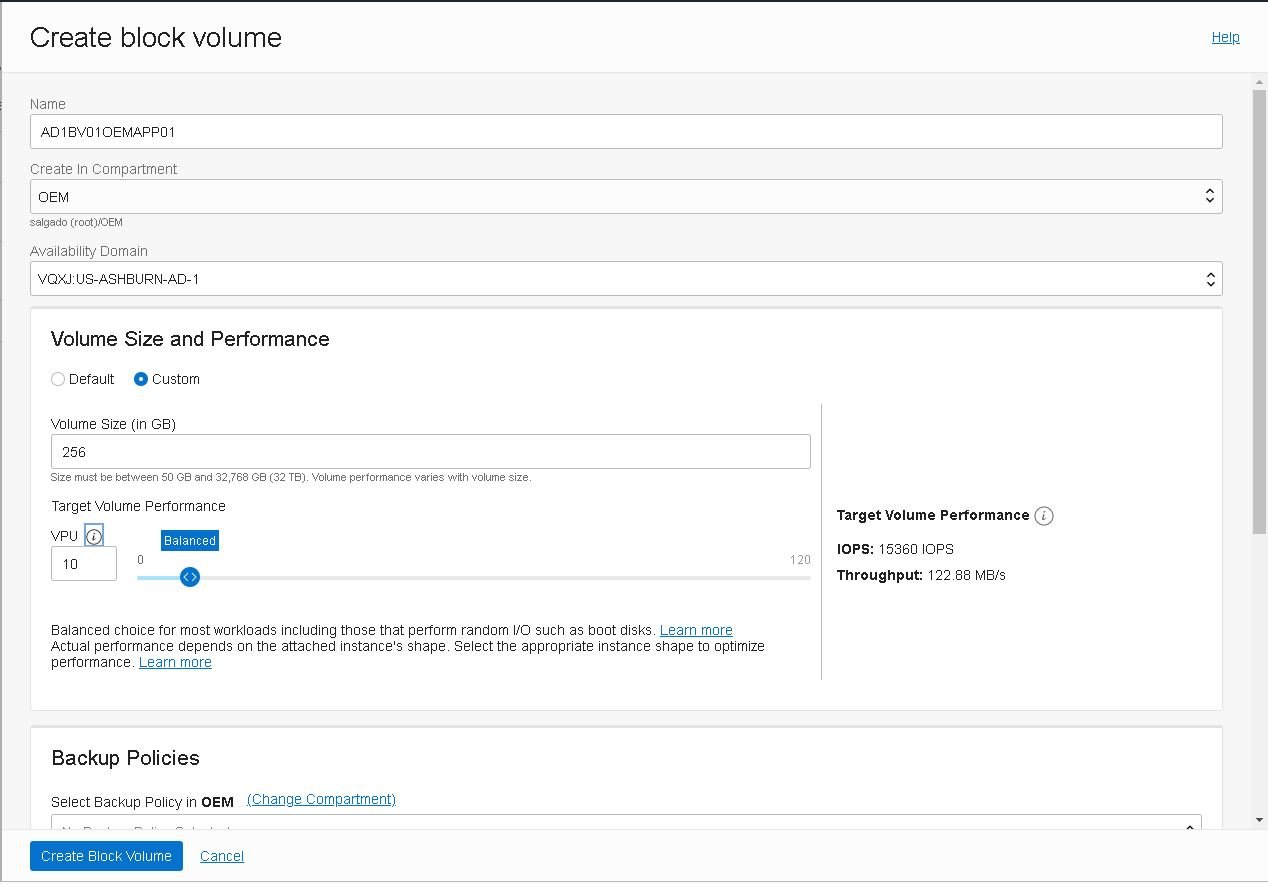
Take the opportunity to create the Block Volume that will be used in the second instance (AD2BV01OEMAPP02), as well as a third to host the shared network storage, named AD1VC01OEMSTO01, each with 256GB.
When creation is complete, attach this volume to the “vloemapp01” instance. To do so, click “Attached Instances,” then click the “Attach Instance” button:
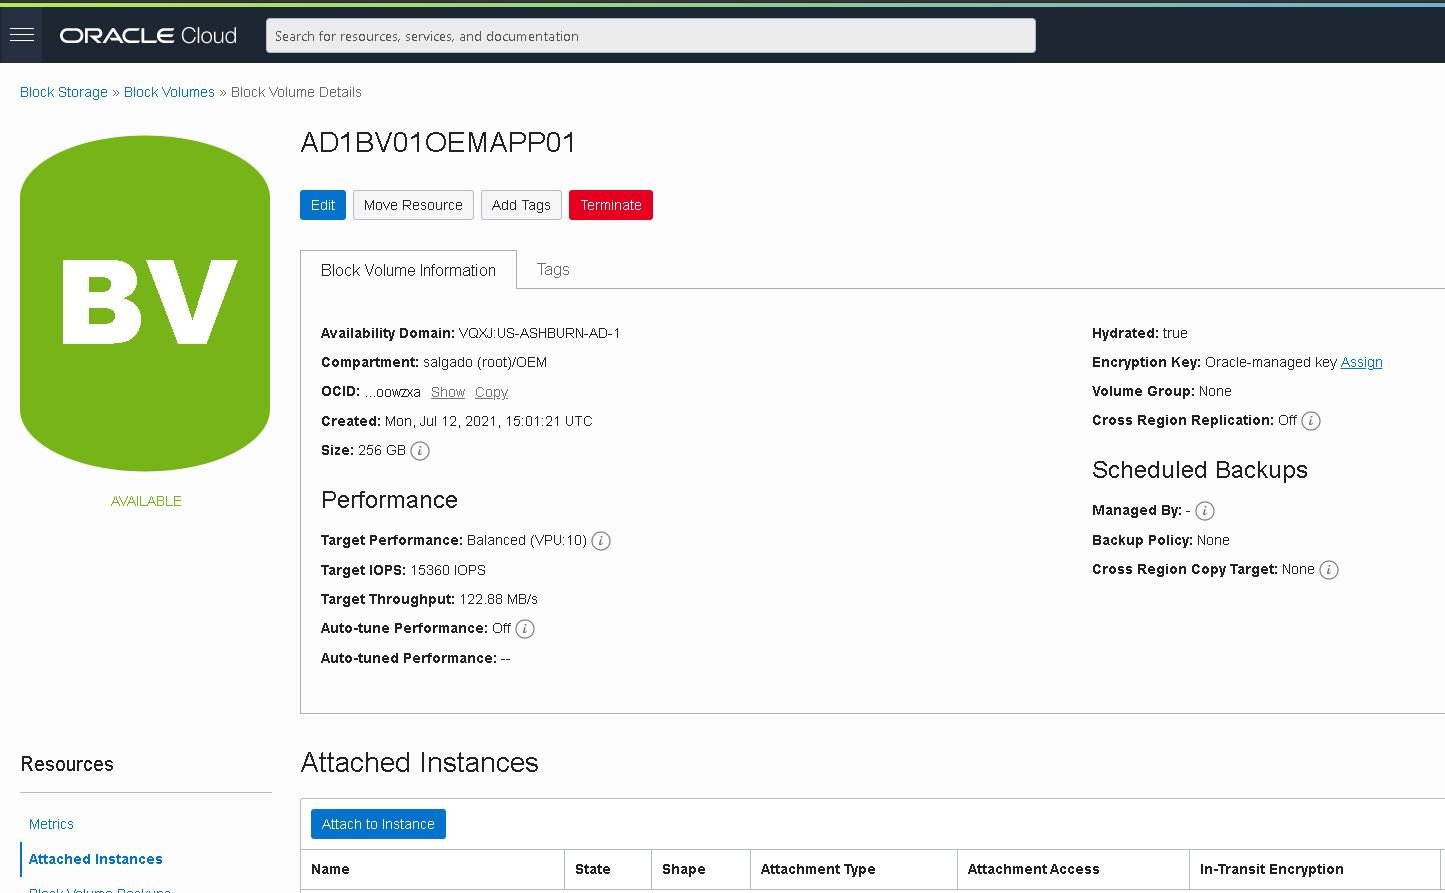
Select the appropriate instance and click “Attach”:
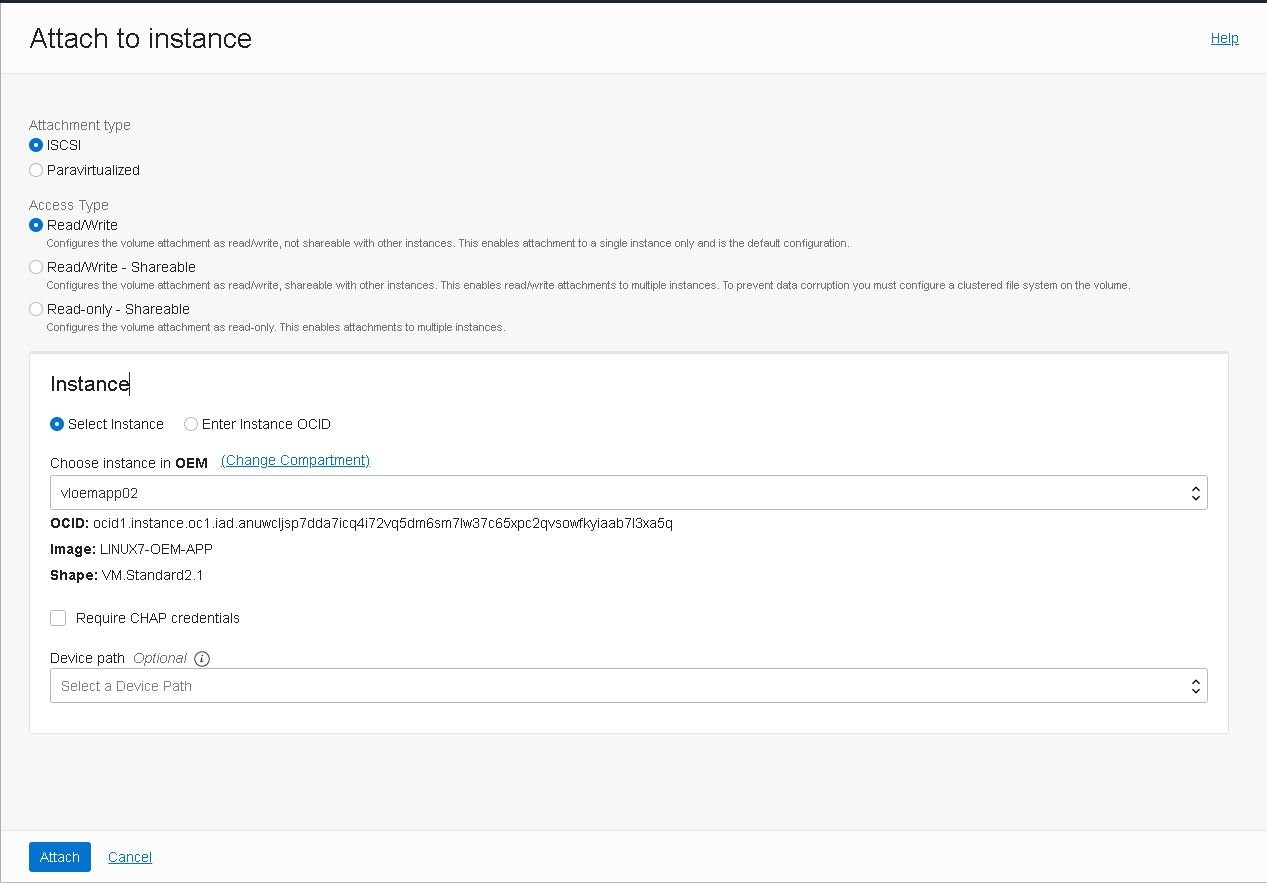
When the attachment is complete, you’ll need to run the block volume’s iSCSI commands using OS tools to login and enable the block volume. If you choose to add this volume to /etc/fstab, you must include the _netdev and nofail options. Failure to do so will cause the instance to fail to boot in the future:
- Go to the “vloemapp01” instance details page, then click on “Attached Block Volumes,” then click the Actions icon (three dots) for the newly attached volume, and finally select “iSCSI Commands and Information.”

- The “iSCSI Commands and Information” dialog box displays specific identifying information about your volume and the iSCSI commands you’ll need. You can copy and paste the commands into your instance session window for each of the following steps:
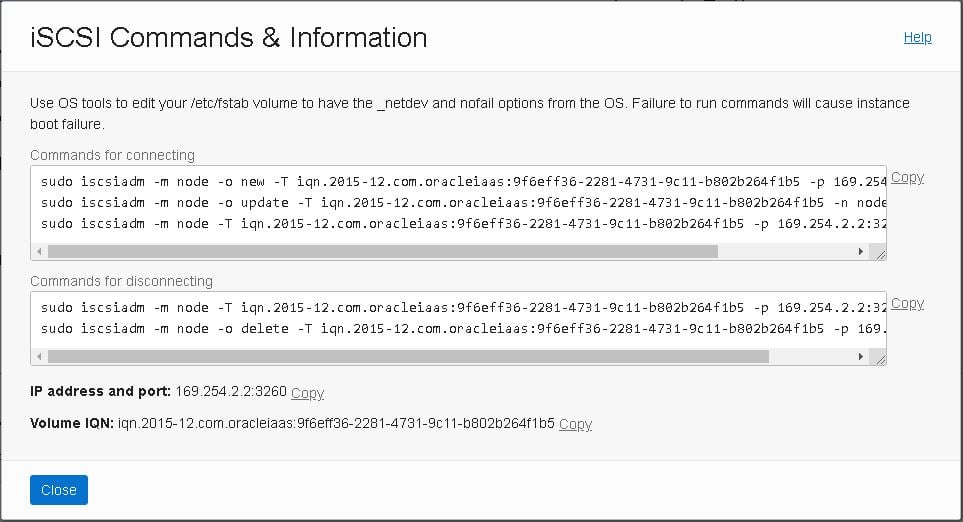
Register the new block volume and create a new file system with it
- Register the volume with the iscsiadm tool:

- Configure iSCSI to automatically connect to the authenticated block storage volumes after a reboot:

- Log in to iSCSI:

- Create a new partition using “fdisk” utility:
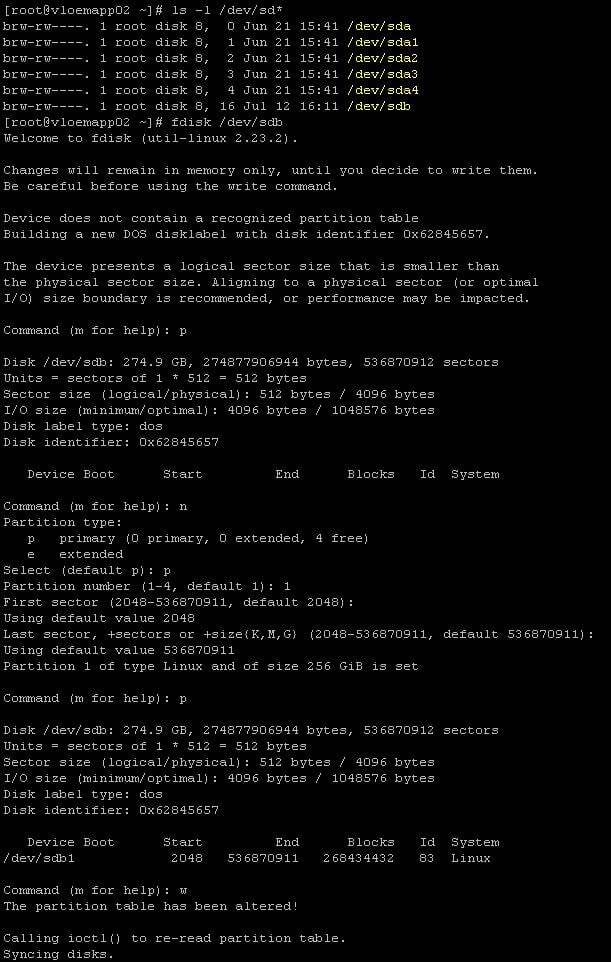
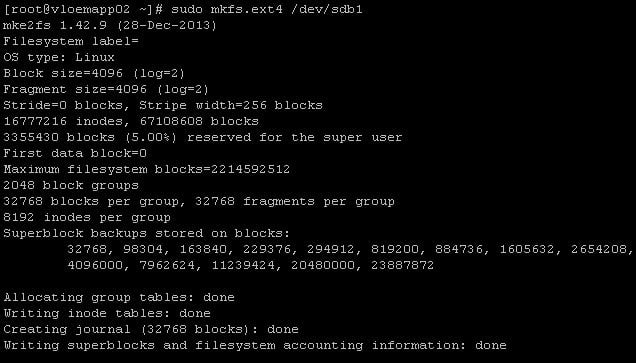
- Create and mount the new file system:
![]()
- Get the devices UUID using “blkid”:

- Add the device to /etc/fstab using the “UUID” from the “blkid” command, and the options described here.
Example:UUID=dc2a813c-bc22-4aad-8b87-ecf51f8e834e /u01 ext4 defaults,_netdev,nofail 0 2
By default, Linux processes the /etc/fstab file before the initiator starts. To configure the mount process to initiate before the volumes are mounted, specify the “_netdev” option on each line of the /etc/fstab file.
To prevent issues due to device names, specify the volume UUID in the /etc/fstab file instead of the device name. This process guarantees that the same volume is always mounted to the same mount point.
Create a 32GB swap file as required by OEM 13.5
- Create a 32GB swapfile on the new file system as OEM requires it:
[root@vloemapp01 ~]# dd if=/dev/zero of=/u01/swapfile bs=1024 count=33554432
- Set up the swap file:
[root@vloemapp01 ~]# mkswap /u01/swapfile
Setting up swapspace version 1, size = 33554428 KiB
no label, UUID=a84ed3ce-8cea-442a-b96a-f0f73c5017b
- Enable the swap file immediately but not automatically at boot time:
[root@vloemapp01 ~]# swapon /u01/swapfile
- Edit /etc/fstab to include the following entry:
UUID=310c3383-fa5b-4e0f-b1db-bea13a416db0 /u01/swapfile swap swap defaults 0 0
- Verify the swap file by viewing the output of the following commands:
[root@vloemapp01 ~]# cat /proc/swaps
or
[root@vloemapp01 ~]# free
Stay tuned for the next posts in this series, which will cover the deployment of the second compute instance, the load balancer setup, and OEM’s setup.
Share this
- Technical Track (967)
- Oracle (400)
- MySQL (137)
- Cloud (128)
- Open Source (90)
- Google Cloud (81)
- DBA Lounge (76)
- Microsoft SQL Server (76)
- Technical Blog (74)
- Big Data (52)
- AWS (49)
- Google Cloud Platform (46)
- Cassandra (44)
- DevOps (41)
- Azure (38)
- Pythian (33)
- Linux (30)
- Database (26)
- Podcasts (25)
- Site Reliability Engineering (25)
- Performance (24)
- SQL Server (24)
- Microsoft Azure (23)
- Oracle E-Business Suite (23)
- PostgreSQL (23)
- Oracle Database (22)
- Docker (21)
- Group Blog Posts (20)
- Security (20)
- DBA (19)
- Log Buffer (19)
- SQL (19)
- Exadata (18)
- Mongodb (18)
- Oracle Cloud Infrastructure (OCI) (18)
- Oracle Exadata (18)
- Automation (17)
- Hadoop (16)
- Oracleebs (16)
- Amazon RDS (15)
- Ansible (15)
- Ebs (15)
- Snowflake (15)
- ASM (13)
- BigQuery (13)
- Patching (13)
- RDS (13)
- Replication (13)
- Advanced Analytics (12)
- Data (12)
- GenAI (12)
- Kubernetes (12)
- Oracle 12C (12)
- Backup (11)
- LLM (11)
- Machine Learning (11)
- OCI (11)
- Rman (11)
- Cloud Migration (10)
- Datascape Podcast (10)
- Monitoring (10)
- R12 (10)
- 12C (9)
- AI (9)
- Apache Cassandra (9)
- Data Guard (9)
- Infrastructure (9)
- Oracle 19C (9)
- Oracle Applications (9)
- Python (9)
- Series (9)
- AWR (8)
- Amazon Web Services (AWS) (8)
- Articles (8)
- High Availability (8)
- Oracle EBS (8)
- Percona (8)
- Powershell (8)
- Recovery (8)
- Weblogic (8)
- Apache Beam (7)
- Backups (7)
- Data Governance (7)
- Goldengate (7)
- Innodb (7)
- Migration (7)
- Myrocks (7)
- OEM (7)
- Oracle Enterprise Manager (OEM) (7)
- Performance Tuning (7)
- Authentication (6)
- ChatGPT-4 (6)
- Data Enablement (6)
- Data Visualization (6)
- Database Performance (6)
- E-Business Suite (6)
- Fmw (6)
- Grafana (6)
- Oracle Enterprise Manager (6)
- Orchestrator (6)
- Postgres (6)
- Rac (6)
- Renew Refresh Republish (6)
- RocksDB (6)
- Serverless (6)
- Upgrade (6)
- 19C (5)
- Azure Data Factory (5)
- Azure Synapse Analytics (5)
- Cpu (5)
- Disaster Recovery (5)
- Error (5)
- Generative AI (5)
- Google BigQuery (5)
- Indexes (5)
- Love Letters To Data (5)
- Mariadb (5)
- Microsoft (5)
- Proxysql (5)
- Scala (5)
- Sql Server Administration (5)
- VMware (5)
- Windows (5)
- Xtrabackup (5)
- Airflow (4)
- Analytics (4)
- Apex (4)
- Best Practices (4)
- Centrally Managed Users (4)
- Cli (4)
- Cloud Spanner (4)
- Cockroachdb (4)
- Configuration Management (4)
- Container (4)
- Data Management (4)
- Data Pipeline (4)
- Data Security (4)
- Data Strategy (4)
- Database Administrator (4)
- Database Management (4)
- Database Migration (4)
- Dataflow (4)
- Dbsat (4)
- Elasticsearch (4)
- Fahd Mirza (4)
- Fusion Middleware (4)
- Google (4)
- Io (4)
- Java (4)
- Kafka (4)
- Middleware (4)
- Mysql 8 (4)
- Network (4)
- Ocidtab (4)
- Opatch (4)
- Oracle Autonomous Database (Adb) (4)
- Oracle Cloud (4)
- Pitr (4)
- Post-Mortem Analysis (4)
- Prometheus (4)
- Redhat (4)
- September 9Th 2015 (4)
- Sql2016 (4)
- Ssl (4)
- Terraform (4)
- Workflow (4)
- 2Fa (3)
- Alwayson (3)
- Amazon Relational Database Service (Rds) (3)
- Apache Kafka (3)
- Apexexport (3)
- Aurora (3)
- Azure Sql Db (3)
- Business Intelligence (3)
- Cdb (3)
- ChatGPT (3)
- Cloud Armor (3)
- Cloud Database (3)
- Cloud FinOps (3)
- Cloud Security (3)
- Cluster (3)
- Consul (3)
- Cosmos Db (3)
- Covid19 (3)
- Crontab (3)
- Data Analytics (3)
- Data Integration (3)
- Database 12C (3)
- Database Monitoring (3)
- Database Troubleshooting (3)
- Database Upgrade (3)
- Databases (3)
- Dataops (3)
- Dbt (3)
- Digital Transformation (3)
- ERP (3)
- Google Chrome (3)
- Google Cloud Sql (3)
- Graphite (3)
- Haproxy (3)
- Heterogeneous Database Migration (3)
- Hugepages (3)
- Inside Pythian (3)
- Installation (3)
- Json (3)
- Keras (3)
- Ldap (3)
- Liquibase (3)
- Love Letter (3)
- Lua (3)
- Mfa (3)
- Multitenant (3)
- Mysql 5.7 (3)
- Mysql Configuration (3)
- Nginx (3)
- Nodetool (3)
- Non-Tech Articles (3)
- Oem 13C (3)
- Oms (3)
- Oracle 18C (3)
- Oracle Data Guard (3)
- Oracle Live Sql (3)
- Oracle Rac (3)
- Patch (3)
- Perl (3)
- Pmm (3)
- Pt-Online-Schema-Change (3)
- Rdbms (3)
- Recommended (3)
- Remote Teams (3)
- Reporting (3)
- Reverse Proxy (3)
- S3 (3)
- Spark (3)
- Sql On The Edge (3)
- Sql Server Configuration (3)
- Sql Server On Linux (3)
- Ssis (3)
- Ssis Catalog (3)
- Stefan Knecht (3)
- Striim (3)
- Sysadmin (3)
- System Versioned (3)
- Systemd (3)
- Temporal Tables (3)
- Tensorflow (3)
- Tools (3)
- Tuning (3)
- Vasu Balla (3)
- Vault (3)
- Vulnerability (3)
- Waf (3)
- 18C (2)
- Adf (2)
- Adop (2)
- Agent (2)
- Agile (2)
- Amazon Data Migration Service (2)
- Amazon Ec2 (2)
- Amazon S3 (2)
- Apache Flink (2)
- Apple (2)
- Apps (2)
- Ashdump (2)
- Atp (2)
- Audit (2)
- Automatic Backups (2)
- Autonomous (2)
- Autoupgrade (2)
- Awr Data Mining (2)
- Azure Sql (2)
- Azure Sql Data Sync (2)
- Bash (2)
- Business (2)
- Caching (2)
- Cassandra Nodetool (2)
- Cdap (2)
- Certification (2)
- Cloning (2)
- Cloud Cost Optimization (2)
- Cloud Data Fusion (2)
- Cloud Hosting (2)
- Cloud Infrastructure (2)
- Cloud Shell (2)
- Cloud Sql (2)
- Cloudscape (2)
- Cluster Level Consistency (2)
- Conferences (2)
- Consul-Template (2)
- Containerization (2)
- Containers (2)
- Cosmosdb (2)
- Cost Management (2)
- Costs (2)
- Cql (2)
- Cqlsh (2)
- Cyber Security (2)
- Data Analysis (2)
- Data Discovery (2)
- Data Engineering (2)
- Data Migration (2)
- Data Modeling (2)
- Data Quality (2)
- Data Streaming (2)
- Data Warehouse (2)
- Database Consulting (2)
- Database Migrations (2)
- Dataguard (2)
- Datapump (2)
- Ddl (2)
- Debezium (2)
- Dictionary Views (2)
- Dms (2)
- Docker-Composer (2)
- Dr (2)
- Duplicate (2)
- Ecc (2)
- Elastic (2)
- Elastic Stack (2)
- Em12C (2)
- Encryption (2)
- Enterprise Data Platform (EDP) (2)
- Enterprise Manager (2)
- Etl (2)
- Events (2)
- Exachk (2)
- Filter Driver (2)
- Flume (2)
- Full Text Search (2)
- Galera (2)
- Gemini (2)
- General Purpose Ssd (2)
- Gh-Ost (2)
- Gke (2)
- Google Workspace (2)
- Hanganalyze (2)
- Hdfs (2)
- Health Check (2)
- Historical Trends (2)
- Incremental (2)
- Infiniband (2)
- Infrastructure As Code (2)
- Innodb Cluster (2)
- Innodb File Structure (2)
- Innodb Group Replication (2)
- Install (2)
- Internals (2)
- Java Web Start (2)
- Kibana (2)
- Log (2)
- Log4J (2)
- Logs (2)
- Memory (2)
- Merge Replication (2)
- Metrics (2)
- Mutex (2)
- MySQLShell (2)
- NLP (2)
- Neo4J (2)
- Node.Js (2)
- Nosql (2)
- November 11Th 2015 (2)
- Ntp (2)
- Oci Iam (2)
- Oem12C (2)
- Omspatcher (2)
- Opatchauto (2)
- Open Source Database (2)
- Operational Excellence (2)
- Oracle 11G (2)
- Oracle Datase (2)
- Oracle Extended Manager (Oem) (2)
- Oracle Flashback (2)
- Oracle Forms (2)
- Oracle Installation (2)
- Oracle Io Testing (2)
- Pdb (2)
- Podcast (2)
- Power Bi (2)
- Puppet (2)
- Pythian Europe (2)
- R12.2 (2)
- Redshift (2)
- Remote DBA (2)
- Remote Sre (2)
- SAP HANA Cloud (2)
- Sap Migration (2)
- Scale (2)
- Schema (2)
- September 30Th 2015 (2)
- September 3Rd 2015 (2)
- Shell (2)
- Simon Pane (2)
- Single Sign-On (2)
- Sql Server On Gke (2)
- Sqlplus (2)
- Sre (2)
- Ssis Catalog Error (2)
- Ssisdb (2)
- Standby (2)
- Statspack Mining (2)
- Systemstate Dump (2)
- Tablespace (2)
- Technical Training (2)
- Tempdb (2)
- Tfa (2)
- Throughput (2)
- Tls (2)
- Tombstones (2)
- Transactional Replication (2)
- User Groups (2)
- Vagrant (2)
- Variables (2)
- Virtual Machine (2)
- Virtual Machines (2)
- Virtualbox (2)
- Web Application Firewall (2)
- Webinars (2)
- X5 (2)
- scalability (2)
- //Build2019 (1)
- 11G (1)
- 12.1 (1)
- 12Cr1 (1)
- 12Cr2 (1)
- 18C Grid Installation (1)
- 2022 (1)
- 2022 Snowflake Summit (1)
- AI Platform (1)
- AI Summit (1)
- Actifio (1)
- Active Directory (1)
- Adaptive Hash Index (1)
- Adf Custom Email (1)
- Adobe Flash (1)
- Adrci (1)
- Advanced Data Services (1)
- Afd (1)
- After Logon Trigger (1)
- Ahf (1)
- Aix (1)
- Akka (1)
- Alloydb (1)
- Alter Table (1)
- Always On (1)
- Always On Listener (1)
- Alwayson With Gke (1)
- Amazon (1)
- Amazon Athena (1)
- Amazon Aurora Backtrack (1)
- Amazon Efs (1)
- Amazon Redshift (1)
- Amazon Sagemaker (1)
- Amazon Vpc Flow Logs (1)
- Amdu (1)
- Analysis (1)
- Analytical Models (1)
- Analyzing Bigquery Via Sheets (1)
- Anisble (1)
- Annual Mysql Community Dinner (1)
- Anthos (1)
- Apache (1)
- Apache Nifi (1)
- Apache Spark (1)
- Application Migration (1)
- Architect (1)
- Architecture (1)
- Ash (1)
- Asmlib (1)
- Atlas CLI (1)
- Audit In Postgres (1)
- Audit In Postgresql (1)
- Auto Failover (1)
- Auto Increment (1)
- Auto Index (1)
- Autoconfig (1)
- Automated Reports (1)
- Automl (1)
- Autostart (1)
- Awr Mining (1)
- Aws Glue (1)
- Aws Lake Formation (1)
- Aws Lambda (1)
- Azure Analysis Services (1)
- Azure Blob Storage (1)
- Azure Cognitive Search (1)
- Azure Data (1)
- Azure Data Lake (1)
- Azure Data Lake Analytics (1)
- Azure Data Lake Store (1)
- Azure Data Migration Service (1)
- Azure Dma (1)
- Azure Dms (1)
- Azure Document Intelligence (1)
- Azure Integration Runtime (1)
- Azure OpenAI (1)
- Azure Sql Data Warehouse (1)
- Azure Sql Dw (1)
- Azure Sql Managed Instance (1)
- Azure Vm (1)
- Backup For Sql Server (1)
- Bacpac (1)
- Bag (1)
- Bare Metal Solution (1)
- Batch Operation (1)
- Batches In Cassandra (1)
- Beats (1)
- Best Practice (1)
- Bi Publisher (1)
- Binary Logging (1)
- Bind Variables (1)
- Bitnami (1)
- Blob Storage Endpoint (1)
- Blockchain (1)
- Browsers (1)
- Btp Architecture (1)
- Btp Components (1)
- Buffer Pool (1)
- Bug (1)
- Bugs (1)
- Build 2019 Updates (1)
- Build Cassandra (1)
- Bundle Patch (1)
- Bushy Join (1)
- Business Continuity (1)
- Business Insights (1)
- Business Process Modelling (1)
- Business Reputation (1)
- CAPEX (1)
- Capacity Planning (1)
- Career (1)
- Career Development (1)
- Cassandra-Cli (1)
- Catcon.Pm (1)
- Catctl.Pl (1)
- Catupgrd.Sql (1)
- Cbo (1)
- Cdb Duplication (1)
- Certificate (1)
- Certificate Management (1)
- Chaos Engineering (1)
- Cheatsheet (1)
- Checkactivefilesandexecutables (1)
- Chmod (1)
- Chown (1)
- Chrome Enterprise (1)
- Chrome Security (1)
- Cl-Series (1)
- Cleanup (1)
- Cloud Browser (1)
- Cloud Build (1)
- Cloud Consulting (1)
- Cloud Data Warehouse (1)
- Cloud Database Management (1)
- Cloud Dataproc (1)
- Cloud Foundry (1)
- Cloud Manager (1)
- Cloud Migations (1)
- Cloud Networking (1)
- Cloud SQL Replica (1)
- Cloud Scheduler (1)
- Cloud Services (1)
- Cloud Strategies (1)
- Cloudformation (1)
- Cluster Resource (1)
- Cmo (1)
- Cockroach Db (1)
- Coding Benchmarks (1)
- Colab (1)
- Collectd (1)
- Columnar (1)
- Communication Plans (1)
- Community (1)
- Compact Storage (1)
- Compaction (1)
- Compliance (1)
- Compression (1)
- Compute Instances (1)
- Compute Node (1)
- Concurrent Manager (1)
- Concurrent Processing (1)
- Configuration (1)
- Consistency Level (1)
- Consolidation (1)
- Conversational AI (1)
- Covid-19 (1)
- Cpu Patching (1)
- Cqlsstablewriter (1)
- Crash (1)
- Create Catalog Error (1)
- Create_File_Dest (1)
- Credentials (1)
- Cross Platform (1)
- CrowdStrike (1)
- Crsctl (1)
- Custom Instance Images (1)
- Cve-2022-21500 (1)
- Cvu (1)
- Cypher Queries (1)
- DAX (1)
- DBSAT 3 (1)
- Dacpac (1)
- Dag (1)
- Data Analytics Platform (1)
- Data Box (1)
- Data Classification (1)
- Data Cleansing (1)
- Data Encryption (1)
- Data Estate (1)
- Data Flow Management (1)
- Data Insights (1)
- Data Integrity (1)
- Data Lake (1)
- Data Leader (1)
- Data Lifecycle Management (1)
- Data Lineage (1)
- Data Masking (1)
- Data Mesh (1)
- Data Migration Assistant (1)
- Data Migration Service (1)
- Data Mining (1)
- Data Monetization (1)
- Data Policy (1)
- Data Profiling (1)
- Data Protection (1)
- Data Retention (1)
- Data Safe (1)
- Data Sheets (1)
- Data Summit (1)
- Data Vault (1)
- Data Warehouse Modernization (1)
- Database Auditing (1)
- Database Consultant (1)
- Database Link (1)
- Database Modernization (1)
- Database Provisioning (1)
- Database Provisioning Failed (1)
- Database Replication (1)
- Database Scaling (1)
- Database Schemas (1)
- Database Security (1)
- Databricks (1)
- Datadog (1)
- Datafile (1)
- Datapatch (1)
- Dataprivacy (1)
- Datascape 59 (1)
- Datasets (1)
- Datastax Cassandra (1)
- Datastax Opscenter (1)
- Datasync Error (1)
- Db_Create_File_Dest (1)
- Dbaas (1)
- Dbatools (1)
- Dbcc Checkident (1)
- Dbms_Cloud (1)
- Dbms_File_Transfer (1)
- Dbms_Metadata (1)
- Dbms_Service (1)
- Dbms_Stats (1)
- Dbupgrade (1)
- Deep Learning (1)
- Delivery (1)
- Devd (1)
- Dgbroker (1)
- Dialogflow (1)
- Dict0Dict (1)
- Did You Know (1)
- Direct Path Read Temp (1)
- Disk Groups (1)
- Disk Management (1)
- Diskgroup (1)
- Dispatchers (1)
- Distributed Ag (1)
- Distribution Agent (1)
- Documentation (1)
- Download (1)
- Dp Agent (1)
- Duet AI (1)
- Duplication (1)
- Dynamic Sampling (1)
- Dynamic Tasks (1)
- E-Business Suite Cpu Patching (1)
- E-Business Suite Patching (1)
- Ebs Sso (1)
- Ec2 (1)
- Edb Postgresql Advanced Server (1)
- Edb Postgresql Password Verify Function (1)
- Editions (1)
- Edp (1)
- El Carro (1)
- Elassandra (1)
- Elk Stack (1)
- Em13Cr2 (1)
- Emcli (1)
- End of Life (1)
- Engineering (1)
- Enqueue (1)
- Enterprise (1)
- Enterprise Architecture (1)
- Enterprise Command Centers (1)
- Enterprise Manager Command Line Interface (Em Cli (1)
- Enterprise Plus (1)
- Episode 58 (1)
- Error Handling (1)
- Exacc (1)
- Exacheck (1)
- Exacs (1)
- Exadata Asr (1)
- Execution (1)
- Executive Sponsor (1)
- Expenditure (1)
- Export Sccm Collection To Csv (1)
- External Persistent Volumes (1)
- Fail (1)
- Failed Upgrade (1)
- Failover In Postgresql (1)
- Fall 2021 (1)
- Fast Recovery Area (1)
- Flash Recovery Area (1)
- Flashback (1)
- Fnd (1)
- Fndsm (1)
- Force_Matching_Signature (1)
- Fra Full (1)
- Framework (1)
- Freebsd (1)
- Fsync (1)
- Function-Based Index (1)
- GCVE Architecture (1)
- GPQA (1)
- Gaming (1)
- Garbagecollect (1)
- Gcp Compute (1)
- Gcp-Spanner (1)
- Geography (1)
- Geth (1)
- Getmospatch (1)
- Git (1)
- Global Analytics (1)
- Google Analytics (1)
- Google Cloud Architecture Framework (1)
- Google Cloud Data Services (1)
- Google Cloud Partner (1)
- Google Cloud Spanner (1)
- Google Cloud VMware Engine (1)
- Google Compute Engine (1)
- Google Dataflow (1)
- Google Datalab (1)
- Google Grab And Go (1)
- Google Sheets (1)
- Gp2 (1)
- Graph Algorithms (1)
- Graph Databases (1)
- Graph Inferences (1)
- Graph Theory (1)
- GraphQL (1)
- Graphical User Interface (Gui) (1)
- Grid (1)
- Grid Infrastructure (1)
- Griddisk Resize (1)
- Grp (1)
- Guaranteed Restore Point (1)
- Guid Mismatch (1)
- HR Technology (1)
- HRM (1)
- Ha (1)
- Hang (1)
- Hashicorp (1)
- Hbase (1)
- Hcc (1)
- Hdinsight (1)
- Healthcheck (1)
- Hemantgiri S. Goswami (1)
- Hortonworks (1)
- How To Install Ssrs (1)
- Hr (1)
- Httpchk (1)
- Https (1)
- Huge Pages (1)
- HumanEval (1)
- Hung Database (1)
- Hybrid Columnar Compression (1)
- Hyper-V (1)
- Hyperscale (1)
- Hypothesis Driven Development (1)
- Ibm (1)
- Identity Management (1)
- Idm (1)
- Ilom (1)
- Imageinfo (1)
- Impdp (1)
- In Place Upgrade (1)
- Incident Response (1)
- Indempotent (1)
- Indexing In Mongodb (1)
- Influxdb (1)
- Information (1)
- Infrastructure As A Code (1)
- Injection (1)
- Innobackupex (1)
- Innodb Concurrency (1)
- Innodb Flush Method (1)
- Insights (1)
- Installing (1)
- Instance Cloning (1)
- Integration Services (1)
- Integrations (1)
- Interactive_Timeout (1)
- Interval Partitioning (1)
- Invisible Indexes (1)
- Io1 (1)
- IoT (1)
- Iops (1)
- Iphone (1)
- Ipv6 (1)
- Iscsi (1)
- Iscsi-Initiator-Utils (1)
- Iscsiadm (1)
- Issues (1)
- It Industry (1)
- It Teams (1)
- JMX Metrics (1)
- Jared Still (1)
- Javascript (1)
- Jdbc (1)
- Jinja2 (1)
- Jmx (1)
- Jmx Monitoring (1)
- Jvm (1)
- Jython (1)
- K8S (1)
- Kernel (1)
- Key Btp Components (1)
- Kfed (1)
- Kill Sessions (1)
- Knapsack (1)
- Kubeflow (1)
- LMSYS Chatbot Arena (1)
- Large Pages (1)
- Latency (1)
- Latest News (1)
- Leadership (1)
- Leap Second (1)
- Limits (1)
- Line 1 (1)
- Linkcolumn (1)
- Linux Host Monitoring (1)
- Linux Storage Appliance (1)
- Listener (1)
- Loadavg (1)
- Lock_Sga (1)
- Locks (1)
- Log File Switch (Archiving Needed) (1)
- Logfile (1)
- Looker (1)
- Lvm (1)
- MMLU (1)
- Managed Instance (1)
- Managed Services (1)
- Management (1)
- Management Servers (1)
- Marketing (1)
- Marketing Analytics (1)
- Martech (1)
- Masking (1)
- Megha Bedi (1)
- Metadata (1)
- Method-R Workbench (1)
- Metric (1)
- Metric Extensions (1)
- Michelle Gutzait (1)
- Microservices (1)
- Microsoft Azure Sql Database (1)
- Microsoft Build (1)
- Microsoft Build 2019 (1)
- Microsoft Ignite (1)
- Microsoft Inspire 2019 (1)
- Migrate (1)
- Migrating Ssis Catalog (1)
- Migrating To Azure Sql (1)
- Migration Checklist (1)
- Mirroring (1)
- Mismatch (1)
- Model Governance (1)
- Monetization (1)
- MongoDB Atlas (1)
- MongoDB Compass (1)
- Ms Excel (1)
- Msdtc (1)
- Msdtc In Always On (1)
- Msdtc In Cluster (1)
- Multi-IP (1)
- Multicast (1)
- Multipath (1)
- My.Cnf (1)
- MySQL Shell Logical Backup (1)
- MySQLDump (1)
- Mysql Enterprise (1)
- Mysql Plugin For Oracle Enterprise Manager (1)
- Mysql Replication Filters (1)
- Mysql Server (1)
- Mysql-Python (1)
- Nagios (1)
- Ndb (1)
- Net_Read_Timeout (1)
- Net_Write_Timeout (1)
- Netcat (1)
- Newsroom (1)
- Nfs (1)
- Nifi (1)
- Node (1)
- November 10Th 2015 (1)
- November 6Th 2015 (1)
- Null Columns (1)
- Nullipotent (1)
- OPEX (1)
- ORAPKI (1)
- O_Direct (1)
- Oacore (1)
- October 21St 2015 (1)
- October 6Th 2015 (1)
- October 8Th 2015 (1)
- Oda (1)
- Odbcs (1)
- Odbs (1)
- Odi (1)
- Oel (1)
- Ohs (1)
- Olvm (1)
- On-Prem To Azure Sql (1)
- On-Premises (1)
- Onclick (1)
- Open.Canada.Ca (1)
- Openstack (1)
- Operating System Monitoring (1)
- Oplog (1)
- Opsworks (1)
- Optimization (1)
- Optimizer (1)
- Ora-01852 (1)
- Ora-7445 (1)
- Oracle 19 (1)
- Oracle 20C (1)
- Oracle Cursor (1)
- Oracle Database 12.2 (1)
- Oracle Database Appliance (1)
- Oracle Database Se2 (1)
- Oracle Database Standard Edition 2 (1)
- Oracle Database Upgrade (1)
- Oracle Database@Google Cloud (1)
- Oracle Exadata Smart Scan (1)
- Oracle Licensing (1)
- Oracle Linux Virtualization Manager (1)
- Oracle Oda (1)
- Oracle Openworld (1)
- Oracle Parallelism (1)
- Oracle Rdbms (1)
- Oracle Real Application Clusters (1)
- Oracle Reports (1)
- Oracle Security (1)
- Oracle Wallet (1)
- Orasrp (1)
- Organizational Change (1)
- Orion (1)
- Os (1)
- Osbws_Install.Jar (1)
- Oui Gui (1)
- Output (1)
- Owox (1)
- Paas (1)
- Package Deployment Wizard Error (1)
- Parallel Execution (1)
- Parallel Query (1)
- Parallel Query Downgrade (1)
- Partitioning (1)
- Partitions (1)
- Password (1)
- Password Change (1)
- Password Recovery (1)
- Password Verify Function In Postgresql (1)
- Patches (1)
- Patchmgr (1)
- Pdb Duplication (1)
- Penalty (1)
- Perfomrance (1)
- Performance Schema (1)
- Pg 15 (1)
- Pg_Rewind (1)
- Pga (1)
- Pipeline Debugging (1)
- Pivot (1)
- Planning (1)
- Plsql (1)
- Policy (1)
- Polybase (1)
- Post-Acquisition (1)
- Post-Covid It (1)
- Postgresql Complex Password (1)
- Postgresql With Repmgr Integration (1)
- Pq (1)
- Preliminar Connection (1)
- Preliminary Connection (1)
- Privatecloud (1)
- Process Mining (1)
- Production (1)
- Productivity (1)
- Profile In Edb Postgresql (1)
- Programming (1)
- Prompt Engineering (1)
- Provisioned Iops (1)
- Provisiones Iops (1)
- Proxy Monitoring (1)
- Psu (1)
- Public Cloud (1)
- Pubsub (1)
- Purge (1)
- Purge Thread (1)
- Pythian Blackbird Acquisition (1)
- Pythian Goodies (1)
- Pythian News (1)
- Python Pandas (1)
- Query Performance (1)
- Quicksight (1)
- Quota Limits (1)
- R12 R12.2 Cp Concurrent Processing Abort (1)
- R12.1.3 (1)
- REF! (1)
- Ram Cache (1)
- Rbac (1)
- Rdb (1)
- Rds_File_Util (1)
- Read Free Replication (1)
- Read Latency (1)
- Read Only (1)
- Read Replica (1)
- Reboot (1)
- Recruiting (1)
- Redo Size (1)
- Relational Database Management System (1)
- Release (1)
- Release Automation (1)
- Repair (1)
- Replication Compatibility (1)
- Replication Error (1)
- Repmgr (1)
- Repmgrd (1)
- Reporting Services 2019 (1)
- Resiliency Planning (1)
- Resource Manager (1)
- Resources (1)
- Restore (1)
- Restore Point (1)
- Retail (1)
- Rhel (1)
- Risk (1)
- Risk Management (1)
- Rocksrb (1)
- Role In Postgresql (1)
- Rollback (1)
- Rolling Patch (1)
- Row0Purge (1)
- Rpm (1)
- Rule "Existing Clustered Or Clustered-Prepared In (1)
- Running Discovery On Remote Machine (1)
- SAP (1)
- SQL Optimization (1)
- SQL Tracing (1)
- SSRS Administration (1)
- SaaS (1)
- Sap Assessment (1)
- Sap Assessment Report (1)
- Sap Backup Restore (1)
- Sap Btp Architecture (1)
- Sap Btp Benefits (1)
- Sap Btp Model (1)
- Sap Btp Services (1)
- Sap Homogenous System Copy Method (1)
- Sap Landscape Copy (1)
- Sap Migration Assessment (1)
- Sap On Mssql (1)
- Sap System Copy (1)
- Sar (1)
- Scaling Ir (1)
- Sccm (1)
- Sccm Powershell (1)
- Scheduler (1)
- Scheduler_Job (1)
- Schedulers (1)
- Scheduling (1)
- Scott Mccormick (1)
- Scripts (1)
- Sdp (1)
- Secrets (1)
- Securing Sql Server (1)
- Security Compliance (1)
- Sed (Stream Editor) (1)
- Self Hosted Ir (1)
- Semaphore (1)
- Seps (1)
- September 11Th 2015 (1)
- Serverless Computing (1)
- Serverless Framework (1)
- Service Broker (1)
- Service Bus (1)
- Shared Connections (1)
- Shared Storage (1)
- Shellshock (1)
- Signals (1)
- Silent (1)
- Slave (1)
- Slob (1)
- Smart Scan (1)
- Smtp (1)
- Snapshot (1)
- Snowday Fall 2021 (1)
- Socat (1)
- Software Development (1)
- Software Engineering (1)
- Solutions Architecture (1)
- Spanner-Backups (1)
- Sphinx (1)
- Split Brain In Postgresql (1)
- Spm (1)
- Sql Agent (1)
- Sql Backup To Url Error (1)
- Sql Cluster Installer Hang (1)
- Sql Database (1)
- Sql Developer (1)
- Sql On Linux (1)
- Sql Server 2014 (1)
- Sql Server 2016 (1)
- Sql Server Agent On Linux (1)
- Sql Server Backups (1)
- Sql Server Denali Is Required To Install Integrat (1)
- Sql Server Health Check (1)
- Sql Server Troubleshooting On Linux (1)
- Sql Server Version (1)
- Sql Setup (1)
- Sql Vm (1)
- Sql2K19Ongke (1)
- Sqldatabase Serverless (1)
- Ssh User Equivalence (1)
- Ssis Denali Error (1)
- Ssis Install Error E Xisting Clustered Or Cluster (1)
- Ssis Package Deployment Error (1)
- Ssisdb Master Key (1)
- Ssisdb Restore Error (1)
- Sso (1)
- Ssrs 2019 (1)
- Sstable2Json (1)
- Sstableloader (1)
- Sstablesimpleunsortedwriter (1)
- Stack Dump (1)
- Standard Edition (1)
- Startup Process (1)
- Statistics (1)
- Statspack (1)
- Statspack Data Mining (1)
- Statspack Erroneously Reporting (1)
- Statspack Issues (1)
- Storage (1)
- Stored Procedure (1)
- Strategies (1)
- Streaming (1)
- Sunos (1)
- Swap (1)
- Swapping (1)
- Switch (1)
- Syft (1)
- Synapse (1)
- Sync Failed There Is Not Enough Space On The Disk (1)
- Sys Schema (1)
- System Function (1)
- Systems Administration (1)
- T-Sql (1)
- Table Optimization (1)
- Tablespace Growth (1)
- Tablespaces (1)
- Tags (1)
- Tar (1)
- Tde (1)
- Team Management (1)
- Tech Debt (1)
- Technology (1)
- Telegraf (1)
- Tempdb Encryption (1)
- Templates (1)
- Temporary Tablespace (1)
- Tenserflow (1)
- Teradata (1)
- Testing New Cassandra Builds (1)
- There Is Not Enough Space On The Disk (1)
- Thick Data (1)
- Third-Party Data (1)
- Thrift (1)
- Thrift Data (1)
- Tidb (1)
- Time Series (1)
- Time-Drift (1)
- Tkprof (1)
- Tmux (1)
- Tns (1)
- Trace (1)
- Tracefile (1)
- Training (1)
- Transaction Log (1)
- Transactions (1)
- Transformation Navigator (1)
- Transparent Data Encryption (1)
- Trigger (1)
- Triggers On Memory-Optimized Tables Must Use With (1)
- Troubleshooting (1)
- Tungsten (1)
- Tvdxtat (1)
- Twitter (1)
- U-Sql (1)
- UNDO Tablespace (1)
- Upgrade Issues (1)
- Uptime (1)
- Uptrade (1)
- Url Backup Error (1)
- Usability (1)
- Use Cases (1)
- User (1)
- User Defined Compactions (1)
- Utilization (1)
- Utl_Smtp (1)
- VDI Jump Host (1)
- Validate Structure (1)
- Validate_Credentials (1)
- Value (1)
- Velocity (1)
- Vertex AI (1)
- Vertica (1)
- Vertical Slicing (1)
- Videos (1)
- Virtual Private Cloud (1)
- Virtualization (1)
- Vision (1)
- Vpn (1)
- Wait_Timeout (1)
- Wallet (1)
- Webhook (1)
- Weblogic Connection Filters (1)
- Webscale Database (1)
- Windows 10 (1)
- Windows Powershell (1)
- WiredTiger (1)
- With Native_Compilation (1)
- Word (1)
- Workshop (1)
- Workspace Security (1)
- Xbstream (1)
- Xml Publisher (1)
- Zabbix (1)
- dbms_Monitor (1)
- postgresql 16 (1)
- sqltrace (1)
- tracing (1)
- vSphere (1)
- xml (1)
- December 2024 (1)
- October 2024 (2)
- September 2024 (7)
- August 2024 (4)
- July 2024 (2)
- June 2024 (6)
- May 2024 (3)
- April 2024 (2)
- February 2024 (1)
- January 2024 (11)
- December 2023 (10)
- November 2023 (11)
- October 2023 (10)
- September 2023 (8)
- August 2023 (6)
- July 2023 (2)
- June 2023 (13)
- May 2023 (4)
- April 2023 (6)
- March 2023 (10)
- February 2023 (6)
- January 2023 (5)
- December 2022 (10)
- November 2022 (10)
- October 2022 (10)
- September 2022 (13)
- August 2022 (16)
- July 2022 (12)
- June 2022 (13)
- May 2022 (11)
- April 2022 (4)
- March 2022 (5)
- February 2022 (4)
- January 2022 (14)
- December 2021 (16)
- November 2021 (11)
- October 2021 (6)
- September 2021 (11)
- August 2021 (6)
- July 2021 (9)
- June 2021 (4)
- May 2021 (8)
- April 2021 (16)
- March 2021 (16)
- February 2021 (6)
- January 2021 (12)
- December 2020 (12)
- November 2020 (17)
- October 2020 (11)
- September 2020 (10)
- August 2020 (11)
- July 2020 (13)
- June 2020 (6)
- May 2020 (9)
- April 2020 (18)
- March 2020 (21)
- February 2020 (13)
- January 2020 (15)
- December 2019 (10)
- November 2019 (11)
- October 2019 (12)
- September 2019 (16)
- August 2019 (15)
- July 2019 (10)
- June 2019 (16)
- May 2019 (20)
- April 2019 (21)
- March 2019 (14)
- February 2019 (18)
- January 2019 (18)
- December 2018 (5)
- November 2018 (16)
- October 2018 (12)
- September 2018 (20)
- August 2018 (27)
- July 2018 (31)
- June 2018 (34)
- May 2018 (28)
- April 2018 (27)
- March 2018 (17)
- February 2018 (8)
- January 2018 (20)
- December 2017 (14)
- November 2017 (4)
- October 2017 (1)
- September 2017 (3)
- August 2017 (5)
- July 2017 (4)
- June 2017 (2)
- May 2017 (7)
- April 2017 (7)
- March 2017 (8)
- February 2017 (8)
- January 2017 (5)
- December 2016 (3)
- November 2016 (4)
- October 2016 (8)
- September 2016 (9)
- August 2016 (10)
- July 2016 (9)
- June 2016 (8)
- May 2016 (13)
- April 2016 (16)
- March 2016 (13)
- February 2016 (11)
- January 2016 (6)
- December 2015 (11)
- November 2015 (11)
- October 2015 (5)
- September 2015 (16)
- August 2015 (4)
- July 2015 (1)
- June 2015 (3)
- May 2015 (6)
- April 2015 (5)
- March 2015 (5)
- February 2015 (4)
- January 2015 (3)
- December 2014 (7)
- October 2014 (4)
- September 2014 (6)
- August 2014 (6)
- July 2014 (16)
- June 2014 (7)
- May 2014 (6)
- April 2014 (5)
- March 2014 (4)
- February 2014 (10)
- January 2014 (6)
- December 2013 (8)
- November 2013 (12)
- October 2013 (9)
- September 2013 (6)
- August 2013 (7)
- July 2013 (9)
- June 2013 (7)
- May 2013 (7)
- April 2013 (4)
- March 2013 (7)
- February 2013 (4)
- January 2013 (4)
- December 2012 (6)
- November 2012 (8)
- October 2012 (9)
- September 2012 (3)
- August 2012 (5)
- July 2012 (5)
- June 2012 (7)
- May 2012 (11)
- April 2012 (1)
- March 2012 (8)
- February 2012 (1)
- January 2012 (6)
- December 2011 (8)
- November 2011 (5)
- October 2011 (9)
- September 2011 (6)
- August 2011 (4)
- July 2011 (1)
- June 2011 (1)
- May 2011 (5)
- April 2011 (2)
- February 2011 (2)
- January 2011 (2)
- December 2010 (1)
- November 2010 (7)
- October 2010 (3)
- September 2010 (8)
- August 2010 (2)
- July 2010 (4)
- June 2010 (7)
- May 2010 (2)
- April 2010 (1)
- March 2010 (3)
- February 2010 (3)
- January 2010 (2)
- November 2009 (6)
- October 2009 (6)
- August 2009 (3)
- July 2009 (3)
- June 2009 (3)
- May 2009 (2)
- April 2009 (8)
- March 2009 (6)
- February 2009 (4)
- January 2009 (3)
- November 2008 (3)
- October 2008 (7)
- September 2008 (6)
- August 2008 (9)
- July 2008 (9)
- June 2008 (9)
- May 2008 (9)
- April 2008 (8)
- March 2008 (4)
- February 2008 (3)
- January 2008 (3)
- December 2007 (2)
- November 2007 (7)
- October 2007 (1)
- August 2007 (4)
- July 2007 (3)
- June 2007 (8)
- May 2007 (4)
- April 2007 (2)
- March 2007 (2)
- February 2007 (5)
- January 2007 (8)
- December 2006 (1)
- November 2006 (3)
- October 2006 (4)
- September 2006 (3)
- July 2006 (1)
- May 2006 (2)
- April 2006 (1)
- July 2005 (1)
No Comments Yet
Let us know what you think