Share this
Part Three: Deploying High Available Applications in Oracle Cloud Infrastructure – Instance Clone and Linux Storage Appliance
by Fernando Salgado on Sep 20, 2021 12:00:00 AM
This is the third in a series that covers the details to deploy a high-available setup of Oracle Enterprise Manager 13.5 using Oracle Cloud Infrastructure‘s resources.
Recap
This series demonstrates how to deploy a high-available installation of OEM 13.5 using OCI’s services.
This setup will comprise the following resources:
- A two-node RAC VM database—covered in the first post
- A data guard standby DB
- Two application hosts—partially covered in the second post
- A load balancer
- Shared storage area
The second post of this series demonstrated the setup of the first application machine, of which we’ll clone and create a second instance.
This post will show how to launch the second virtual machine using OCI’s Cloud Shell and, also, how to deploy a Linux storage appliance to host the shared storage area. Level 3 of high availability for OEM requires a standby database, so this post also includes some details on how to set that up.
Create a custom instance image
Now that you’ve set up your first virtual machine (VM) to be used as an application instance for Oracle Enterprise Manager, it’s time to create a custom image based on that machine.
- In the “Compute Instance” section, select the first VM we created. Go into the details and select “Create Custom Image” from the “More actions” menu:
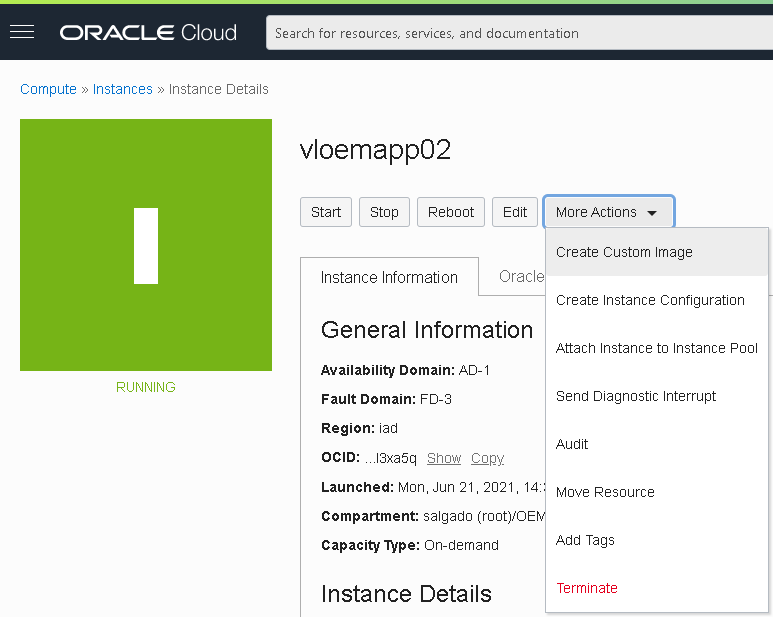
Note: The instance will become unavailable while the image is being created.
- Next, provide a name for your Custom OS image and click “Create Custom Image”:
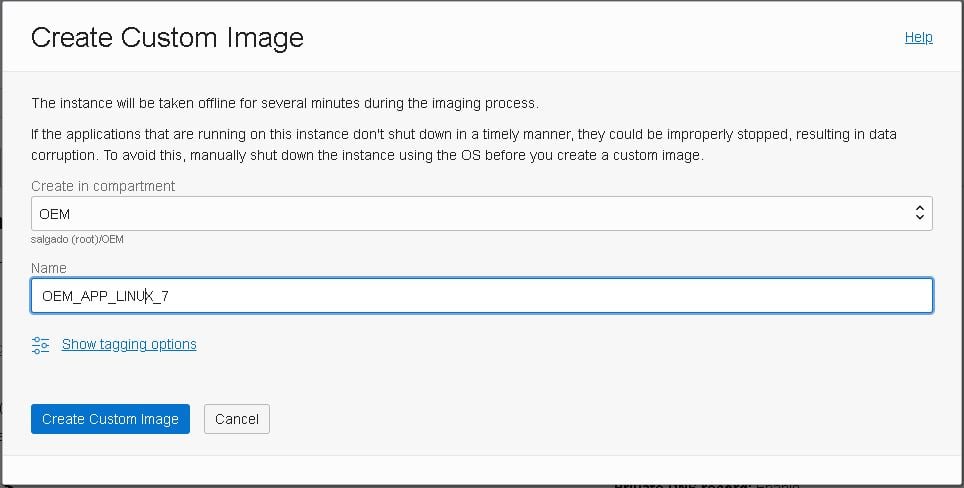
Now that we have an OS image based on the first application machine, let’s launch our second instance using this image.
Create the second instance
We’ll first do this using the console:
- In the “Compute Instances” section, select “Create Instance.”
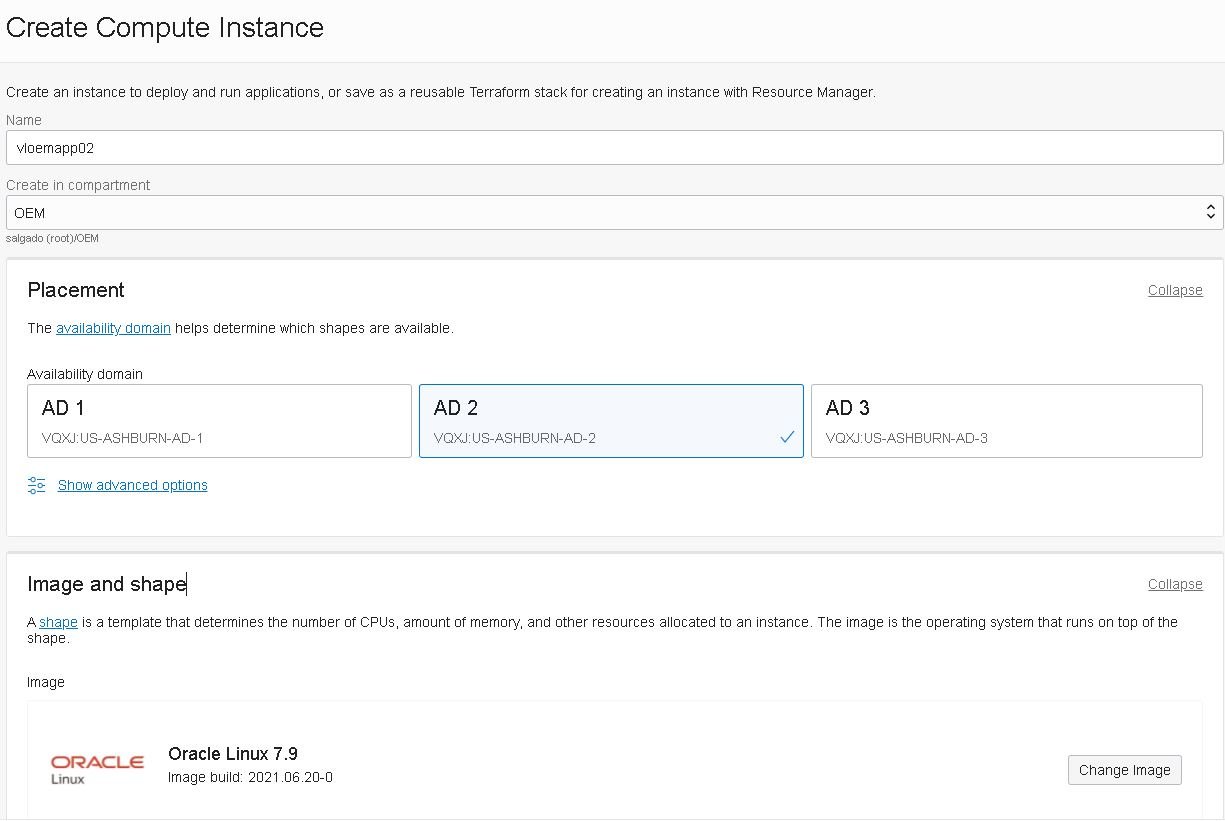
- Type in the instance name: “vloemapp02”, then select the compartment and a different Availability domain than the one used for the first instance, then click the “Change Image” button:
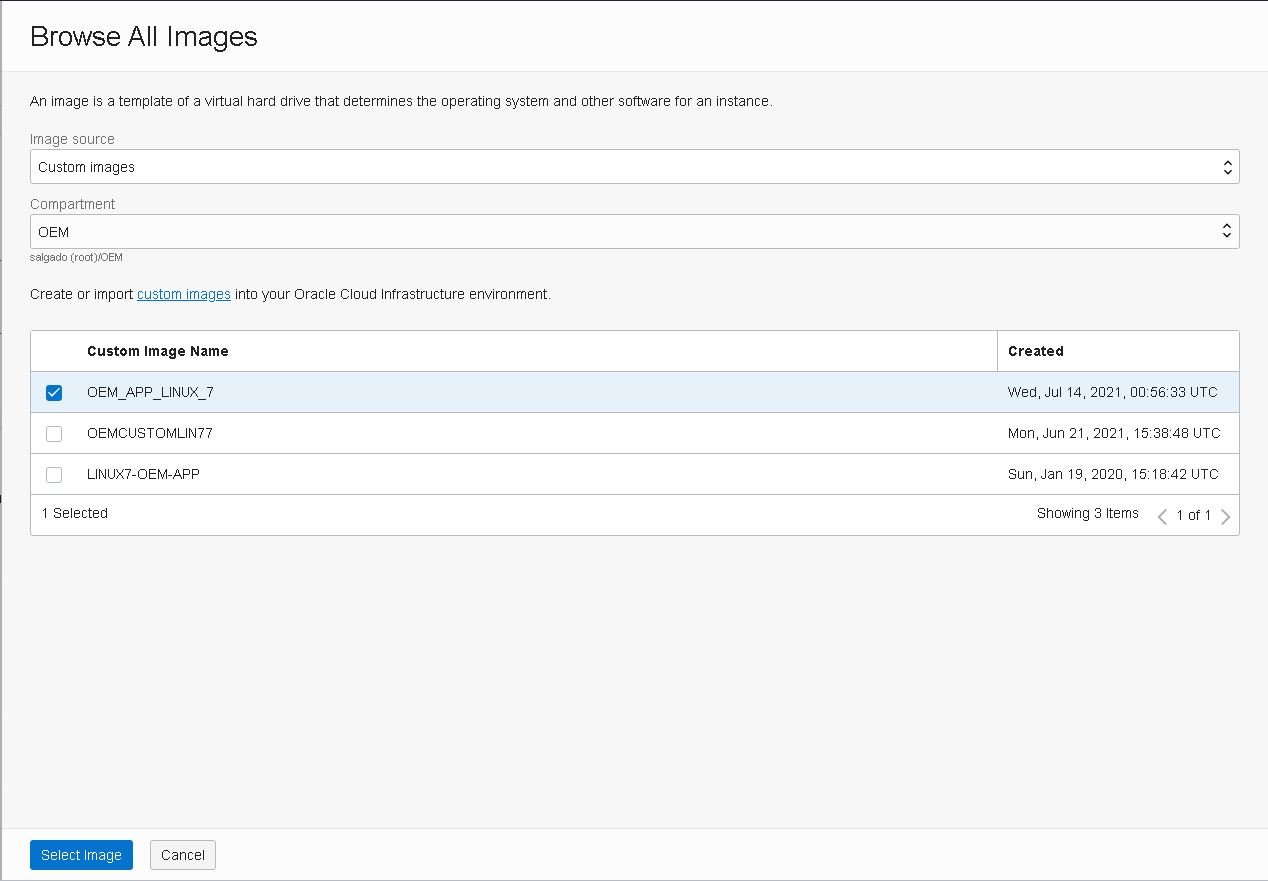
- Select the image that we just created and click “Select image”:
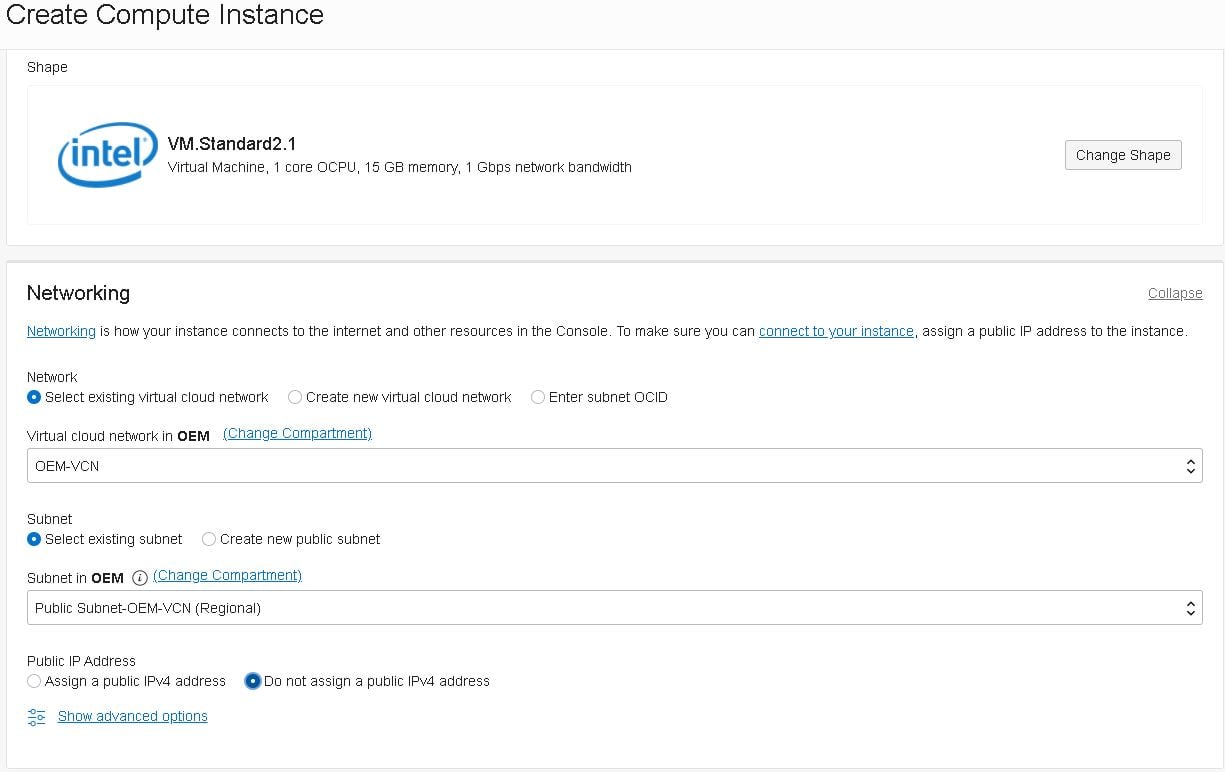
- Select the public subnet for this instance but do not assign a public IP at this time:
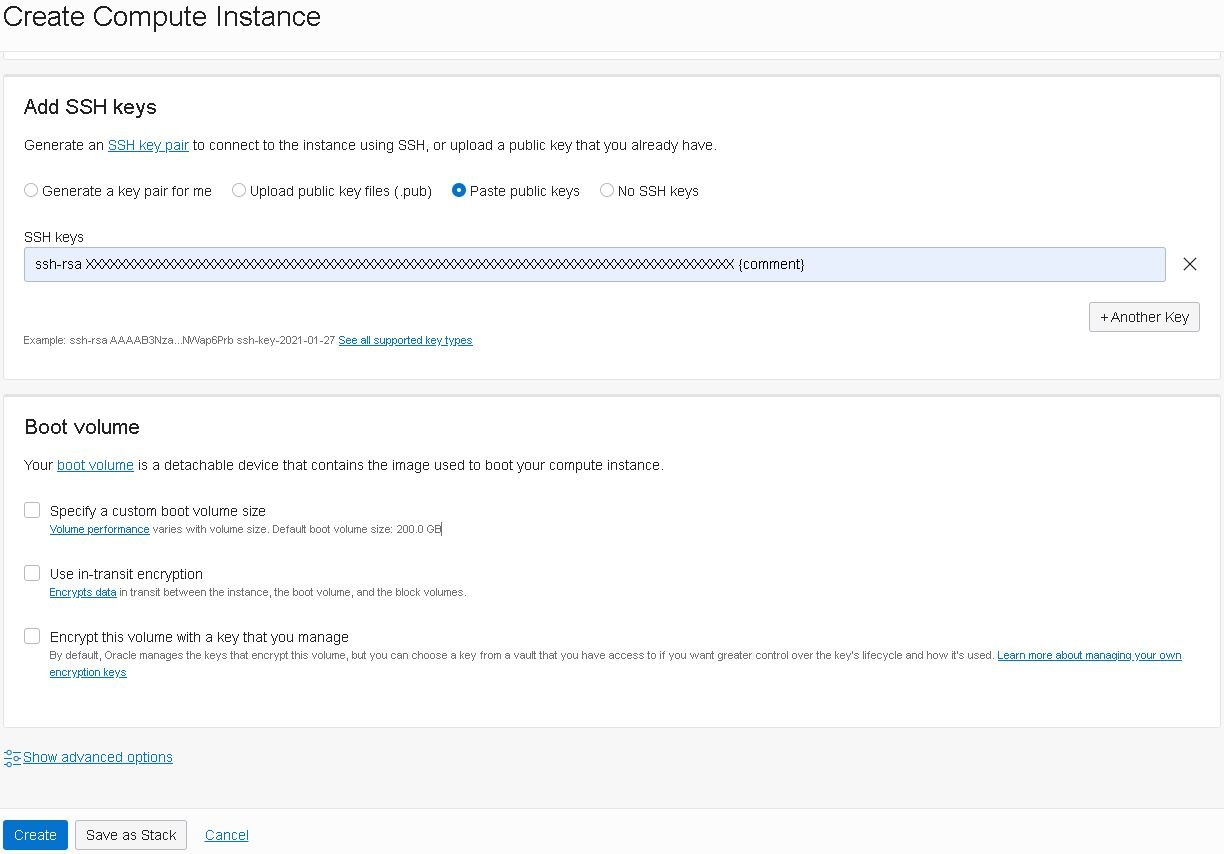
- Enter your single-line ssh-rsa key, as shown below, or upload / create your key pair file, then click “Create”:
If you prefer, you can also create the instance using OCI’s Console shell interface:
- Click the fifth icon from right to left (the one with the symbols “>_”) in the top right corner:

The Cloud Shell will open on the bottom of the page. From there, you can just type in the “oci compute instance launch” command as below:
oci compute instance launch \
--availability-domain "VQXJ:US-ASHBURN-AD-2" \
--fault-domain "FD-2" \
--compartment-id "ocid1.compartment.oc1..**************************************************" \
--shape "VM.Standard2.1" \
--subnet-id "ocid1.vcn.oc1.iad.**************************************************" \
--display-name "lvoemapp02"  \
--image-id  "ocid1.image.oc1.iad.**************************************************" \
--ssh-authorized-keys-file key.pub
Now that the new instance is created, you’ll have to assign a public IP address the same way we did on the second post. Note: For a live application, you should not assign a public IP to the application machines; instead, you should use a bastion host. You should also attach a block volume to this instance and create a 32GB Swap File, the same way we did in the second post.
Shared storage server
To have two instances of the Oracle Management Service in active-active mode, we’ll need a shared storage area, so we’ll launch a small VM with a block volume shared between the application servers.
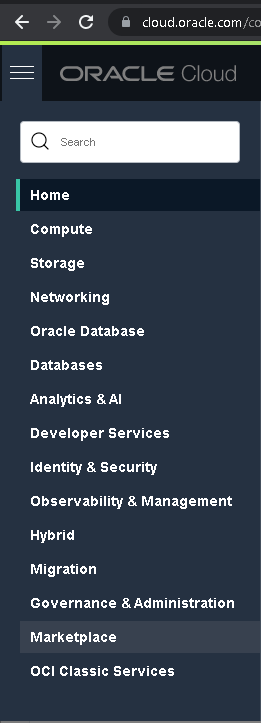
- Oracle offers some out-of-the box solutions through their Marketplace, which you can access through the top-left menu:
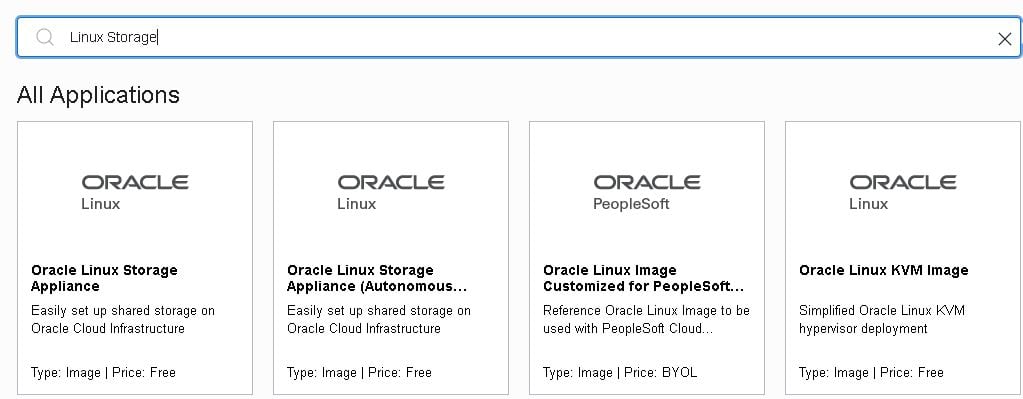
- We’ll launch a new Linux storage appliance, named “vloemsto01”, so search for “Linux Storage Appliance (Autonomous Linux)” and select the appliance below:
- Then accept the terms and launch the instance.

Your new storage appliance will show up as a regular compute instance, so now we’ll need to attach a block volume to it. You can follow the same steps we used in the second post.
Once the new block volume is attached, we should create and share a new file system so we can mount it on both application servers.
- First, create a new partition using the “fdisk” utility:
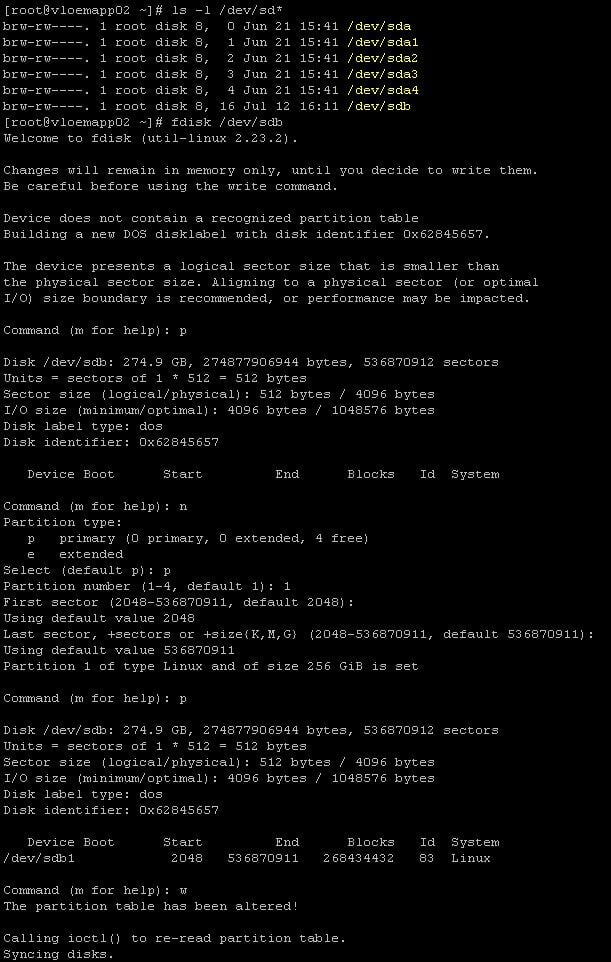
Create and mount the new file system, using the block volume attached previously:
[root@vloemsto01 ~]# sudo mkfs.ext4 /dev/sdb1
[root@vloemsto01 ~]# mkdir /oracle
[root@vloemsto01 ~]# mount /dev/sdb1 /oracle
Create a shared file system:
[root@vloemsto01 ~]# echo "/oracle vloemapp01(rw) vloemapp02(rw)" >> /etc/exports

[root@vloemsto01 ~]# exportfs -r
Mount the shared file system on both application servers (vloemapp01 and vloemapp02), using the commands below:
[root@vloemapp01 ~]# mkdir -p /u01/app/oracle/oms_shared_fs
[root@vloemapp01 ~]# chown -R oracle:oinstall /u01/app/oracle/oms_shared_fs
[root@vloemapp01 ~]# mount -t nfs vloemsto01:/oracle /u01/app/oracle/oms_shared_fs
[root@vloemapp01 ~]# echo "vloemsto01:/oracle /u01/app/oracle/oms_shared_fs nfs defaults 0 0" >> vi /etc/fstab

[root@vloemapp02 ~]# mkdir -p /u01/app/oracle/oms_shared_fs
[root@vloemapp02 ~]# chown -R oracle:oinstall /u01/app/oracle/oms_shared_fs
[root@vloemapp02 ~]# mount -t nfs vloemsto01:/oracle /u01/app/oracle/oms_shared_fs
[root@vloemapp02 ~]# echo "vloemsto01:/oracle /u01/app/oracle/oms_shared_fs nfs defaults 0 0" >> vi /etc/fstab
Standby Database
To achieve Level 3 of high availability for OEM 13.5, we need to make sure that the database has a disaster recovery solution using Oracle‘s Data Guard.
This is a widely known procedure and, honestly, is not within the scope of this series, but you can reference a generic procedure showing how to create a standby database, or you can look at one specific procedure on how to use Oracle Data Guard on OCI.
Creating a Physical Standby with RMAN Active Duplicate in 11.2.0.3
Thank you for reading! Please share your comments below.
Share this
- Technical Track (969)
- Oracle (400)
- MySQL (137)
- Cloud (131)
- Open Source (90)
- Google Cloud (83)
- DBA Lounge (76)
- Microsoft SQL Server (76)
- Technical Blog (74)
- Big Data (52)
- AWS (49)
- Google Cloud Platform (47)
- Cassandra (44)
- DevOps (41)
- Azure (38)
- Pythian (33)
- Linux (30)
- Database (26)
- Podcasts (25)
- Site Reliability Engineering (25)
- Performance (24)
- SQL Server (24)
- Microsoft Azure (23)
- Oracle E-Business Suite (23)
- PostgreSQL (23)
- Oracle Database (22)
- Docker (21)
- Group Blog Posts (20)
- Security (20)
- DBA (19)
- Log Buffer (19)
- SQL (19)
- Exadata (18)
- Mongodb (18)
- Oracle Cloud Infrastructure (OCI) (18)
- Oracle Exadata (18)
- Automation (17)
- Hadoop (16)
- Oracleebs (16)
- Amazon RDS (15)
- Ansible (15)
- Ebs (15)
- Snowflake (15)
- ASM (13)
- BigQuery (13)
- Patching (13)
- RDS (13)
- Replication (13)
- Data (12)
- GenAI (12)
- Kubernetes (12)
- Oracle 12C (12)
- Advanced Analytics (11)
- Backup (11)
- LLM (11)
- Machine Learning (11)
- OCI (11)
- Rman (11)
- Cloud Migration (10)
- Datascape Podcast (10)
- Monitoring (10)
- R12 (10)
- 12C (9)
- AI (9)
- Apache Cassandra (9)
- Data Guard (9)
- Infrastructure (9)
- Oracle 19C (9)
- Oracle Applications (9)
- Python (9)
- Series (9)
- AWR (8)
- Amazon Web Services (AWS) (8)
- Articles (8)
- High Availability (8)
- Oracle EBS (8)
- Percona (8)
- Powershell (8)
- Recovery (8)
- Weblogic (8)
- Apache Beam (7)
- Backups (7)
- Data Governance (7)
- Goldengate (7)
- Innodb (7)
- Migration (7)
- Myrocks (7)
- OEM (7)
- Oracle Enterprise Manager (OEM) (7)
- Performance Tuning (7)
- Authentication (6)
- ChatGPT-4 (6)
- Data Enablement (6)
- Database Performance (6)
- E-Business Suite (6)
- Fmw (6)
- Grafana (6)
- Oracle Enterprise Manager (6)
- Orchestrator (6)
- Postgres (6)
- Rac (6)
- Renew Refresh Republish (6)
- RocksDB (6)
- Serverless (6)
- Upgrade (6)
- 19C (5)
- Azure Data Factory (5)
- Azure Synapse Analytics (5)
- Cpu (5)
- Data Visualization (5)
- Disaster Recovery (5)
- Error (5)
- Generative AI (5)
- Google BigQuery (5)
- Indexes (5)
- Love Letters To Data (5)
- Mariadb (5)
- Microsoft (5)
- Proxysql (5)
- Scala (5)
- Sql Server Administration (5)
- VMware (5)
- Windows (5)
- Xtrabackup (5)
- Airflow (4)
- Analytics (4)
- Apex (4)
- Best Practices (4)
- Centrally Managed Users (4)
- Cli (4)
- Cloud FinOps (4)
- Cloud Spanner (4)
- Cockroachdb (4)
- Configuration Management (4)
- Container (4)
- Data Management (4)
- Data Pipeline (4)
- Data Security (4)
- Data Strategy (4)
- Database Administrator (4)
- Database Management (4)
- Database Migration (4)
- Dataflow (4)
- Dbsat (4)
- Elasticsearch (4)
- Fahd Mirza (4)
- Fusion Middleware (4)
- Google (4)
- Io (4)
- Java (4)
- Kafka (4)
- Middleware (4)
- Mysql 8 (4)
- Network (4)
- Ocidtab (4)
- Opatch (4)
- Oracle Autonomous Database (Adb) (4)
- Oracle Cloud (4)
- Pitr (4)
- Post-Mortem Analysis (4)
- Prometheus (4)
- Redhat (4)
- September 9Th 2015 (4)
- Sql2016 (4)
- Ssl (4)
- Terraform (4)
- Workflow (4)
- 2Fa (3)
- Alwayson (3)
- Amazon Relational Database Service (Rds) (3)
- Apache Kafka (3)
- Apexexport (3)
- Aurora (3)
- Azure Sql Db (3)
- Cdb (3)
- ChatGPT (3)
- Cloud Armor (3)
- Cloud Database (3)
- Cloud Security (3)
- Cluster (3)
- Consul (3)
- Cosmos Db (3)
- Cost Management (3)
- Covid19 (3)
- Crontab (3)
- Data Analytics (3)
- Data Integration (3)
- Database 12C (3)
- Database Monitoring (3)
- Database Troubleshooting (3)
- Database Upgrade (3)
- Databases (3)
- Dataops (3)
- Dbt (3)
- Digital Transformation (3)
- ERP (3)
- Google Chrome (3)
- Google Cloud Sql (3)
- Graphite (3)
- Haproxy (3)
- Heterogeneous Database Migration (3)
- Hugepages (3)
- Inside Pythian (3)
- Installation (3)
- Json (3)
- Keras (3)
- Ldap (3)
- Liquibase (3)
- Love Letter (3)
- Lua (3)
- Mfa (3)
- Multitenant (3)
- Mysql 5.7 (3)
- Mysql Configuration (3)
- Nginx (3)
- Nodetool (3)
- Non-Tech Articles (3)
- Oem 13C (3)
- Oms (3)
- Oracle 18C (3)
- Oracle Data Guard (3)
- Oracle Live Sql (3)
- Oracle Rac (3)
- Patch (3)
- Perl (3)
- Pmm (3)
- Pt-Online-Schema-Change (3)
- Rdbms (3)
- Recommended (3)
- Remote Teams (3)
- Reporting (3)
- Reverse Proxy (3)
- S3 (3)
- Spark (3)
- Sql On The Edge (3)
- Sql Server Configuration (3)
- Sql Server On Linux (3)
- Ssis (3)
- Ssis Catalog (3)
- Stefan Knecht (3)
- Striim (3)
- Sysadmin (3)
- System Versioned (3)
- Systemd (3)
- Temporal Tables (3)
- Tensorflow (3)
- Tools (3)
- Tuning (3)
- Vasu Balla (3)
- Vault (3)
- Vulnerability (3)
- Waf (3)
- 18C (2)
- Adf (2)
- Adop (2)
- Agent (2)
- Agile (2)
- Amazon Data Migration Service (2)
- Amazon Ec2 (2)
- Amazon S3 (2)
- Apache Flink (2)
- Apple (2)
- Apps (2)
- Ashdump (2)
- Atp (2)
- Audit (2)
- Automatic Backups (2)
- Autonomous (2)
- Autoupgrade (2)
- Awr Data Mining (2)
- Azure Sql (2)
- Azure Sql Data Sync (2)
- Bash (2)
- Business (2)
- Business Intelligence (2)
- Caching (2)
- Cassandra Nodetool (2)
- Cdap (2)
- Certification (2)
- Cloning (2)
- Cloud Cost Optimization (2)
- Cloud Data Fusion (2)
- Cloud Hosting (2)
- Cloud Infrastructure (2)
- Cloud Shell (2)
- Cloud Sql (2)
- Cloudscape (2)
- Cluster Level Consistency (2)
- Conferences (2)
- Consul-Template (2)
- Containerization (2)
- Containers (2)
- Cosmosdb (2)
- Costs (2)
- Cql (2)
- Cqlsh (2)
- Cyber Security (2)
- Data Discovery (2)
- Data Migration (2)
- Data Quality (2)
- Data Streaming (2)
- Data Warehouse (2)
- Database Consulting (2)
- Database Migrations (2)
- Dataguard (2)
- Datapump (2)
- Ddl (2)
- Debezium (2)
- Dictionary Views (2)
- Dms (2)
- Docker-Composer (2)
- Dr (2)
- Duplicate (2)
- Ecc (2)
- Elastic (2)
- Elastic Stack (2)
- Em12C (2)
- Encryption (2)
- Enterprise Data Platform (EDP) (2)
- Enterprise Manager (2)
- Etl (2)
- Events (2)
- Exachk (2)
- Filter Driver (2)
- Flume (2)
- Full Text Search (2)
- Galera (2)
- Gemini (2)
- General Purpose Ssd (2)
- Gh-Ost (2)
- Gke (2)
- Google Workspace (2)
- Hanganalyze (2)
- Hdfs (2)
- Health Check (2)
- Historical Trends (2)
- Incremental (2)
- Infiniband (2)
- Infrastructure As Code (2)
- Innodb Cluster (2)
- Innodb File Structure (2)
- Innodb Group Replication (2)
- Install (2)
- Internals (2)
- Java Web Start (2)
- Kibana (2)
- Log (2)
- Log4J (2)
- Logs (2)
- Memory (2)
- Merge Replication (2)
- Metrics (2)
- Mutex (2)
- MySQLShell (2)
- NLP (2)
- Neo4J (2)
- Node.Js (2)
- Nosql (2)
- November 11Th 2015 (2)
- Ntp (2)
- Oci Iam (2)
- Oem12C (2)
- Omspatcher (2)
- Opatchauto (2)
- Open Source Database (2)
- Operational Excellence (2)
- Oracle 11G (2)
- Oracle Datase (2)
- Oracle Extended Manager (Oem) (2)
- Oracle Flashback (2)
- Oracle Forms (2)
- Oracle Installation (2)
- Oracle Io Testing (2)
- Pdb (2)
- Podcast (2)
- Puppet (2)
- Pythian Europe (2)
- R12.2 (2)
- Redshift (2)
- Remote DBA (2)
- Remote Sre (2)
- SAP (2)
- SAP HANA Cloud (2)
- Sap Migration (2)
- Scale (2)
- Schema (2)
- September 30Th 2015 (2)
- September 3Rd 2015 (2)
- Shell (2)
- Simon Pane (2)
- Single Sign-On (2)
- Sql Server On Gke (2)
- Sqlplus (2)
- Sre (2)
- Ssis Catalog Error (2)
- Ssisdb (2)
- Standby (2)
- Statspack Mining (2)
- Systemstate Dump (2)
- Tablespace (2)
- Technical Training (2)
- Tempdb (2)
- Tfa (2)
- Throughput (2)
- Tls (2)
- Tombstones (2)
- Transactional Replication (2)
- User Groups (2)
- Vagrant (2)
- Variables (2)
- Virtual Machine (2)
- Virtual Machines (2)
- Virtualbox (2)
- Web Application Firewall (2)
- Webinars (2)
- X5 (2)
- scalability (2)
- //Build2019 (1)
- 11G (1)
- 12.1 (1)
- 12Cr1 (1)
- 12Cr2 (1)
- 18C Grid Installation (1)
- 2022 (1)
- 2022 Snowflake Summit (1)
- AI Platform (1)
- AI Summit (1)
- Actifio (1)
- Active Directory (1)
- Adaptive Hash Index (1)
- Adf Custom Email (1)
- Adobe Flash (1)
- Adrci (1)
- Advanced Data Services (1)
- Afd (1)
- After Logon Trigger (1)
- Ahf (1)
- Aix (1)
- Akka (1)
- Alloydb (1)
- Alter Table (1)
- Always On (1)
- Always On Listener (1)
- Alwayson With Gke (1)
- Amazon (1)
- Amazon Athena (1)
- Amazon Aurora Backtrack (1)
- Amazon Efs (1)
- Amazon Redshift (1)
- Amazon Sagemaker (1)
- Amazon Vpc Flow Logs (1)
- Amdu (1)
- Analysis (1)
- Analytical Models (1)
- Analyzing Bigquery Via Sheets (1)
- Anisble (1)
- Annual Mysql Community Dinner (1)
- Anthos (1)
- Apache (1)
- Apache Nifi (1)
- Apache Spark (1)
- Application Migration (1)
- Architect (1)
- Architecture (1)
- Ash (1)
- Asmlib (1)
- Atlas CLI (1)
- Audit In Postgres (1)
- Audit In Postgresql (1)
- Auto Failover (1)
- Auto Increment (1)
- Auto Index (1)
- Autoconfig (1)
- Automated Reports (1)
- Automl (1)
- Autostart (1)
- Awr Mining (1)
- Aws Glue (1)
- Aws Lake Formation (1)
- Aws Lambda (1)
- Azure Analysis Services (1)
- Azure Blob Storage (1)
- Azure Cognitive Search (1)
- Azure Data (1)
- Azure Data Lake (1)
- Azure Data Lake Analytics (1)
- Azure Data Lake Store (1)
- Azure Data Migration Service (1)
- Azure Dma (1)
- Azure Dms (1)
- Azure Document Intelligence (1)
- Azure Integration Runtime (1)
- Azure OpenAI (1)
- Azure Sql Data Warehouse (1)
- Azure Sql Dw (1)
- Azure Sql Managed Instance (1)
- Azure Vm (1)
- Backup For Sql Server (1)
- Bacpac (1)
- Bag (1)
- Bare Metal Solution (1)
- Batch Operation (1)
- Batches In Cassandra (1)
- Beats (1)
- Best Practice (1)
- Bi Publisher (1)
- Binary Logging (1)
- Bind Variables (1)
- Bitnami (1)
- Blob Storage Endpoint (1)
- Blockchain (1)
- Browsers (1)
- Btp Architecture (1)
- Btp Components (1)
- Buffer Pool (1)
- Bug (1)
- Bugs (1)
- Build 2019 Updates (1)
- Build Cassandra (1)
- Bundle Patch (1)
- Bushy Join (1)
- Business Continuity (1)
- Business Insights (1)
- Business Process Modelling (1)
- Business Reputation (1)
- CAPEX (1)
- Capacity Planning (1)
- Career (1)
- Career Development (1)
- Cassandra-Cli (1)
- Catcon.Pm (1)
- Catctl.Pl (1)
- Catupgrd.Sql (1)
- Cbo (1)
- Cdb Duplication (1)
- Certificate (1)
- Certificate Management (1)
- Chaos Engineering (1)
- Cheatsheet (1)
- Checkactivefilesandexecutables (1)
- Chmod (1)
- Chown (1)
- Chrome Enterprise (1)
- Chrome Security (1)
- Cl-Series (1)
- Cleanup (1)
- Cloud Browser (1)
- Cloud Build (1)
- Cloud Consulting (1)
- Cloud Data Warehouse (1)
- Cloud Database Management (1)
- Cloud Dataproc (1)
- Cloud Foundry (1)
- Cloud Manager (1)
- Cloud Migations (1)
- Cloud Networking (1)
- Cloud SQL Replica (1)
- Cloud Scheduler (1)
- Cloud Services (1)
- Cloud Strategies (1)
- Cloudformation (1)
- Cluster Resource (1)
- Cmo (1)
- Cockroach Db (1)
- Coding Benchmarks (1)
- Colab (1)
- Collectd (1)
- Columnar (1)
- Communication Plans (1)
- Community (1)
- Compact Storage (1)
- Compaction (1)
- Compliance (1)
- Compression (1)
- Compute Instances (1)
- Compute Node (1)
- Concurrent Manager (1)
- Concurrent Processing (1)
- Configuration (1)
- Consistency Level (1)
- Consolidation (1)
- Conversational AI (1)
- Covid-19 (1)
- Cpu Patching (1)
- Cqlsstablewriter (1)
- Crash (1)
- Create Catalog Error (1)
- Create_File_Dest (1)
- Credentials (1)
- Cross Platform (1)
- CrowdStrike (1)
- Crsctl (1)
- Custom Instance Images (1)
- Cve-2022-21500 (1)
- Cvu (1)
- Cypher Queries (1)
- DBSAT 3 (1)
- Dacpac (1)
- Dag (1)
- Data Analysis (1)
- Data Analytics Platform (1)
- Data Box (1)
- Data Classification (1)
- Data Cleansing (1)
- Data Encryption (1)
- Data Engineering (1)
- Data Estate (1)
- Data Flow Management (1)
- Data Insights (1)
- Data Integrity (1)
- Data Lake (1)
- Data Leader (1)
- Data Lifecycle Management (1)
- Data Lineage (1)
- Data Masking (1)
- Data Mesh (1)
- Data Migration Assistant (1)
- Data Migration Service (1)
- Data Mining (1)
- Data Modeling (1)
- Data Monetization (1)
- Data Policy (1)
- Data Profiling (1)
- Data Protection (1)
- Data Retention (1)
- Data Safe (1)
- Data Sheets (1)
- Data Summit (1)
- Data Vault (1)
- Data Warehouse Modernization (1)
- Database Auditing (1)
- Database Consultant (1)
- Database Link (1)
- Database Modernization (1)
- Database Provisioning (1)
- Database Provisioning Failed (1)
- Database Replication (1)
- Database Scaling (1)
- Database Schemas (1)
- Database Security (1)
- Databricks (1)
- Datadog (1)
- Datafile (1)
- Datapatch (1)
- Dataprivacy (1)
- Datascape 59 (1)
- Datasets (1)
- Datastax Cassandra (1)
- Datastax Opscenter (1)
- Datasync Error (1)
- Db_Create_File_Dest (1)
- Dbaas (1)
- Dbatools (1)
- Dbcc Checkident (1)
- Dbms_Cloud (1)
- Dbms_File_Transfer (1)
- Dbms_Metadata (1)
- Dbms_Service (1)
- Dbms_Stats (1)
- Dbupgrade (1)
- Deep Learning (1)
- Delivery (1)
- Devd (1)
- Dgbroker (1)
- Dialogflow (1)
- Dict0Dict (1)
- Did You Know (1)
- Direct Path Read Temp (1)
- Disk Groups (1)
- Disk Management (1)
- Diskgroup (1)
- Dispatchers (1)
- Distributed Ag (1)
- Distribution Agent (1)
- Documentation (1)
- Download (1)
- Dp Agent (1)
- Duet AI (1)
- Duplication (1)
- Dynamic Sampling (1)
- Dynamic Tasks (1)
- E-Business Suite Cpu Patching (1)
- E-Business Suite Patching (1)
- Ebs Sso (1)
- Ec2 (1)
- Edb Postgresql Advanced Server (1)
- Edb Postgresql Password Verify Function (1)
- Editions (1)
- Edp (1)
- El Carro (1)
- Elassandra (1)
- Elk Stack (1)
- Em13Cr2 (1)
- Emcli (1)
- End of Life (1)
- Engineering (1)
- Enqueue (1)
- Enterprise (1)
- Enterprise Architecture (1)
- Enterprise Command Centers (1)
- Enterprise Manager Command Line Interface (Em Cli (1)
- Enterprise Plus (1)
- Episode 58 (1)
- Error Handling (1)
- Exacc (1)
- Exacheck (1)
- Exacs (1)
- Exadata Asr (1)
- Execution (1)
- Executive Sponsor (1)
- Expenditure (1)
- Export Sccm Collection To Csv (1)
- External Persistent Volumes (1)
- Fail (1)
- Failed Upgrade (1)
- Failover In Postgresql (1)
- Fall 2021 (1)
- Fast Recovery Area (1)
- FinOps Strategy (1)
- Flash Recovery Area (1)
- Flashback (1)
- Fnd (1)
- Fndsm (1)
- Force_Matching_Signature (1)
- Fra Full (1)
- Framework (1)
- Freebsd (1)
- Fsync (1)
- Function-Based Index (1)
- GCVE Architecture (1)
- GPQA (1)
- Gaming (1)
- Garbagecollect (1)
- Gcp Compute (1)
- Gcp-Spanner (1)
- Geography (1)
- Geth (1)
- Getmospatch (1)
- Git (1)
- Global Analytics (1)
- Gmail (1)
- Gmail Security (1)
- Google Analytics (1)
- Google Cloud Architecture Framework (1)
- Google Cloud Data Services (1)
- Google Cloud Partner (1)
- Google Cloud Spanner (1)
- Google Cloud VMware Engine (1)
- Google Compute Engine (1)
- Google Dataflow (1)
- Google Datalab (1)
- Google Grab And Go (1)
- Google Sheets (1)
- Gp2 (1)
- Graph Algorithms (1)
- Graph Databases (1)
- Graph Inferences (1)
- Graph Theory (1)
- GraphQL (1)
- Graphical User Interface (Gui) (1)
- Grid (1)
- Grid Infrastructure (1)
- Griddisk Resize (1)
- Grp (1)
- Guaranteed Restore Point (1)
- Guid Mismatch (1)
- HR Technology (1)
- HRM (1)
- Ha (1)
- Hang (1)
- Hashicorp (1)
- Hbase (1)
- Hcc (1)
- Hdinsight (1)
- Healthcheck (1)
- Hemantgiri S. Goswami (1)
- Hortonworks (1)
- How To Install Ssrs (1)
- Hr (1)
- Httpchk (1)
- Https (1)
- Huge Pages (1)
- HumanEval (1)
- Hung Database (1)
- Hybrid Columnar Compression (1)
- Hyper-V (1)
- Hyperscale (1)
- Hypothesis Driven Development (1)
- Ibm (1)
- Identity Management (1)
- Idm (1)
- Ilom (1)
- Imageinfo (1)
- Impdp (1)
- In Place Upgrade (1)
- Incident Response (1)
- Indempotent (1)
- Indexing In Mongodb (1)
- Influxdb (1)
- Information (1)
- Infrastructure As A Code (1)
- Injection (1)
- Innobackupex (1)
- Innodb Concurrency (1)
- Innodb Flush Method (1)
- Insights (1)
- Installing (1)
- Instance Cloning (1)
- Integration Services (1)
- Integrations (1)
- Interactive_Timeout (1)
- Interval Partitioning (1)
- Invisible Indexes (1)
- Io1 (1)
- IoT (1)
- Iops (1)
- Iphone (1)
- Ipv6 (1)
- Iscsi (1)
- Iscsi-Initiator-Utils (1)
- Iscsiadm (1)
- Issues (1)
- It Industry (1)
- It Teams (1)
- JMX Metrics (1)
- Jared Still (1)
- Javascript (1)
- Jdbc (1)
- Jinja2 (1)
- Jmx (1)
- Jmx Monitoring (1)
- Jvm (1)
- Jython (1)
- K8S (1)
- Kernel (1)
- Key Btp Components (1)
- Kfed (1)
- Kill Sessions (1)
- Knapsack (1)
- Kubeflow (1)
- LMSYS Chatbot Arena (1)
- Large Pages (1)
- Latency (1)
- Latest News (1)
- Leadership (1)
- Leap Second (1)
- Limits (1)
- Line 1 (1)
- Linkcolumn (1)
- Linux Host Monitoring (1)
- Linux Storage Appliance (1)
- Listener (1)
- Loadavg (1)
- Lock_Sga (1)
- Locks (1)
- Log File Switch (Archiving Needed) (1)
- Logfile (1)
- Looker (1)
- Lvm (1)
- MMLU (1)
- Managed Instance (1)
- Managed Services (1)
- Management (1)
- Management Servers (1)
- Marketing (1)
- Marketing Analytics (1)
- Martech (1)
- Masking (1)
- Megha Bedi (1)
- Metadata (1)
- Method-R Workbench (1)
- Metric (1)
- Metric Extensions (1)
- Michelle Gutzait (1)
- Microservices (1)
- Microsoft Azure Sql Database (1)
- Microsoft Build (1)
- Microsoft Build 2019 (1)
- Microsoft Ignite (1)
- Microsoft Inspire 2019 (1)
- Migrate (1)
- Migrating Ssis Catalog (1)
- Migrating To Azure Sql (1)
- Migration Checklist (1)
- Mirroring (1)
- Mismatch (1)
- Model Governance (1)
- Monetization (1)
- MongoDB Atlas (1)
- MongoDB Compass (1)
- Ms Excel (1)
- Msdtc (1)
- Msdtc In Always On (1)
- Msdtc In Cluster (1)
- Multi-IP (1)
- Multicast (1)
- Multipath (1)
- My.Cnf (1)
- MySQL Shell Logical Backup (1)
- MySQLDump (1)
- Mysql Enterprise (1)
- Mysql Plugin For Oracle Enterprise Manager (1)
- Mysql Replication Filters (1)
- Mysql Server (1)
- Mysql-Python (1)
- Nagios (1)
- Ndb (1)
- Net_Read_Timeout (1)
- Net_Write_Timeout (1)
- Netcat (1)
- Newsroom (1)
- Nfs (1)
- Nifi (1)
- Node (1)
- November 10Th 2015 (1)
- November 6Th 2015 (1)
- Null Columns (1)
- Nullipotent (1)
- OPEX (1)
- ORAPKI (1)
- O_Direct (1)
- Oacore (1)
- October 21St 2015 (1)
- October 6Th 2015 (1)
- October 8Th 2015 (1)
- Oda (1)
- Odbcs (1)
- Odbs (1)
- Odi (1)
- Oel (1)
- Ohs (1)
- Olvm (1)
- On-Prem To Azure Sql (1)
- On-Premises (1)
- Onclick (1)
- Open.Canada.Ca (1)
- Openstack (1)
- Operating System Monitoring (1)
- Oplog (1)
- Opsworks (1)
- Optimization (1)
- Optimizer (1)
- Ora-01852 (1)
- Ora-7445 (1)
- Oracle 19 (1)
- Oracle 20C (1)
- Oracle Cursor (1)
- Oracle Database 12.2 (1)
- Oracle Database Appliance (1)
- Oracle Database Se2 (1)
- Oracle Database Standard Edition 2 (1)
- Oracle Database Upgrade (1)
- Oracle Database@Google Cloud (1)
- Oracle Exadata Smart Scan (1)
- Oracle Licensing (1)
- Oracle Linux Virtualization Manager (1)
- Oracle Oda (1)
- Oracle Openworld (1)
- Oracle Parallelism (1)
- Oracle Rdbms (1)
- Oracle Real Application Clusters (1)
- Oracle Reports (1)
- Oracle Security (1)
- Oracle Wallet (1)
- Orasrp (1)
- Organizational Change (1)
- Orion (1)
- Os (1)
- Osbws_Install.Jar (1)
- Oui Gui (1)
- Output (1)
- Owox (1)
- Paas (1)
- Package Deployment Wizard Error (1)
- Parallel Execution (1)
- Parallel Query (1)
- Parallel Query Downgrade (1)
- Partitioning (1)
- Partitions (1)
- Password (1)
- Password Change (1)
- Password Recovery (1)
- Password Verify Function In Postgresql (1)
- Patches (1)
- Patchmgr (1)
- Pdb Duplication (1)
- Penalty (1)
- Perfomrance (1)
- Performance Schema (1)
- Pg 15 (1)
- Pg_Rewind (1)
- Pga (1)
- Pipeline Debugging (1)
- Pivot (1)
- Planning (1)
- Plsql (1)
- Policy (1)
- Polybase (1)
- Post-Acquisition (1)
- Post-Covid It (1)
- Postgresql Complex Password (1)
- Postgresql With Repmgr Integration (1)
- Power Bi (1)
- Pq (1)
- Preliminar Connection (1)
- Preliminary Connection (1)
- Privatecloud (1)
- Process Mining (1)
- Production (1)
- Productivity (1)
- Profile In Edb Postgresql (1)
- Programming (1)
- Prompt Engineering (1)
- Provisioned Iops (1)
- Provisiones Iops (1)
- Proxy Monitoring (1)
- Psu (1)
- Public Cloud (1)
- Pubsub (1)
- Purge (1)
- Purge Thread (1)
- Pythian Blackbird Acquisition (1)
- Pythian Goodies (1)
- Pythian News (1)
- Python Pandas (1)
- Query Performance (1)
- Quicksight (1)
- Quota Limits (1)
- R12 R12.2 Cp Concurrent Processing Abort (1)
- R12.1.3 (1)
- REF! (1)
- Ram Cache (1)
- Rbac (1)
- Rdb (1)
- Rds_File_Util (1)
- Read Free Replication (1)
- Read Latency (1)
- Read Only (1)
- Read Replica (1)
- Reboot (1)
- Recruiting (1)
- Redo Size (1)
- Relational Database Management System (1)
- Release (1)
- Release Automation (1)
- Repair (1)
- Replication Compatibility (1)
- Replication Error (1)
- Repmgr (1)
- Repmgrd (1)
- Reporting Services 2019 (1)
- Resiliency Planning (1)
- Resource Manager (1)
- Resources (1)
- Restore (1)
- Restore Point (1)
- Retail (1)
- Rhel (1)
- Risk (1)
- Risk Management (1)
- Rocksrb (1)
- Role In Postgresql (1)
- Rollback (1)
- Rolling Patch (1)
- Row0Purge (1)
- Rpm (1)
- Rule "Existing Clustered Or Clustered-Prepared In (1)
- Running Discovery On Remote Machine (1)
- SQL Optimization (1)
- SQL Tracing (1)
- SSRS Administration (1)
- SaaS (1)
- Sap Assessment (1)
- Sap Assessment Report (1)
- Sap Backup Restore (1)
- Sap Btp Architecture (1)
- Sap Btp Benefits (1)
- Sap Btp Model (1)
- Sap Btp Services (1)
- Sap Homogenous System Copy Method (1)
- Sap Landscape Copy (1)
- Sap Migration Assessment (1)
- Sap On Mssql (1)
- Sap System Copy (1)
- Sar (1)
- Scaling Ir (1)
- Sccm (1)
- Sccm Powershell (1)
- Scheduler (1)
- Scheduler_Job (1)
- Schedulers (1)
- Scheduling (1)
- Scott Mccormick (1)
- Scripts (1)
- Sdp (1)
- Secrets (1)
- Securing Sql Server (1)
- Security Compliance (1)
- Sed (Stream Editor) (1)
- Self Hosted Ir (1)
- Semaphore (1)
- Seps (1)
- September 11Th 2015 (1)
- Serverless Computing (1)
- Serverless Framework (1)
- Service Broker (1)
- Service Bus (1)
- Shared Connections (1)
- Shared Storage (1)
- Shellshock (1)
- Signals (1)
- Silent (1)
- Slave (1)
- Slob (1)
- Smart Scan (1)
- Smtp (1)
- Snapshot (1)
- Snowday Fall 2021 (1)
- Socat (1)
- Software Development (1)
- Software Engineering (1)
- Solutions Architecture (1)
- Spanner-Backups (1)
- Sphinx (1)
- Split Brain In Postgresql (1)
- Spm (1)
- Sql Agent (1)
- Sql Backup To Url Error (1)
- Sql Cluster Installer Hang (1)
- Sql Database (1)
- Sql Developer (1)
- Sql On Linux (1)
- Sql Server 2014 (1)
- Sql Server 2016 (1)
- Sql Server Agent On Linux (1)
- Sql Server Backups (1)
- Sql Server Denali Is Required To Install Integrat (1)
- Sql Server Health Check (1)
- Sql Server Troubleshooting On Linux (1)
- Sql Server Version (1)
- Sql Setup (1)
- Sql Vm (1)
- Sql2K19Ongke (1)
- Sqldatabase Serverless (1)
- Ssh User Equivalence (1)
- Ssis Denali Error (1)
- Ssis Install Error E Xisting Clustered Or Cluster (1)
- Ssis Package Deployment Error (1)
- Ssisdb Master Key (1)
- Ssisdb Restore Error (1)
- Sso (1)
- Ssrs 2019 (1)
- Sstable2Json (1)
- Sstableloader (1)
- Sstablesimpleunsortedwriter (1)
- Stack Dump (1)
- Standard Edition (1)
- Startup Process (1)
- Statistics (1)
- Statspack (1)
- Statspack Data Mining (1)
- Statspack Erroneously Reporting (1)
- Statspack Issues (1)
- Storage (1)
- Stored Procedure (1)
- Strategies (1)
- Streaming (1)
- Sunos (1)
- Swap (1)
- Swapping (1)
- Switch (1)
- Syft (1)
- Synapse (1)
- Sync Failed There Is Not Enough Space On The Disk (1)
- Sys Schema (1)
- System Function (1)
- Systems Administration (1)
- T-Sql (1)
- Table Optimization (1)
- Tablespace Growth (1)
- Tablespaces (1)
- Tags (1)
- Tar (1)
- Tde (1)
- Team Management (1)
- Tech Debt (1)
- Technology (1)
- Telegraf (1)
- Tempdb Encryption (1)
- Templates (1)
- Temporary Tablespace (1)
- Tenserflow (1)
- Teradata (1)
- Testing New Cassandra Builds (1)
- There Is Not Enough Space On The Disk (1)
- Thick Data (1)
- Third-Party Data (1)
- Thrift (1)
- Thrift Data (1)
- Tidb (1)
- Time Series (1)
- Time-Drift (1)
- Tkprof (1)
- Tmux (1)
- Tns (1)
- Trace (1)
- Tracefile (1)
- Training (1)
- Transaction Log (1)
- Transactions (1)
- Transformation Navigator (1)
- Transparent Data Encryption (1)
- Trigger (1)
- Triggers On Memory-Optimized Tables Must Use With (1)
- Troubleshooting (1)
- Tungsten (1)
- Tvdxtat (1)
- Twitter (1)
- U-Sql (1)
- UNDO Tablespace (1)
- Upgrade Issues (1)
- Uptime (1)
- Uptrade (1)
- Url Backup Error (1)
- Usability (1)
- Use Cases (1)
- User (1)
- User Defined Compactions (1)
- Utilization (1)
- Utl_Smtp (1)
- VDI Jump Host (1)
- Validate Structure (1)
- Validate_Credentials (1)
- Value (1)
- Velocity (1)
- Vertex AI (1)
- Vertica (1)
- Vertical Slicing (1)
- Videos (1)
- Virtual Private Cloud (1)
- Virtualization (1)
- Vision (1)
- Vpn (1)
- Wait_Timeout (1)
- Wallet (1)
- Webhook (1)
- Weblogic Connection Filters (1)
- Webscale Database (1)
- Windows 10 (1)
- Windows Powershell (1)
- WiredTiger (1)
- With Native_Compilation (1)
- Word (1)
- Workshop (1)
- Workspace Security (1)
- Xbstream (1)
- Xml Publisher (1)
- Zabbix (1)
- dbms_Monitor (1)
- postgresql 16 (1)
- sqltrace (1)
- tracing (1)
- vSphere (1)
- xml (1)
- October 2024 (2)
- September 2024 (7)
- August 2024 (4)
- July 2024 (2)
- June 2024 (6)
- May 2024 (3)
- April 2024 (2)
- February 2024 (2)
- January 2024 (11)
- December 2023 (10)
- November 2023 (11)
- October 2023 (10)
- September 2023 (8)
- August 2023 (7)
- July 2023 (2)
- June 2023 (13)
- May 2023 (4)
- April 2023 (6)
- March 2023 (10)
- February 2023 (6)
- January 2023 (5)
- December 2022 (10)
- November 2022 (10)
- October 2022 (10)
- September 2022 (13)
- August 2022 (16)
- July 2022 (12)
- June 2022 (13)
- May 2022 (11)
- April 2022 (4)
- March 2022 (5)
- February 2022 (4)
- January 2022 (14)
- December 2021 (16)
- November 2021 (11)
- October 2021 (7)
- September 2021 (11)
- August 2021 (6)
- July 2021 (9)
- June 2021 (4)
- May 2021 (8)
- April 2021 (16)
- March 2021 (16)
- February 2021 (6)
- January 2021 (12)
- December 2020 (12)
- November 2020 (17)
- October 2020 (11)
- September 2020 (10)
- August 2020 (11)
- July 2020 (13)
- June 2020 (6)
- May 2020 (9)
- April 2020 (18)
- March 2020 (21)
- February 2020 (13)
- January 2020 (15)
- December 2019 (10)
- November 2019 (11)
- October 2019 (12)
- September 2019 (16)
- August 2019 (15)
- July 2019 (10)
- June 2019 (16)
- May 2019 (20)
- April 2019 (21)
- March 2019 (14)
- February 2019 (18)
- January 2019 (18)
- December 2018 (5)
- November 2018 (16)
- October 2018 (12)
- September 2018 (20)
- August 2018 (27)
- July 2018 (31)
- June 2018 (34)
- May 2018 (28)
- April 2018 (27)
- March 2018 (17)
- February 2018 (8)
- January 2018 (20)
- December 2017 (14)
- November 2017 (4)
- October 2017 (1)
- September 2017 (3)
- August 2017 (5)
- July 2017 (4)
- June 2017 (2)
- May 2017 (7)
- April 2017 (7)
- March 2017 (8)
- February 2017 (8)
- January 2017 (5)
- December 2016 (3)
- November 2016 (4)
- October 2016 (8)
- September 2016 (9)
- August 2016 (10)
- July 2016 (9)
- June 2016 (8)
- May 2016 (13)
- April 2016 (16)
- March 2016 (13)
- February 2016 (11)
- January 2016 (6)
- December 2015 (11)
- November 2015 (11)
- October 2015 (5)
- September 2015 (16)
- August 2015 (4)
- July 2015 (1)
- June 2015 (3)
- May 2015 (6)
- April 2015 (5)
- March 2015 (5)
- February 2015 (4)
- January 2015 (3)
- December 2014 (7)
- October 2014 (4)
- September 2014 (6)
- August 2014 (6)
- July 2014 (16)
- June 2014 (7)
- May 2014 (6)
- April 2014 (5)
- March 2014 (4)
- February 2014 (10)
- January 2014 (6)
- December 2013 (8)
- November 2013 (12)
- October 2013 (9)
- September 2013 (6)
- August 2013 (7)
- July 2013 (9)
- June 2013 (7)
- May 2013 (7)
- April 2013 (4)
- March 2013 (7)
- February 2013 (4)
- January 2013 (4)
- December 2012 (6)
- November 2012 (8)
- October 2012 (9)
- September 2012 (3)
- August 2012 (5)
- July 2012 (5)
- June 2012 (7)
- May 2012 (11)
- April 2012 (1)
- March 2012 (8)
- February 2012 (1)
- January 2012 (6)
- December 2011 (8)
- November 2011 (5)
- October 2011 (9)
- September 2011 (6)
- August 2011 (4)
- July 2011 (1)
- June 2011 (1)
- May 2011 (5)
- April 2011 (2)
- February 2011 (2)
- January 2011 (2)
- December 2010 (1)
- November 2010 (7)
- October 2010 (3)
- September 2010 (8)
- August 2010 (2)
- July 2010 (4)
- June 2010 (7)
- May 2010 (2)
- April 2010 (1)
- March 2010 (3)
- February 2010 (3)
- January 2010 (2)
- November 2009 (6)
- October 2009 (6)
- August 2009 (3)
- July 2009 (3)
- June 2009 (3)
- May 2009 (2)
- April 2009 (8)
- March 2009 (6)
- February 2009 (4)
- January 2009 (3)
- November 2008 (3)
- October 2008 (7)
- September 2008 (6)
- August 2008 (9)
- July 2008 (9)
- June 2008 (9)
- May 2008 (9)
- April 2008 (8)
- March 2008 (4)
- February 2008 (3)
- January 2008 (3)
- December 2007 (2)
- November 2007 (7)
- October 2007 (1)
- August 2007 (4)
- July 2007 (3)
- June 2007 (8)
- May 2007 (4)
- April 2007 (2)
- March 2007 (2)
- February 2007 (5)
- January 2007 (8)
- December 2006 (1)
- November 2006 (3)
- October 2006 (4)
- September 2006 (3)
- July 2006 (1)
- May 2006 (2)
- April 2006 (1)
- July 2005 (1)
No Comments Yet
Let us know what you think