Share this
VPN Options with Azure: Azure to Site
by Pythian Marketing on Jul 26, 2020 12:00:00 AM
Azure VPN Tunnel Options
Azure provides several options to connect a remote site network to your cloud environment. For example, the site is remote from Azure's perspective and might be located in a data center or office.- The Azure ExpressRoute option requires private circuits to be already in place in the remote site. This type of connection has many benefits but can be expensive.
- The Azure VPN option uses the public Internet that has a lower cost and can still be secure. These VPNs can be either route-based or policy-based.
| Route-based VPN | Policy-based VPN |
| Encrypts all traversing traffic | Encrypts a subset of the traversing traffic according to a tunnel policy |
| Supports the exchange of dynamic routing information | Does not support the exchange of dynamic routing information |
| New network routes can be added as static or dynamically learned | New networks must be added to tunnel policy |
| Traversing traffic can be NAT'ed | Traversing traffic cannot be NAT'ed |
| Allow for load balancing and redundancy | Does not allow for load balancing and redundancy |
| Supports IKEv1 or IKEv2 | Supports IKEv1 only |
Site-to-Azure Route-based VPN Tunnel
When the remote site gateway device supports route-based IKEv2 VPN, you can establish a standard connection to Azure. The next section covers the configuration in Azure and the remote site gateway.Azure VPN Tunnel Setup
First, we'll go over a route-based IKEv2 VPN tunnel configuration of the Azure resources.Virtual Network Gateway
In Azure, you need to create or already have in place at least one Virtual Network Gateway (VNG). You can create multiple IKEv2 VPN tunnel connections under one VNG with one connection per remote location. Also, one VNG can serve the traffic only for a single Azure location, so you would need to create at least one VNG for each location that requires VPN tunnel connectivity. The following information describes how to create a VNG:- Search for "virtual network gateways" in the Azure console search bar.
- Select Virtual network gateways.
- Click Add in the upper left corner of the Virtual network gateways display.
- Select or enter the following Create virtual network gateway options:
- Name: A name for the VNG.
- Region: Azure Region where the VNG will be active.
- Gateway type: VPN.
- VPN type: Route-based.
- SKU: VpnGw1.
- Virtual network: The Virtual Network (VNet) will have access to the VPN tunnel. Use the Create virtual network option if the VNet doesn't already exist.
- Gateway subnet address range: Azure pre-fills the lowest available subnet from the chosen VNet. Use the zero subnet if available.
- Public IP address: Create new or Use existing.
- Public IP address name: A name for the public IP address resource, if creating a new one.Note: Active-active mode and BGP ASN are disabled, as our discussion is focused on the tunnel security options (and not on HA setup or dynamic routing exchange).
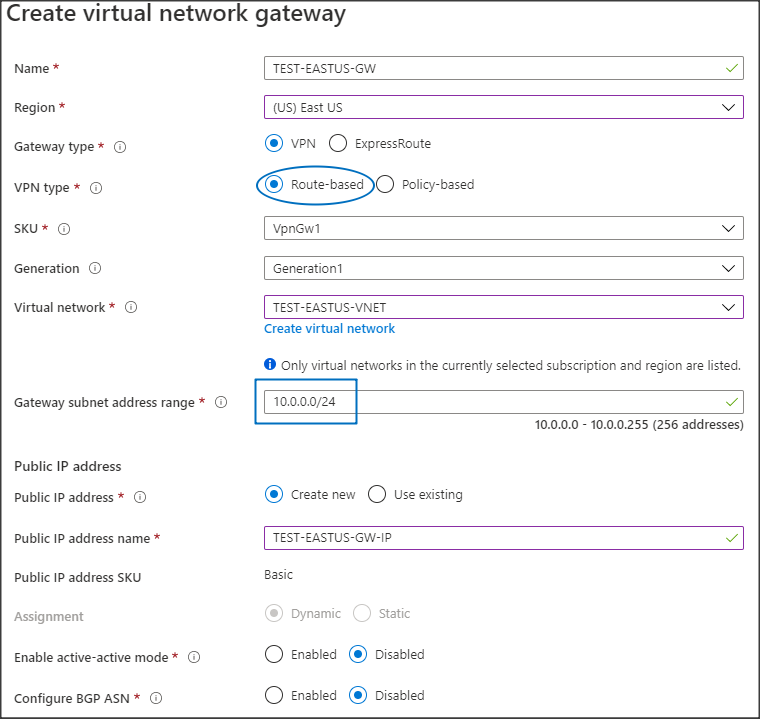
- Proceed with creating the new VNG.Note: Deployment can take 20-30 minutes to complete.
VPN Connection and Local Network Gateway
Each Azure VPN tunnel is represented by a connection under its VNG. One VNG can service multiple tunnel connections. Unlike AWS, the public VPN gateway IP address in Azure is assigned to the gateway itself, as we saw in the VNG configuration discussed above. This is similar to a typical configuration in a physical VPN gateway device. The following steps show how to create a new connection and a local network gateway. The Local network gateway represents the remote network gateway and subnets, reachable through the tunnel.- Navigate to the VNG.
- Select Connections and click the Add button.
- Select or enter the following Add connection options:
- Name: A name for the new connection.
- Connection type: Site-to-site (IPsec).
- Virtual network gateway: The parent VNG is already selected (locked in).
- Shared key (PSK): The PSK that matches on both sides fo the tunnel. This can be an arbitrary string and you can modify it later if this info is unavailable.
- IKE Protocol: IKEv2
- Resource group: The resource group is already locked in.
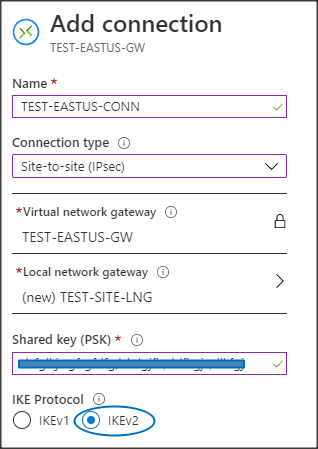
- Go back up to the Local network gateway option and select Choose a local network gateway.
- Select Create new, which opens the Create local network gateway blade.
- Select or enter the following Create local network gateway options:
- Name: A name for the local network gateway.
- IP address: The remote location gateway public IP address.
- Address space: The remote subnet.Note: Azure creates an internal static route for this subnet pointed at this VPN connection.
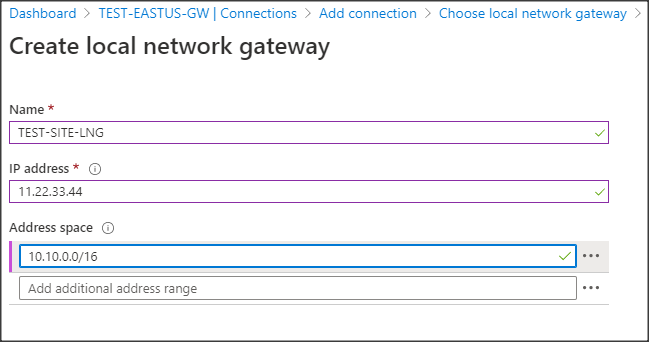
- Click OK to save the options and go back to the Add connection blade.
- Click OK to create the new connection.
Remote Site VPN Tunnel Setup
We'll configure a route-based IKEv2 VPN tunnel on the remote site gateway device to work with the newly created Azure VPN tunnel. Because we're working with the default IPsec policies on the Azure side, you must make any customization on the remote site gateway side. Those Azure defaults dictate the options chosen on the remote side. Our example below shows the setup in a physical SonicWall firewall device, but the configuration is similar on devices from other manufacturers.VPN Security Policy
First, we'll create the VPN tunnel interface:- Navigate to the VPN -> Settings tab in the SonicWall GUI.
- Click Add to create a new VPN policy. This takes you to the General tab.
- Select or enter the following Security Policy options:
- Policy Type: Tunnel Interface.
- Authentication Method: IKE using Preshared Secret.
- Name: Name for the tunnel.
- IPsec Primary Gateway Name or Address: The Azure VNG public IP address.
- Select or enter the following IKE Authentication options:
- Shared Secret and Confirm Shared Secret: Matching the Azure PSK.
- Local IKE ID: The SonicWall public IP address (with IPv4 Address selected)
- Peer IKE ID: The Azure VNG public IP address (with IPv4 Address selected)
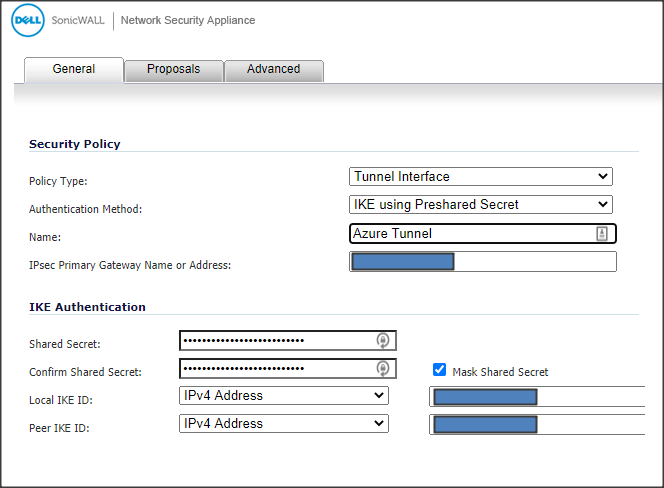
- Go to the Proposals tab.
- Select or enter the following IKE (Phase 1) Proposal options:
- Exchange: IKEv2 Mode.
- DH Group: Group 2.
- Encryption: AES-256.
- Authentication: SHA256.
- Life Time (seconds): 1800.
- Select or enter the following IPsec (Phase 2) Proposal options:
- Protocol: ESP.
- Encryption: AES-256.
- Authentication: SHA256.
- Enable Perfect Forward Secrecy: Enabled with DH Group set to Group 14.
- Life Time (seconds): 1800.
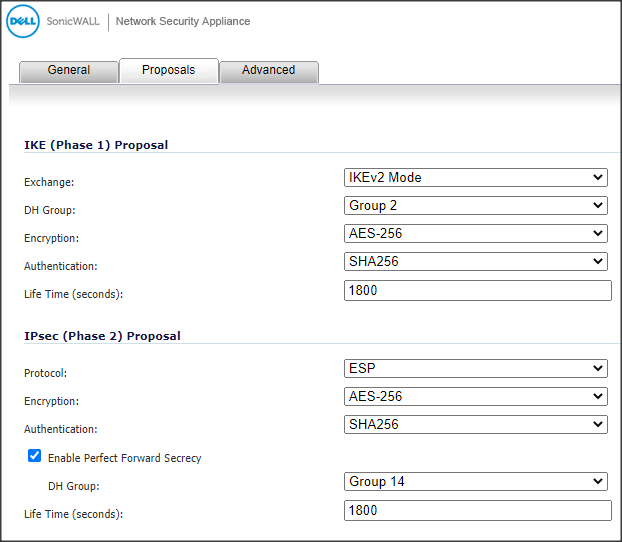 Note: Phase 1 and 2 lifetime periods are much shorter than those default values on the Azure side (3600 seconds). This forces the Azure VNG to always be the responder during the negotiation stage which allows us to enable Perfect Forward Secrecy (PFS).
- Go to the Advanced tab.
- Leave Enable Keep Alive enabled.
- Enable the Do not send trigger packet during IKE SA negotiation option.
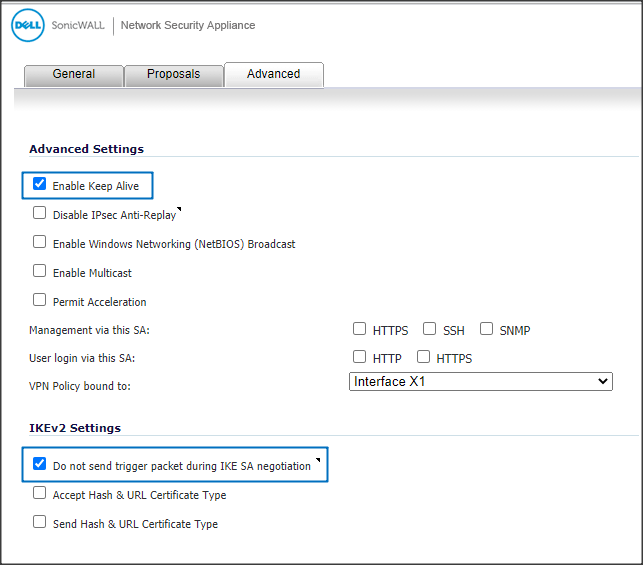
- Click OK to save the configuration.
Network Routing Policy
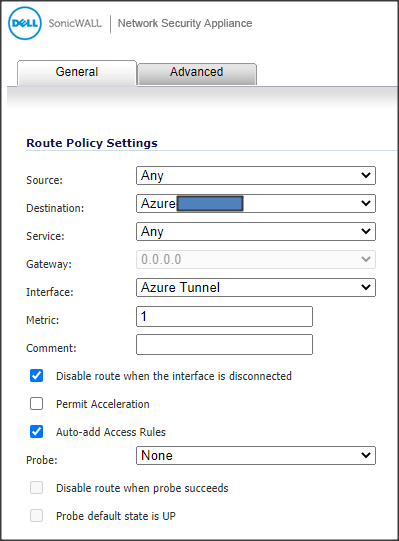
Now, you can create the necessary static route for the Azure-bound traffic.- Navigate to the Network-›Routing tab in the SonicWall GUI.
- Click Add to create a new Route Policy.
- Select the Azure network for Destination. Note: Best practice is to use a network address object for the destination. You might need to create the object prior.
- Set Interface to the VPN tunnel interface you just created.
- Click OK to create the static route.
Verification and Testing
In the Azure VNG, verify that the VPN connection status under Connections is Connected . In the remote site gateway SonicWall device, go to VPN -> Settings. Under the VPN Policies section verify the Azure VPN tunnel shows in green. In the Currently Active VPN Tunnels section you can monitor the traffic passing through. If necessary, test connectivity between the systems on both sides of the VPN tunnel.Site-to-Azure policy-based IKEv1 VPN tunnel
Some devices do not support route-based VPN tunnels, so one option is to create a new policy-based type Azure VNG to connect to those devices. However, because one Azure VNet can only connect to one VNG, this new VNG cannot connect directly to the needed VNet and additional peering and routing might be necessary. This could complicate the Azure configuration so a better solution might be to build a dedicated Azure VM that will act as a gateway. A VM running an IPsec application, such as Netgate pfSense (pfSense), can act as a VPN gateway on the Azure side. The information below demonstrates how you can set up a pfSense application running in a VM as a gateway. You'll use a physical Meraki MX firewall device that doesn't support IKEv2 (IKEv2 is supported in the beta firmware version for some Meraki MX models). You can replicate this on devices from other manufacturers that do not support IKEv2. The setup on the Meraki side dictates the level of security configured on both sides.Azure VPN Tunnel Setup
Netgate pfSense VM
First, you'll create a pfSense VM in Azure to serve as a VPN tunnel gateway. The following steps guide you through the setup:- Go to the Azure Marketplace and search for "pfsense" to find the Netgate pfSense® Firewall/VPN/Router app.
- In the app, create a virtual appliance.
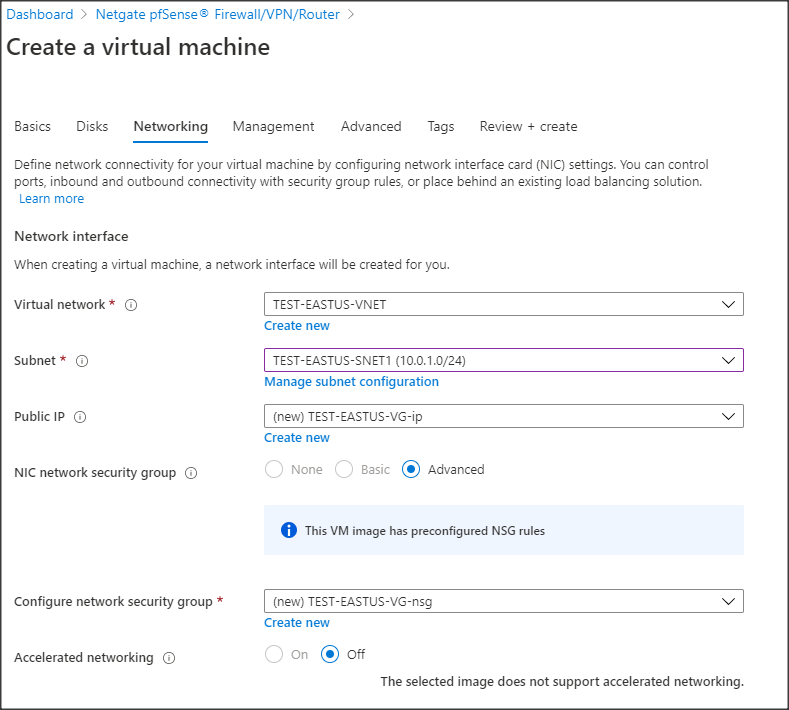
- Create the VM, selecting resources (vCPU, RAM, and disk) as you would normally do in Azure.Note: You can use minimal values for these resources during this step. You can increase them later depending on the actual traffic load.
- When choosing the Networking options, verify the network interface has the correct virtual network and subnet and that there is an assigned Public IP address:
pfSense VPN configuration
- When you create the VM and it's running, add a security rule in the VM Networking configuration to allow access from your public IP address on port 443.
- Browse to the pfSense public IP address on port 443. Use the username chosen during the VM creation and the default password pfsense to log in.
- When you are logged in, go to System -> User Manager and change the default password.
- Go to System -> Advanced -> Firewall&NAT and select the Disable Firewall option to disable all packet filtering. Note: pfSense can also act as a firewall in addition to the Azure security group configuration. Leave this option checked if your implementation requires it.
- Go to VPN -> IPsec -> Tunnels and select
 to create phase 1 of the VPN tunnel.
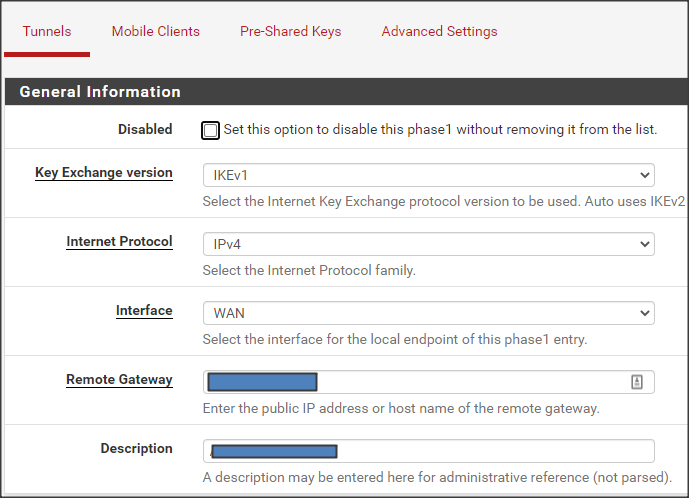
 - Select or enter the following General Information options:
- Key Exchange version: IKEv1.
- Internet Protocol: IPv4.
- Interface: WAN.
- Remote Gateway: The remote site gateway device public IP address.
- Description: A description for this VPN tunnel.
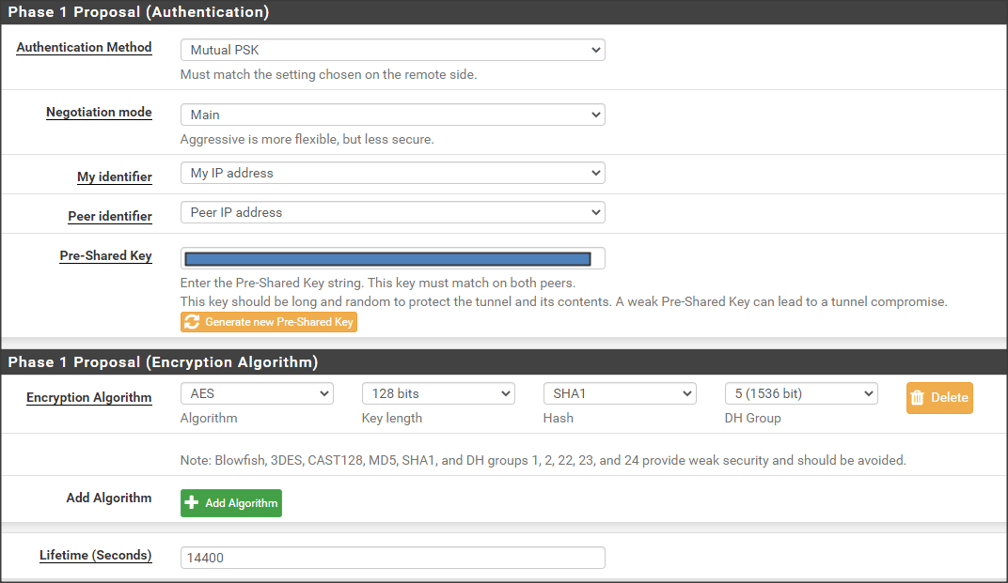
- Select or enter the following Phase 1 Proposal (Authentication) options:
- Authentication Method: Mutual PSK.
- Negotiation mode: Main.
- My identifier: My IP address.
- Peer identifier: Peer IP address.
- Click
 under the Pre-Shared Key field to generate a random PSK.
 - Select or enter the following Phase 1 Proposal (Encryption Algorithm) options:
- Algorithm: AES.
- Key length: 128 bits.
- Hash: SHA1.
- DH Group: 5 (1536 bit).
- Lifetime (Seconds): 14400.
- Click Save to finish setting up phase 1 of the VPN tunnel. This takes you back to the VPN -> IPsec -> Tunnels page.
- Click
 ->
->  to start the phase 2 VPN tunnel configuration.
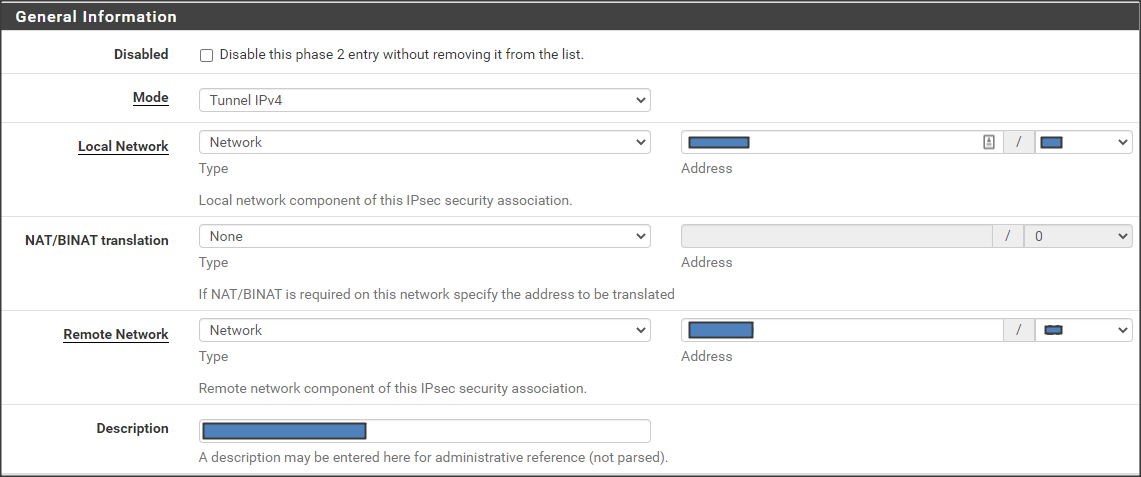
 - Select or enter the following General Information options:
- Mode: Tunnel IPv4.
- Local Network - Type: Network. Address: The Azure Vnet subnet.
- NAT/BINAT translation: None.
- Remote Network - Type: Network. Address: The remote site private subnet.
- Description: A description for this phase 2 tunnel.
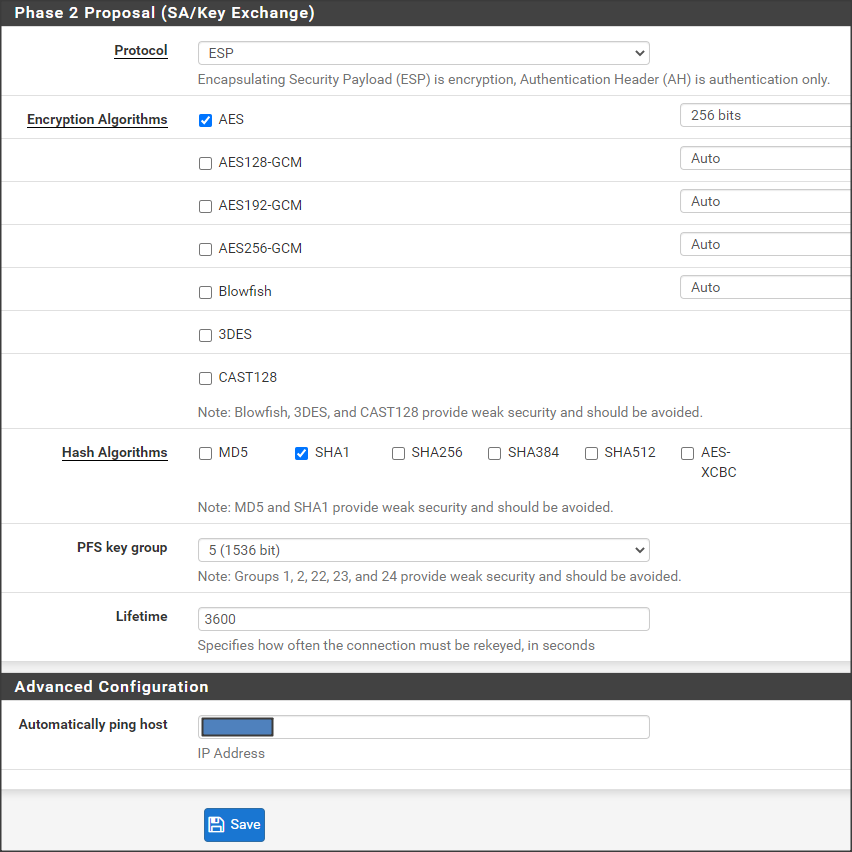
- Select or enter the following Phase 2 Proposal (SA/Key Exchange) options:
- Protocol: ESP.
- Encryption Algorithms: AES 256 bits.
- Hash Algorithms: SHA1.
- PFS key group: 5 (1536 bit).
- Lifetime: 3600.
- (Optional) In the Advanced Configuration section, you can use the Automatically ping host option as a keep-alive ICMP test.
- Click Save to finish setting up this phase 2 VPN tunnel. This takes you back to the VPN -> IPsec -> Tunnels page.
- To create additional phase 2 VPN tunnels, you can use the configuration of the recently created one as a template:
- Click
 to show the phase 2 VPN tunnel you just created.
 - Click the copy icon/button in the P2 actions column.
- Repeat steps 12 through 15 by only changing the necessary values.
- Click
Route Table to pfSense VM
Because the pfSense gateway is not a typical VNG, Azure would not have created an internal static route needed to handle the traffic bound towards the remote site network. You need to create a routing table with a static route for that purpose.- Search for "route tables" in the Azure console search bar.
- Select Route tables.
- Click Add in the upper left corner of the Route tables display.
- Select or enter the following Create route table options:
- Name: A name for the route table.
- Resource group: The same as the pfSense VM VNet.
- Virtual network gateway route propagation: Enabled.
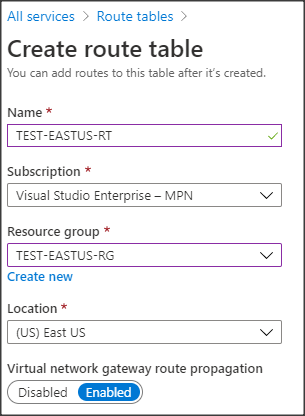
- When it's created, go to Settings -> Routes and click Add to create a route.
- Select or enter the following Add route options:
- Route name: A name for the route.
- Address prefix: The subnet of the remote site.
- Next hop type: Virtual appliance. This opens the next option.
- Next hop address: The private IP address of the pfSense VM interface.
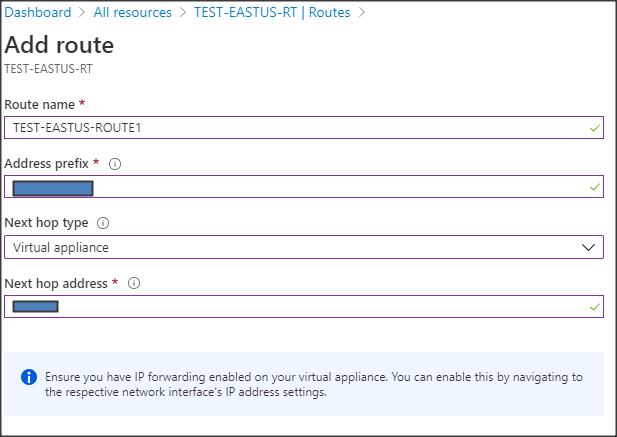 Note: As seen from the warning, the VM receives traffic not destined for its IP address, which would be normally dropped. Enabling IP forwarding in the next steps remedies this situation.
- Click OK to create the route.
- Repeat steps 5 through 7 to create any additional routes under this route table for each subnet on the remote site that needs to be reachable over the VPN tunnel.
- While still in the Route table view:
- Go to Settings -> Subnets and click Associate.
- Select the VNet and subnet where the pfSense VM is located.
- Click OK to save the association.Note: As needed, you can add additional subnets here in your particular setup.
- Locate the network interface configuration for the pfSense VM.
- Go to IP configurations under Settings.
- Enable the IP forwarding option.
Remote Site VPN Tunnel Setup
In the remote site gateway device, you'll configure a policy-based IKEv1 VPN tunnel to match settings implemented in the Azure pfSense VM. The following steps guide you through the setup:Meraki MX VPN Configuration
- In the MX Security Appliance, go to Security & SD-WAN-›Configure -> Site-to-site VPN -> Non-Meraki VPN peers.
- Select Hub (Mesh) for Type.
- Select the local subnets to include in the VPN tunnel policy.
- Click Add a peer.
- Enter a Name, following an established naming convention.
- Specify the public IP of the Azure pfSense VM for Public IP.
- Enter Private subnets. Those are all subnets on the Azure side that need to be reachable through the VPN tunnel.
- Select the Default link under IPsec policies, which opens a new window to set custom policy.
- Select or enter the following phase 1 options:
- Encryption: AES 128.
- Authentication: SHA1.
- Diffie-Hellman group: 5.
- Lifetime (seconds): 28800.
- Select or enter the following phase 2 options:
- Encryption: AES 256.
- Authentication: SHA1.
- PFS group: 5.
- Lifetime (seconds): 7200.
- When your done customizing, click Update.
- Enter the Preshared secret. You can retrieve the PSK by going back to VPN -> IPsec -> Tunnels of the pfSense GUI and editing the VPN tunnel. The PSK is in the Phase 1 Proposal (Authentication) section.
- Leave Availability set to All networks unless there is a security requirement to limit the access to the VPN tunnel from particular subnets.
- Click Save to complete the setup.
Verification and Testing
In the Azure pfSense GUI, go to Status -> IPsec -> Overview and verify the Status of the IPsec tunnel is . Click
 to show the phase 2 (child SA) tunnel's status and verify that they've also been established.
Note: It's possible to have more than one child tunnel per remote subnet. In the remote site gateway Meraki device web UI, go to
Security appliance ->
VPN and click
Non-Meraki peer. Verify the VPN tunnel has a status of "green." In the pfSense web UI, the
Diagnostics-›
Ping page provides a way to test with ping. If necessary, test connectivity between machines on both sides of the VPN tunnel.
Note: If the VPN connection doesn't establish or is unstable, it might be necessary to change the security options (Encryption, Authentication, DH group, PFS) to less secure values. The same applies if the on-premises gateway device doesn't support the options used in the above examples.
Conclusion
We covered two scenarios for a VPN connection from Azure to a remote site. With the increasing support for IKEv2, we'll see route-based VPN tunnels becoming the standard, and policy-based VPN connections the exception.Share this
- Technical Track (967)
- Oracle (400)
- MySQL (137)
- Cloud (128)
- Open Source (90)
- Google Cloud (81)
- DBA Lounge (76)
- Microsoft SQL Server (76)
- Technical Blog (74)
- Big Data (52)
- AWS (49)
- Google Cloud Platform (46)
- Cassandra (44)
- DevOps (41)
- Azure (38)
- Pythian (33)
- Linux (30)
- Database (26)
- Podcasts (25)
- Site Reliability Engineering (25)
- Performance (24)
- SQL Server (24)
- Microsoft Azure (23)
- Oracle E-Business Suite (23)
- PostgreSQL (23)
- Oracle Database (22)
- Docker (21)
- Group Blog Posts (20)
- Security (20)
- DBA (19)
- Log Buffer (19)
- SQL (19)
- Exadata (18)
- Mongodb (18)
- Oracle Cloud Infrastructure (OCI) (18)
- Oracle Exadata (18)
- Automation (17)
- Hadoop (16)
- Oracleebs (16)
- Amazon RDS (15)
- Ansible (15)
- Ebs (15)
- Snowflake (15)
- ASM (13)
- BigQuery (13)
- Patching (13)
- RDS (13)
- Replication (13)
- Advanced Analytics (12)
- Data (12)
- GenAI (12)
- Kubernetes (12)
- Oracle 12C (12)
- Backup (11)
- LLM (11)
- Machine Learning (11)
- OCI (11)
- Rman (11)
- Cloud Migration (10)
- Datascape Podcast (10)
- Monitoring (10)
- R12 (10)
- 12C (9)
- AI (9)
- Apache Cassandra (9)
- Data Guard (9)
- Infrastructure (9)
- Oracle 19C (9)
- Oracle Applications (9)
- Python (9)
- Series (9)
- AWR (8)
- Amazon Web Services (AWS) (8)
- Articles (8)
- High Availability (8)
- Oracle EBS (8)
- Percona (8)
- Powershell (8)
- Recovery (8)
- Weblogic (8)
- Apache Beam (7)
- Backups (7)
- Data Governance (7)
- Goldengate (7)
- Innodb (7)
- Migration (7)
- Myrocks (7)
- OEM (7)
- Oracle Enterprise Manager (OEM) (7)
- Performance Tuning (7)
- Authentication (6)
- ChatGPT-4 (6)
- Data Enablement (6)
- Data Visualization (6)
- Database Performance (6)
- E-Business Suite (6)
- Fmw (6)
- Grafana (6)
- Oracle Enterprise Manager (6)
- Orchestrator (6)
- Postgres (6)
- Rac (6)
- Renew Refresh Republish (6)
- RocksDB (6)
- Serverless (6)
- Upgrade (6)
- 19C (5)
- Azure Data Factory (5)
- Azure Synapse Analytics (5)
- Cpu (5)
- Disaster Recovery (5)
- Error (5)
- Generative AI (5)
- Google BigQuery (5)
- Indexes (5)
- Love Letters To Data (5)
- Mariadb (5)
- Microsoft (5)
- Proxysql (5)
- Scala (5)
- Sql Server Administration (5)
- VMware (5)
- Windows (5)
- Xtrabackup (5)
- Airflow (4)
- Analytics (4)
- Apex (4)
- Best Practices (4)
- Centrally Managed Users (4)
- Cli (4)
- Cloud Spanner (4)
- Cockroachdb (4)
- Configuration Management (4)
- Container (4)
- Data Management (4)
- Data Pipeline (4)
- Data Security (4)
- Data Strategy (4)
- Database Administrator (4)
- Database Management (4)
- Database Migration (4)
- Dataflow (4)
- Dbsat (4)
- Elasticsearch (4)
- Fahd Mirza (4)
- Fusion Middleware (4)
- Google (4)
- Io (4)
- Java (4)
- Kafka (4)
- Middleware (4)
- Mysql 8 (4)
- Network (4)
- Ocidtab (4)
- Opatch (4)
- Oracle Autonomous Database (Adb) (4)
- Oracle Cloud (4)
- Pitr (4)
- Post-Mortem Analysis (4)
- Prometheus (4)
- Redhat (4)
- September 9Th 2015 (4)
- Sql2016 (4)
- Ssl (4)
- Terraform (4)
- Workflow (4)
- 2Fa (3)
- Alwayson (3)
- Amazon Relational Database Service (Rds) (3)
- Apache Kafka (3)
- Apexexport (3)
- Aurora (3)
- Azure Sql Db (3)
- Business Intelligence (3)
- Cdb (3)
- ChatGPT (3)
- Cloud Armor (3)
- Cloud Database (3)
- Cloud FinOps (3)
- Cloud Security (3)
- Cluster (3)
- Consul (3)
- Cosmos Db (3)
- Covid19 (3)
- Crontab (3)
- Data Analytics (3)
- Data Integration (3)
- Database 12C (3)
- Database Monitoring (3)
- Database Troubleshooting (3)
- Database Upgrade (3)
- Databases (3)
- Dataops (3)
- Dbt (3)
- Digital Transformation (3)
- ERP (3)
- Google Chrome (3)
- Google Cloud Sql (3)
- Graphite (3)
- Haproxy (3)
- Heterogeneous Database Migration (3)
- Hugepages (3)
- Inside Pythian (3)
- Installation (3)
- Json (3)
- Keras (3)
- Ldap (3)
- Liquibase (3)
- Love Letter (3)
- Lua (3)
- Mfa (3)
- Multitenant (3)
- Mysql 5.7 (3)
- Mysql Configuration (3)
- Nginx (3)
- Nodetool (3)
- Non-Tech Articles (3)
- Oem 13C (3)
- Oms (3)
- Oracle 18C (3)
- Oracle Data Guard (3)
- Oracle Live Sql (3)
- Oracle Rac (3)
- Patch (3)
- Perl (3)
- Pmm (3)
- Pt-Online-Schema-Change (3)
- Rdbms (3)
- Recommended (3)
- Remote Teams (3)
- Reporting (3)
- Reverse Proxy (3)
- S3 (3)
- Spark (3)
- Sql On The Edge (3)
- Sql Server Configuration (3)
- Sql Server On Linux (3)
- Ssis (3)
- Ssis Catalog (3)
- Stefan Knecht (3)
- Striim (3)
- Sysadmin (3)
- System Versioned (3)
- Systemd (3)
- Temporal Tables (3)
- Tensorflow (3)
- Tools (3)
- Tuning (3)
- Vasu Balla (3)
- Vault (3)
- Vulnerability (3)
- Waf (3)
- 18C (2)
- Adf (2)
- Adop (2)
- Agent (2)
- Agile (2)
- Amazon Data Migration Service (2)
- Amazon Ec2 (2)
- Amazon S3 (2)
- Apache Flink (2)
- Apple (2)
- Apps (2)
- Ashdump (2)
- Atp (2)
- Audit (2)
- Automatic Backups (2)
- Autonomous (2)
- Autoupgrade (2)
- Awr Data Mining (2)
- Azure Sql (2)
- Azure Sql Data Sync (2)
- Bash (2)
- Business (2)
- Caching (2)
- Cassandra Nodetool (2)
- Cdap (2)
- Certification (2)
- Cloning (2)
- Cloud Cost Optimization (2)
- Cloud Data Fusion (2)
- Cloud Hosting (2)
- Cloud Infrastructure (2)
- Cloud Shell (2)
- Cloud Sql (2)
- Cloudscape (2)
- Cluster Level Consistency (2)
- Conferences (2)
- Consul-Template (2)
- Containerization (2)
- Containers (2)
- Cosmosdb (2)
- Cost Management (2)
- Costs (2)
- Cql (2)
- Cqlsh (2)
- Cyber Security (2)
- Data Analysis (2)
- Data Discovery (2)
- Data Engineering (2)
- Data Migration (2)
- Data Modeling (2)
- Data Quality (2)
- Data Streaming (2)
- Data Warehouse (2)
- Database Consulting (2)
- Database Migrations (2)
- Dataguard (2)
- Datapump (2)
- Ddl (2)
- Debezium (2)
- Dictionary Views (2)
- Dms (2)
- Docker-Composer (2)
- Dr (2)
- Duplicate (2)
- Ecc (2)
- Elastic (2)
- Elastic Stack (2)
- Em12C (2)
- Encryption (2)
- Enterprise Data Platform (EDP) (2)
- Enterprise Manager (2)
- Etl (2)
- Events (2)
- Exachk (2)
- Filter Driver (2)
- Flume (2)
- Full Text Search (2)
- Galera (2)
- Gemini (2)
- General Purpose Ssd (2)
- Gh-Ost (2)
- Gke (2)
- Google Workspace (2)
- Hanganalyze (2)
- Hdfs (2)
- Health Check (2)
- Historical Trends (2)
- Incremental (2)
- Infiniband (2)
- Infrastructure As Code (2)
- Innodb Cluster (2)
- Innodb File Structure (2)
- Innodb Group Replication (2)
- Install (2)
- Internals (2)
- Java Web Start (2)
- Kibana (2)
- Log (2)
- Log4J (2)
- Logs (2)
- Memory (2)
- Merge Replication (2)
- Metrics (2)
- Mutex (2)
- MySQLShell (2)
- NLP (2)
- Neo4J (2)
- Node.Js (2)
- Nosql (2)
- November 11Th 2015 (2)
- Ntp (2)
- Oci Iam (2)
- Oem12C (2)
- Omspatcher (2)
- Opatchauto (2)
- Open Source Database (2)
- Operational Excellence (2)
- Oracle 11G (2)
- Oracle Datase (2)
- Oracle Extended Manager (Oem) (2)
- Oracle Flashback (2)
- Oracle Forms (2)
- Oracle Installation (2)
- Oracle Io Testing (2)
- Pdb (2)
- Podcast (2)
- Power Bi (2)
- Puppet (2)
- Pythian Europe (2)
- R12.2 (2)
- Redshift (2)
- Remote DBA (2)
- Remote Sre (2)
- SAP HANA Cloud (2)
- Sap Migration (2)
- Scale (2)
- Schema (2)
- September 30Th 2015 (2)
- September 3Rd 2015 (2)
- Shell (2)
- Simon Pane (2)
- Single Sign-On (2)
- Sql Server On Gke (2)
- Sqlplus (2)
- Sre (2)
- Ssis Catalog Error (2)
- Ssisdb (2)
- Standby (2)
- Statspack Mining (2)
- Systemstate Dump (2)
- Tablespace (2)
- Technical Training (2)
- Tempdb (2)
- Tfa (2)
- Throughput (2)
- Tls (2)
- Tombstones (2)
- Transactional Replication (2)
- User Groups (2)
- Vagrant (2)
- Variables (2)
- Virtual Machine (2)
- Virtual Machines (2)
- Virtualbox (2)
- Web Application Firewall (2)
- Webinars (2)
- X5 (2)
- scalability (2)
- //Build2019 (1)
- 11G (1)
- 12.1 (1)
- 12Cr1 (1)
- 12Cr2 (1)
- 18C Grid Installation (1)
- 2022 (1)
- 2022 Snowflake Summit (1)
- AI Platform (1)
- AI Summit (1)
- Actifio (1)
- Active Directory (1)
- Adaptive Hash Index (1)
- Adf Custom Email (1)
- Adobe Flash (1)
- Adrci (1)
- Advanced Data Services (1)
- Afd (1)
- After Logon Trigger (1)
- Ahf (1)
- Aix (1)
- Akka (1)
- Alloydb (1)
- Alter Table (1)
- Always On (1)
- Always On Listener (1)
- Alwayson With Gke (1)
- Amazon (1)
- Amazon Athena (1)
- Amazon Aurora Backtrack (1)
- Amazon Efs (1)
- Amazon Redshift (1)
- Amazon Sagemaker (1)
- Amazon Vpc Flow Logs (1)
- Amdu (1)
- Analysis (1)
- Analytical Models (1)
- Analyzing Bigquery Via Sheets (1)
- Anisble (1)
- Annual Mysql Community Dinner (1)
- Anthos (1)
- Apache (1)
- Apache Nifi (1)
- Apache Spark (1)
- Application Migration (1)
- Architect (1)
- Architecture (1)
- Ash (1)
- Asmlib (1)
- Atlas CLI (1)
- Audit In Postgres (1)
- Audit In Postgresql (1)
- Auto Failover (1)
- Auto Increment (1)
- Auto Index (1)
- Autoconfig (1)
- Automated Reports (1)
- Automl (1)
- Autostart (1)
- Awr Mining (1)
- Aws Glue (1)
- Aws Lake Formation (1)
- Aws Lambda (1)
- Azure Analysis Services (1)
- Azure Blob Storage (1)
- Azure Cognitive Search (1)
- Azure Data (1)
- Azure Data Lake (1)
- Azure Data Lake Analytics (1)
- Azure Data Lake Store (1)
- Azure Data Migration Service (1)
- Azure Dma (1)
- Azure Dms (1)
- Azure Document Intelligence (1)
- Azure Integration Runtime (1)
- Azure OpenAI (1)
- Azure Sql Data Warehouse (1)
- Azure Sql Dw (1)
- Azure Sql Managed Instance (1)
- Azure Vm (1)
- Backup For Sql Server (1)
- Bacpac (1)
- Bag (1)
- Bare Metal Solution (1)
- Batch Operation (1)
- Batches In Cassandra (1)
- Beats (1)
- Best Practice (1)
- Bi Publisher (1)
- Binary Logging (1)
- Bind Variables (1)
- Bitnami (1)
- Blob Storage Endpoint (1)
- Blockchain (1)
- Browsers (1)
- Btp Architecture (1)
- Btp Components (1)
- Buffer Pool (1)
- Bug (1)
- Bugs (1)
- Build 2019 Updates (1)
- Build Cassandra (1)
- Bundle Patch (1)
- Bushy Join (1)
- Business Continuity (1)
- Business Insights (1)
- Business Process Modelling (1)
- Business Reputation (1)
- CAPEX (1)
- Capacity Planning (1)
- Career (1)
- Career Development (1)
- Cassandra-Cli (1)
- Catcon.Pm (1)
- Catctl.Pl (1)
- Catupgrd.Sql (1)
- Cbo (1)
- Cdb Duplication (1)
- Certificate (1)
- Certificate Management (1)
- Chaos Engineering (1)
- Cheatsheet (1)
- Checkactivefilesandexecutables (1)
- Chmod (1)
- Chown (1)
- Chrome Enterprise (1)
- Chrome Security (1)
- Cl-Series (1)
- Cleanup (1)
- Cloud Browser (1)
- Cloud Build (1)
- Cloud Consulting (1)
- Cloud Data Warehouse (1)
- Cloud Database Management (1)
- Cloud Dataproc (1)
- Cloud Foundry (1)
- Cloud Manager (1)
- Cloud Migations (1)
- Cloud Networking (1)
- Cloud SQL Replica (1)
- Cloud Scheduler (1)
- Cloud Services (1)
- Cloud Strategies (1)
- Cloudformation (1)
- Cluster Resource (1)
- Cmo (1)
- Cockroach Db (1)
- Coding Benchmarks (1)
- Colab (1)
- Collectd (1)
- Columnar (1)
- Communication Plans (1)
- Community (1)
- Compact Storage (1)
- Compaction (1)
- Compliance (1)
- Compression (1)
- Compute Instances (1)
- Compute Node (1)
- Concurrent Manager (1)
- Concurrent Processing (1)
- Configuration (1)
- Consistency Level (1)
- Consolidation (1)
- Conversational AI (1)
- Covid-19 (1)
- Cpu Patching (1)
- Cqlsstablewriter (1)
- Crash (1)
- Create Catalog Error (1)
- Create_File_Dest (1)
- Credentials (1)
- Cross Platform (1)
- CrowdStrike (1)
- Crsctl (1)
- Custom Instance Images (1)
- Cve-2022-21500 (1)
- Cvu (1)
- Cypher Queries (1)
- DAX (1)
- DBSAT 3 (1)
- Dacpac (1)
- Dag (1)
- Data Analytics Platform (1)
- Data Box (1)
- Data Classification (1)
- Data Cleansing (1)
- Data Encryption (1)
- Data Estate (1)
- Data Flow Management (1)
- Data Insights (1)
- Data Integrity (1)
- Data Lake (1)
- Data Leader (1)
- Data Lifecycle Management (1)
- Data Lineage (1)
- Data Masking (1)
- Data Mesh (1)
- Data Migration Assistant (1)
- Data Migration Service (1)
- Data Mining (1)
- Data Monetization (1)
- Data Policy (1)
- Data Profiling (1)
- Data Protection (1)
- Data Retention (1)
- Data Safe (1)
- Data Sheets (1)
- Data Summit (1)
- Data Vault (1)
- Data Warehouse Modernization (1)
- Database Auditing (1)
- Database Consultant (1)
- Database Link (1)
- Database Modernization (1)
- Database Provisioning (1)
- Database Provisioning Failed (1)
- Database Replication (1)
- Database Scaling (1)
- Database Schemas (1)
- Database Security (1)
- Databricks (1)
- Datadog (1)
- Datafile (1)
- Datapatch (1)
- Dataprivacy (1)
- Datascape 59 (1)
- Datasets (1)
- Datastax Cassandra (1)
- Datastax Opscenter (1)
- Datasync Error (1)
- Db_Create_File_Dest (1)
- Dbaas (1)
- Dbatools (1)
- Dbcc Checkident (1)
- Dbms_Cloud (1)
- Dbms_File_Transfer (1)
- Dbms_Metadata (1)
- Dbms_Service (1)
- Dbms_Stats (1)
- Dbupgrade (1)
- Deep Learning (1)
- Delivery (1)
- Devd (1)
- Dgbroker (1)
- Dialogflow (1)
- Dict0Dict (1)
- Did You Know (1)
- Direct Path Read Temp (1)
- Disk Groups (1)
- Disk Management (1)
- Diskgroup (1)
- Dispatchers (1)
- Distributed Ag (1)
- Distribution Agent (1)
- Documentation (1)
- Download (1)
- Dp Agent (1)
- Duet AI (1)
- Duplication (1)
- Dynamic Sampling (1)
- Dynamic Tasks (1)
- E-Business Suite Cpu Patching (1)
- E-Business Suite Patching (1)
- Ebs Sso (1)
- Ec2 (1)
- Edb Postgresql Advanced Server (1)
- Edb Postgresql Password Verify Function (1)
- Editions (1)
- Edp (1)
- El Carro (1)
- Elassandra (1)
- Elk Stack (1)
- Em13Cr2 (1)
- Emcli (1)
- End of Life (1)
- Engineering (1)
- Enqueue (1)
- Enterprise (1)
- Enterprise Architecture (1)
- Enterprise Command Centers (1)
- Enterprise Manager Command Line Interface (Em Cli (1)
- Enterprise Plus (1)
- Episode 58 (1)
- Error Handling (1)
- Exacc (1)
- Exacheck (1)
- Exacs (1)
- Exadata Asr (1)
- Execution (1)
- Executive Sponsor (1)
- Expenditure (1)
- Export Sccm Collection To Csv (1)
- External Persistent Volumes (1)
- Fail (1)
- Failed Upgrade (1)
- Failover In Postgresql (1)
- Fall 2021 (1)
- Fast Recovery Area (1)
- Flash Recovery Area (1)
- Flashback (1)
- Fnd (1)
- Fndsm (1)
- Force_Matching_Signature (1)
- Fra Full (1)
- Framework (1)
- Freebsd (1)
- Fsync (1)
- Function-Based Index (1)
- GCVE Architecture (1)
- GPQA (1)
- Gaming (1)
- Garbagecollect (1)
- Gcp Compute (1)
- Gcp-Spanner (1)
- Geography (1)
- Geth (1)
- Getmospatch (1)
- Git (1)
- Global Analytics (1)
- Google Analytics (1)
- Google Cloud Architecture Framework (1)
- Google Cloud Data Services (1)
- Google Cloud Partner (1)
- Google Cloud Spanner (1)
- Google Cloud VMware Engine (1)
- Google Compute Engine (1)
- Google Dataflow (1)
- Google Datalab (1)
- Google Grab And Go (1)
- Google Sheets (1)
- Gp2 (1)
- Graph Algorithms (1)
- Graph Databases (1)
- Graph Inferences (1)
- Graph Theory (1)
- GraphQL (1)
- Graphical User Interface (Gui) (1)
- Grid (1)
- Grid Infrastructure (1)
- Griddisk Resize (1)
- Grp (1)
- Guaranteed Restore Point (1)
- Guid Mismatch (1)
- HR Technology (1)
- HRM (1)
- Ha (1)
- Hang (1)
- Hashicorp (1)
- Hbase (1)
- Hcc (1)
- Hdinsight (1)
- Healthcheck (1)
- Hemantgiri S. Goswami (1)
- Hortonworks (1)
- How To Install Ssrs (1)
- Hr (1)
- Httpchk (1)
- Https (1)
- Huge Pages (1)
- HumanEval (1)
- Hung Database (1)
- Hybrid Columnar Compression (1)
- Hyper-V (1)
- Hyperscale (1)
- Hypothesis Driven Development (1)
- Ibm (1)
- Identity Management (1)
- Idm (1)
- Ilom (1)
- Imageinfo (1)
- Impdp (1)
- In Place Upgrade (1)
- Incident Response (1)
- Indempotent (1)
- Indexing In Mongodb (1)
- Influxdb (1)
- Information (1)
- Infrastructure As A Code (1)
- Injection (1)
- Innobackupex (1)
- Innodb Concurrency (1)
- Innodb Flush Method (1)
- Insights (1)
- Installing (1)
- Instance Cloning (1)
- Integration Services (1)
- Integrations (1)
- Interactive_Timeout (1)
- Interval Partitioning (1)
- Invisible Indexes (1)
- Io1 (1)
- IoT (1)
- Iops (1)
- Iphone (1)
- Ipv6 (1)
- Iscsi (1)
- Iscsi-Initiator-Utils (1)
- Iscsiadm (1)
- Issues (1)
- It Industry (1)
- It Teams (1)
- JMX Metrics (1)
- Jared Still (1)
- Javascript (1)
- Jdbc (1)
- Jinja2 (1)
- Jmx (1)
- Jmx Monitoring (1)
- Jvm (1)
- Jython (1)
- K8S (1)
- Kernel (1)
- Key Btp Components (1)
- Kfed (1)
- Kill Sessions (1)
- Knapsack (1)
- Kubeflow (1)
- LMSYS Chatbot Arena (1)
- Large Pages (1)
- Latency (1)
- Latest News (1)
- Leadership (1)
- Leap Second (1)
- Limits (1)
- Line 1 (1)
- Linkcolumn (1)
- Linux Host Monitoring (1)
- Linux Storage Appliance (1)
- Listener (1)
- Loadavg (1)
- Lock_Sga (1)
- Locks (1)
- Log File Switch (Archiving Needed) (1)
- Logfile (1)
- Looker (1)
- Lvm (1)
- MMLU (1)
- Managed Instance (1)
- Managed Services (1)
- Management (1)
- Management Servers (1)
- Marketing (1)
- Marketing Analytics (1)
- Martech (1)
- Masking (1)
- Megha Bedi (1)
- Metadata (1)
- Method-R Workbench (1)
- Metric (1)
- Metric Extensions (1)
- Michelle Gutzait (1)
- Microservices (1)
- Microsoft Azure Sql Database (1)
- Microsoft Build (1)
- Microsoft Build 2019 (1)
- Microsoft Ignite (1)
- Microsoft Inspire 2019 (1)
- Migrate (1)
- Migrating Ssis Catalog (1)
- Migrating To Azure Sql (1)
- Migration Checklist (1)
- Mirroring (1)
- Mismatch (1)
- Model Governance (1)
- Monetization (1)
- MongoDB Atlas (1)
- MongoDB Compass (1)
- Ms Excel (1)
- Msdtc (1)
- Msdtc In Always On (1)
- Msdtc In Cluster (1)
- Multi-IP (1)
- Multicast (1)
- Multipath (1)
- My.Cnf (1)
- MySQL Shell Logical Backup (1)
- MySQLDump (1)
- Mysql Enterprise (1)
- Mysql Plugin For Oracle Enterprise Manager (1)
- Mysql Replication Filters (1)
- Mysql Server (1)
- Mysql-Python (1)
- Nagios (1)
- Ndb (1)
- Net_Read_Timeout (1)
- Net_Write_Timeout (1)
- Netcat (1)
- Newsroom (1)
- Nfs (1)
- Nifi (1)
- Node (1)
- November 10Th 2015 (1)
- November 6Th 2015 (1)
- Null Columns (1)
- Nullipotent (1)
- OPEX (1)
- ORAPKI (1)
- O_Direct (1)
- Oacore (1)
- October 21St 2015 (1)
- October 6Th 2015 (1)
- October 8Th 2015 (1)
- Oda (1)
- Odbcs (1)
- Odbs (1)
- Odi (1)
- Oel (1)
- Ohs (1)
- Olvm (1)
- On-Prem To Azure Sql (1)
- On-Premises (1)
- Onclick (1)
- Open.Canada.Ca (1)
- Openstack (1)
- Operating System Monitoring (1)
- Oplog (1)
- Opsworks (1)
- Optimization (1)
- Optimizer (1)
- Ora-01852 (1)
- Ora-7445 (1)
- Oracle 19 (1)
- Oracle 20C (1)
- Oracle Cursor (1)
- Oracle Database 12.2 (1)
- Oracle Database Appliance (1)
- Oracle Database Se2 (1)
- Oracle Database Standard Edition 2 (1)
- Oracle Database Upgrade (1)
- Oracle Database@Google Cloud (1)
- Oracle Exadata Smart Scan (1)
- Oracle Licensing (1)
- Oracle Linux Virtualization Manager (1)
- Oracle Oda (1)
- Oracle Openworld (1)
- Oracle Parallelism (1)
- Oracle Rdbms (1)
- Oracle Real Application Clusters (1)
- Oracle Reports (1)
- Oracle Security (1)
- Oracle Wallet (1)
- Orasrp (1)
- Organizational Change (1)
- Orion (1)
- Os (1)
- Osbws_Install.Jar (1)
- Oui Gui (1)
- Output (1)
- Owox (1)
- Paas (1)
- Package Deployment Wizard Error (1)
- Parallel Execution (1)
- Parallel Query (1)
- Parallel Query Downgrade (1)
- Partitioning (1)
- Partitions (1)
- Password (1)
- Password Change (1)
- Password Recovery (1)
- Password Verify Function In Postgresql (1)
- Patches (1)
- Patchmgr (1)
- Pdb Duplication (1)
- Penalty (1)
- Perfomrance (1)
- Performance Schema (1)
- Pg 15 (1)
- Pg_Rewind (1)
- Pga (1)
- Pipeline Debugging (1)
- Pivot (1)
- Planning (1)
- Plsql (1)
- Policy (1)
- Polybase (1)
- Post-Acquisition (1)
- Post-Covid It (1)
- Postgresql Complex Password (1)
- Postgresql With Repmgr Integration (1)
- Pq (1)
- Preliminar Connection (1)
- Preliminary Connection (1)
- Privatecloud (1)
- Process Mining (1)
- Production (1)
- Productivity (1)
- Profile In Edb Postgresql (1)
- Programming (1)
- Prompt Engineering (1)
- Provisioned Iops (1)
- Provisiones Iops (1)
- Proxy Monitoring (1)
- Psu (1)
- Public Cloud (1)
- Pubsub (1)
- Purge (1)
- Purge Thread (1)
- Pythian Blackbird Acquisition (1)
- Pythian Goodies (1)
- Pythian News (1)
- Python Pandas (1)
- Query Performance (1)
- Quicksight (1)
- Quota Limits (1)
- R12 R12.2 Cp Concurrent Processing Abort (1)
- R12.1.3 (1)
- REF! (1)
- Ram Cache (1)
- Rbac (1)
- Rdb (1)
- Rds_File_Util (1)
- Read Free Replication (1)
- Read Latency (1)
- Read Only (1)
- Read Replica (1)
- Reboot (1)
- Recruiting (1)
- Redo Size (1)
- Relational Database Management System (1)
- Release (1)
- Release Automation (1)
- Repair (1)
- Replication Compatibility (1)
- Replication Error (1)
- Repmgr (1)
- Repmgrd (1)
- Reporting Services 2019 (1)
- Resiliency Planning (1)
- Resource Manager (1)
- Resources (1)
- Restore (1)
- Restore Point (1)
- Retail (1)
- Rhel (1)
- Risk (1)
- Risk Management (1)
- Rocksrb (1)
- Role In Postgresql (1)
- Rollback (1)
- Rolling Patch (1)
- Row0Purge (1)
- Rpm (1)
- Rule "Existing Clustered Or Clustered-Prepared In (1)
- Running Discovery On Remote Machine (1)
- SAP (1)
- SQL Optimization (1)
- SQL Tracing (1)
- SSRS Administration (1)
- SaaS (1)
- Sap Assessment (1)
- Sap Assessment Report (1)
- Sap Backup Restore (1)
- Sap Btp Architecture (1)
- Sap Btp Benefits (1)
- Sap Btp Model (1)
- Sap Btp Services (1)
- Sap Homogenous System Copy Method (1)
- Sap Landscape Copy (1)
- Sap Migration Assessment (1)
- Sap On Mssql (1)
- Sap System Copy (1)
- Sar (1)
- Scaling Ir (1)
- Sccm (1)
- Sccm Powershell (1)
- Scheduler (1)
- Scheduler_Job (1)
- Schedulers (1)
- Scheduling (1)
- Scott Mccormick (1)
- Scripts (1)
- Sdp (1)
- Secrets (1)
- Securing Sql Server (1)
- Security Compliance (1)
- Sed (Stream Editor) (1)
- Self Hosted Ir (1)
- Semaphore (1)
- Seps (1)
- September 11Th 2015 (1)
- Serverless Computing (1)
- Serverless Framework (1)
- Service Broker (1)
- Service Bus (1)
- Shared Connections (1)
- Shared Storage (1)
- Shellshock (1)
- Signals (1)
- Silent (1)
- Slave (1)
- Slob (1)
- Smart Scan (1)
- Smtp (1)
- Snapshot (1)
- Snowday Fall 2021 (1)
- Socat (1)
- Software Development (1)
- Software Engineering (1)
- Solutions Architecture (1)
- Spanner-Backups (1)
- Sphinx (1)
- Split Brain In Postgresql (1)
- Spm (1)
- Sql Agent (1)
- Sql Backup To Url Error (1)
- Sql Cluster Installer Hang (1)
- Sql Database (1)
- Sql Developer (1)
- Sql On Linux (1)
- Sql Server 2014 (1)
- Sql Server 2016 (1)
- Sql Server Agent On Linux (1)
- Sql Server Backups (1)
- Sql Server Denali Is Required To Install Integrat (1)
- Sql Server Health Check (1)
- Sql Server Troubleshooting On Linux (1)
- Sql Server Version (1)
- Sql Setup (1)
- Sql Vm (1)
- Sql2K19Ongke (1)
- Sqldatabase Serverless (1)
- Ssh User Equivalence (1)
- Ssis Denali Error (1)
- Ssis Install Error E Xisting Clustered Or Cluster (1)
- Ssis Package Deployment Error (1)
- Ssisdb Master Key (1)
- Ssisdb Restore Error (1)
- Sso (1)
- Ssrs 2019 (1)
- Sstable2Json (1)
- Sstableloader (1)
- Sstablesimpleunsortedwriter (1)
- Stack Dump (1)
- Standard Edition (1)
- Startup Process (1)
- Statistics (1)
- Statspack (1)
- Statspack Data Mining (1)
- Statspack Erroneously Reporting (1)
- Statspack Issues (1)
- Storage (1)
- Stored Procedure (1)
- Strategies (1)
- Streaming (1)
- Sunos (1)
- Swap (1)
- Swapping (1)
- Switch (1)
- Syft (1)
- Synapse (1)
- Sync Failed There Is Not Enough Space On The Disk (1)
- Sys Schema (1)
- System Function (1)
- Systems Administration (1)
- T-Sql (1)
- Table Optimization (1)
- Tablespace Growth (1)
- Tablespaces (1)
- Tags (1)
- Tar (1)
- Tde (1)
- Team Management (1)
- Tech Debt (1)
- Technology (1)
- Telegraf (1)
- Tempdb Encryption (1)
- Templates (1)
- Temporary Tablespace (1)
- Tenserflow (1)
- Teradata (1)
- Testing New Cassandra Builds (1)
- There Is Not Enough Space On The Disk (1)
- Thick Data (1)
- Third-Party Data (1)
- Thrift (1)
- Thrift Data (1)
- Tidb (1)
- Time Series (1)
- Time-Drift (1)
- Tkprof (1)
- Tmux (1)
- Tns (1)
- Trace (1)
- Tracefile (1)
- Training (1)
- Transaction Log (1)
- Transactions (1)
- Transformation Navigator (1)
- Transparent Data Encryption (1)
- Trigger (1)
- Triggers On Memory-Optimized Tables Must Use With (1)
- Troubleshooting (1)
- Tungsten (1)
- Tvdxtat (1)
- Twitter (1)
- U-Sql (1)
- UNDO Tablespace (1)
- Upgrade Issues (1)
- Uptime (1)
- Uptrade (1)
- Url Backup Error (1)
- Usability (1)
- Use Cases (1)
- User (1)
- User Defined Compactions (1)
- Utilization (1)
- Utl_Smtp (1)
- VDI Jump Host (1)
- Validate Structure (1)
- Validate_Credentials (1)
- Value (1)
- Velocity (1)
- Vertex AI (1)
- Vertica (1)
- Vertical Slicing (1)
- Videos (1)
- Virtual Private Cloud (1)
- Virtualization (1)
- Vision (1)
- Vpn (1)
- Wait_Timeout (1)
- Wallet (1)
- Webhook (1)
- Weblogic Connection Filters (1)
- Webscale Database (1)
- Windows 10 (1)
- Windows Powershell (1)
- WiredTiger (1)
- With Native_Compilation (1)
- Word (1)
- Workshop (1)
- Workspace Security (1)
- Xbstream (1)
- Xml Publisher (1)
- Zabbix (1)
- dbms_Monitor (1)
- postgresql 16 (1)
- sqltrace (1)
- tracing (1)
- vSphere (1)
- xml (1)
- December 2024 (1)
- October 2024 (2)
- September 2024 (7)
- August 2024 (4)
- July 2024 (2)
- June 2024 (6)
- May 2024 (3)
- April 2024 (2)
- February 2024 (1)
- January 2024 (11)
- December 2023 (10)
- November 2023 (11)
- October 2023 (10)
- September 2023 (8)
- August 2023 (6)
- July 2023 (2)
- June 2023 (13)
- May 2023 (4)
- April 2023 (6)
- March 2023 (10)
- February 2023 (6)
- January 2023 (5)
- December 2022 (10)
- November 2022 (10)
- October 2022 (10)
- September 2022 (13)
- August 2022 (16)
- July 2022 (12)
- June 2022 (13)
- May 2022 (11)
- April 2022 (4)
- March 2022 (5)
- February 2022 (4)
- January 2022 (14)
- December 2021 (16)
- November 2021 (11)
- October 2021 (6)
- September 2021 (11)
- August 2021 (6)
- July 2021 (9)
- June 2021 (4)
- May 2021 (8)
- April 2021 (16)
- March 2021 (16)
- February 2021 (6)
- January 2021 (12)
- December 2020 (12)
- November 2020 (17)
- October 2020 (11)
- September 2020 (10)
- August 2020 (11)
- July 2020 (13)
- June 2020 (6)
- May 2020 (9)
- April 2020 (18)
- March 2020 (21)
- February 2020 (13)
- January 2020 (15)
- December 2019 (10)
- November 2019 (11)
- October 2019 (12)
- September 2019 (16)
- August 2019 (15)
- July 2019 (10)
- June 2019 (16)
- May 2019 (20)
- April 2019 (21)
- March 2019 (14)
- February 2019 (18)
- January 2019 (18)
- December 2018 (5)
- November 2018 (16)
- October 2018 (12)
- September 2018 (20)
- August 2018 (27)
- July 2018 (31)
- June 2018 (34)
- May 2018 (28)
- April 2018 (27)
- March 2018 (17)
- February 2018 (8)
- January 2018 (20)
- December 2017 (14)
- November 2017 (4)
- October 2017 (1)
- September 2017 (3)
- August 2017 (5)
- July 2017 (4)
- June 2017 (2)
- May 2017 (7)
- April 2017 (7)
- March 2017 (8)
- February 2017 (8)
- January 2017 (5)
- December 2016 (3)
- November 2016 (4)
- October 2016 (8)
- September 2016 (9)
- August 2016 (10)
- July 2016 (9)
- June 2016 (8)
- May 2016 (13)
- April 2016 (16)
- March 2016 (13)
- February 2016 (11)
- January 2016 (6)
- December 2015 (11)
- November 2015 (11)
- October 2015 (5)
- September 2015 (16)
- August 2015 (4)
- July 2015 (1)
- June 2015 (3)
- May 2015 (6)
- April 2015 (5)
- March 2015 (5)
- February 2015 (4)
- January 2015 (3)
- December 2014 (7)
- October 2014 (4)
- September 2014 (6)
- August 2014 (6)
- July 2014 (16)
- June 2014 (7)
- May 2014 (6)
- April 2014 (5)
- March 2014 (4)
- February 2014 (10)
- January 2014 (6)
- December 2013 (8)
- November 2013 (12)
- October 2013 (9)
- September 2013 (6)
- August 2013 (7)
- July 2013 (9)
- June 2013 (7)
- May 2013 (7)
- April 2013 (4)
- March 2013 (7)
- February 2013 (4)
- January 2013 (4)
- December 2012 (6)
- November 2012 (8)
- October 2012 (9)
- September 2012 (3)
- August 2012 (5)
- July 2012 (5)
- June 2012 (7)
- May 2012 (11)
- April 2012 (1)
- March 2012 (8)
- February 2012 (1)
- January 2012 (6)
- December 2011 (8)
- November 2011 (5)
- October 2011 (9)
- September 2011 (6)
- August 2011 (4)
- July 2011 (1)
- June 2011 (1)
- May 2011 (5)
- April 2011 (2)
- February 2011 (2)
- January 2011 (2)
- December 2010 (1)
- November 2010 (7)
- October 2010 (3)
- September 2010 (8)
- August 2010 (2)
- July 2010 (4)
- June 2010 (7)
- May 2010 (2)
- April 2010 (1)
- March 2010 (3)
- February 2010 (3)
- January 2010 (2)
- November 2009 (6)
- October 2009 (6)
- August 2009 (3)
- July 2009 (3)
- June 2009 (3)
- May 2009 (2)
- April 2009 (8)
- March 2009 (6)
- February 2009 (4)
- January 2009 (3)
- November 2008 (3)
- October 2008 (7)
- September 2008 (6)
- August 2008 (9)
- July 2008 (9)
- June 2008 (9)
- May 2008 (9)
- April 2008 (8)
- March 2008 (4)
- February 2008 (3)
- January 2008 (3)
- December 2007 (2)
- November 2007 (7)
- October 2007 (1)
- August 2007 (4)
- July 2007 (3)
- June 2007 (8)
- May 2007 (4)
- April 2007 (2)
- March 2007 (2)
- February 2007 (5)
- January 2007 (8)
- December 2006 (1)
- November 2006 (3)
- October 2006 (4)
- September 2006 (3)
- July 2006 (1)
- May 2006 (2)
- April 2006 (1)
- July 2005 (1)
No Comments Yet
Let us know what you think