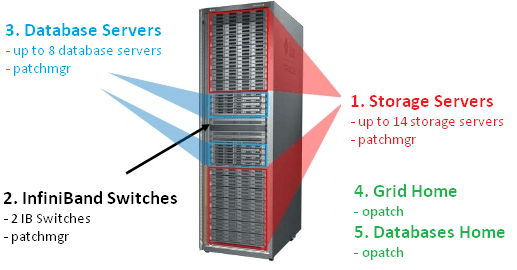
How to patch an exadata (part 3) - grid and database OH patching
3.4/ Patching the Grid Infrastructure
3.4.0 - Information
- Patching a node takes around 30 - 45 minutes
- You have to manually patch each node,one after the other (myclusterdb01 then myclusterdb02 then myclusterdb03 then myclusterdb04, etc...)
- You can use this script to check the status of the instances before and after patching each node
- Patch has to be executed as root
- This procedure will patch the Grid Infrastructure (GI) only (and not the databases ORACLE_HOMEs)
- As we have upgraded opatch for the GI and the database OH in the pre-requisites section, we do not need to create and specify an ocm.rsp file
3.4.1 - Check lsinventory
It is a good idea to check and save a status of the current GI homes before applying the patch. Check the checksum of each home at the and of the opatch lsinventory report (it should be the same).[oracle@myclusterdb01]$ . oraenv <<< +ASM1
[oracle@myclusterdb01]$ $ORACLE_HOME/OPatch/lsinventory -all_nodes
3.4.2 - Patch GI on a Node
[root@myclusterdb01 ~]# cd /patches/OCT2016_bundle_patch/24436624/Database/12.1.0.2.0/12.1.0.2.161018DBBP/24448103
 [root@myclusterdb01 24448103]# /u01/app/12.1.0.2/grid/OPatch/opatchauto apply -oh /u01/app/12.1.0.2/grid
Opatch will most likely finish with some warnings:
[Jun 5, 2016 5:50:47 PM] --------------------------------------------------------------------------------
 [Jun 5, 2016 5:50:47 PM] The following warnings have occurred during OPatch execution:
 [Jun 5, 2016 5:50:47 PM] 1) OUI-67303:
  Patches [ 20831113 20299018 19872484 ] will be rolled back.
 [Jun 5, 2016 5:50:47 PM] --------------------------------------------------------------------------------
 [Jun 5, 2016 5:50:47 PM] OUI-67008:OPatch Session completed with warnings.
Checking the logfiles, you will find that this is probably due to superset patches:
Patch : 23006522 Bug Superset of 20831113
If you check the patch number, you will find that this is an old patch : Patch 20831113: OCW PATCH SET UPDATE 12.1.0.2.4 Then this is safely ignorable as opatch rollback old patches after having applied the new ones.
3.4.3 - Check lsinventory
Let's verify that the patch has been correctly installed on each node (check the checksum of each home at the and of the opatch lsinventory report):[oracle@myclusterdb01]$ . oraenv <<< +ASM1
[oracle@myclusterdb01]$ $ORACLE_HOME/OPatch/lsinventory -all_nodes
3.4.4 - How to Mitigate the Downtime
When you patch the Grid Infrastructure, all the databases running on the node you will patch the Grid on will be stopped for 30 - 45 minutes which is quite a big outage. A way to greatly mitigate this outage (knowing that they're most likely RAC databases running on Exadata), is to use the power of the Oracle services.-
- With load-balances services :
-
- With non load-balances services :
-
- You don't use services?
3.5 Patching the Databases Oracle Homes
3.5.0 - Information
- As we have upgraded opatch for the GI and the database OH in the pre-requisites section, we do not need to create and specify an ocm.rsp file
- Double check that all the prechecks described in the database and OJVM prechecks section are done and returned no error
- This patch has to be launched for every database OH you want to patch
- There is no -rolling option for the database OH patch, you have to do it manually (for example, if you want to patch OH1 on the node1, move the services of the databases that are running on the node 1 to another node, patch the node 1 and continue with the others following the same procedure)
- The OJVM patch requires a total downtime;everything you want to patch that runs on the OH has to be stopped (hopefully, this one is quick)
- In the patch,verify README the numbers of the patches to apply, these are the October 2016's
- You can use screen instead of nohup if it is installed on your system
- I will not describe the steps to apply the patch to a 11g database, they are well documented everywhere, they are basically almost the same as the 12c one except that datapatch is not used but catbundle.sql exa apply, please refer to the README for the exact 11g procedure
3.5.1 opatch lsinventory
Before starting to apply the patch, it is very important to have a clear understanding of the current status to then perform and store the output of the below command:$ORACLE_HOME/OPatch/opatch lsinventory -all_nodes
Have a look at the checksum report at the end of the report, it should be the same on each node:
Binary & Checksum Information
 ==============================

  Binary Location : /u01/app/oracle/product/12.1.0.2/dbhome_1/bin/oracle

  Node Size Checksum
  ---- ---- --------
  myclusterdb01 327642940 BD0547018B032A7D2FCB8209CC4F1E6C8B63E0FBFD8963AE18D50CDA7455602D
  myclusterdb02 327642940 BD0547018B032A7D2FCB8209CC4F1E6C8B63E0FBFD8963AE18D50CDA7455602D
  myclusterdb03 327642940 BD0547018B032A7D2FCB8209CC4F1E6C8B63E0FBFD8963AE18D50CDA7455602D
  myclusterdb04 327642940 BD0547018B032A7D2FCB8209CC4F1E6C8B63E0FBFD8963AE18D50CDA7455602D
 --------------------------------------------------------------------------------

 OPatch succeeded.
3.5.2 - Apply the Patch
The Bundle contains two different patches for the databases ORACLE_HOMES : one to patch the database OH and one specific to the OJVM3.5.2.1 - Apply the Database OH Patch
- This patch has to be applied as root
- You have to manually launch this patch on each node
- Do NOT stop anything here, opatchauto will take care of it
- This patch takes around 20 - 30 minutes to complete on each node
[root@myclusterdb01]# cd /u01/app/oracle/product/12.1.0.2/dbhome_1/OPatch
 [root@myclusterdb01]# nohup ./opatchauto apply /patches/OCT2016_bundle_patch/24436624/Database/12.1.0.2.0/12.1.0.2.161018DBBP/24448103/24340679 -oh /u01/app/oracle/product/12.1.0.2/dbhome_1 &
 [root@myclusterdb01]# nohup ./opatchauto apply /patches/OCT2016_bundle_patch/24436624/Database/12.1.0.2.0/12.1.0.2.161018DBBP/24448103/24846605 -oh /u01/app/oracle/product/12.1.0.2/dbhome_1 &
3.5.2.2 - Apply the OJVM Patch
- The OJVM has to be applied as the oracle user
- This patch will be automatically applied to all the nodes where the ORACLE_HOME is installed
- This patch takes only few minutes to apply
[oracle@myclusterdb01]$ . oraenv <<< A_DATABASE_WITH_THE_CORRECT_ORACLE_HOME
 [oracle@myclusterdb01]$ srvctl stop home -o /u01/app/oracle/product/12.1.0.2/dbhome_1 -s /tmp/12c.statefile_n1 -n myclusterdb01
 [oracle@myclusterdb01]$ srvctl stop home -o /u01/app/oracle/product/12.1.0.2/dbhome_1 -s /tmp/12c.statefile_n2 -n myclusterdb02
 [oracle@myclusterdb01]$ srvctl stop home -o /u01/app/oracle/product/12.1.0.2/dbhome_1 -s /tmp/12c.statefile_n3 -n myclusterdb03
 [oracle@myclusterdb01]$ srvctl stop home -o /u01/app/oracle/product/12.1.0.2/dbhome_1 -s /tmp/12c.statefile_n4 -n myclusterdb04
- Apply the patch from myclusterdb01 (any node can be used though)
[oracle@myclusterdb01]$ cd /patches/OCT2016_bundle_patch/24436624/Database/12.1.0.2.0/12.1.0.2.161018OJVMPSU/24315824
 [oracle@myclusterdb01]$ $ORACLE_HOME/OPatch/opatch apply
3.5.3 - opatch lsinventory
To be sure that the patch has successfully been applied on all the nodes, perform and store the output of the below command:$ORACLE_HOME/OPatch/opatch lsinventory -all_nodes
Have a look at the checksum report at the end of the report, it should be the same on each node (an example of this output is shown in paragraph 3.5.1)
3.5.4 - Post-Install
Some post-install steps have to be performed for both OJVM and database OH patch, this has to be done for each database (on one node only). . oraenv <<< A_DATABASE
sqlplus / as sysdba
startup nomount -- All DB should be down here, only start on one node, don't use srvctl here
alter system set cluster_database=false scope=spfile;
shut immediate
startup upgrade
cd /u01/app/oracle/product/12.1.0.2/dbhome_1/OPatch
./datapatch -verbose
-- It happened that datapatch had issues with some patches then we have to :
./datapatch -apply 22674709 -force -bundle_series PSU -verbose
./datapatch -apply 22806133 -force -bundle_series PSU -verbose
Note: the datapatch -force is recommended by Oracle support when ./datapatch -verbose fails (...). you can ignore the errors of the -force datapatch
 sqlplus / as sysdba
 alter system set cluster_database=true scope=spfile;
 shut immediate
 srvctl start database -d XXX

 - Verify that the patches are correctly installed
 set lines 200
 set pages 999
 SELECT patch_id, patch_uid, version, flags, action, action_time, description, status, bundle_id, bundle_series, logfile FROM dba_registry_sqlpatch ;
3.5.5 - Post Post-Install
Use the start home statement in case of something is missing using the statefiles we created in the paragraph 3.5.2.2srvctl start home -o /u01/app/oracle/product/12.1.0.2/dbhome_1 -s /tmp/12c.statefile_n1 -n myclusterdb01
srvctl start home -o /u01/app/oracle/product/12.1.0.2/dbhome_1 -s /tmp/12c.statefile_n2 -n myclusterdb02
srvctl start home -o /u01/app/oracle/product/12.1.0.2/dbhome_1 -s /tmp/12c.statefile_n3 -n myclusterdb03
srvctl start home -o /u01/app/oracle/product/12.1.0.2/dbhome_1 -s /tmp/12c.statefile_n4 -n myclusterdb04
3.5.6 - A Quicker Way
There's a quicker way to patch the database ORACLE_HOMEs than the one described above. This quicker way is also more flexible to manage and reduces the outage needed to apply the post-install steps. With the above procedure, once the ORACLE_HOME is patched, you have no other choice than to apply the post-install steps right after as you have no another way to restart the database. When you have many database sharing the same ORACLE_HOME, this can be quite long and/or painful. Note that if you have 30 databases sharing the same ORACLE_HOME, you won't be able to apply 30 post-install steps at the same time.The thirtieth database will then suffer a bigger outage than the first one you restart on the patched ORACLE_HOME. This is totally mitigated by the way of doing I describe below. This quicker way is to clone the current OH (let's say /u01/app/oracle/product/12.1.0.2/dbhome_1) to another one (let's say /u01/app/oracle/product/12.1.0.2/dbhome_2), apply the patch against the future OH (dbhome_2) and then move database per database (when you want) from the old OH (dbhome_1) to the new patched OH (dbhome_2). Here is plan:- Copy dbhome_1 to dbhome_2 on each node
cp -r /u01/app/oracle/product/12.1.0.2/dbhome_1 /u01/app/oracle/product/12.1.0.2/dbhome_2
- Clone it on each node
- On node 1
[oracle@myclusterdb01]$ cd /u01/app/oracle/product/12.1.0.2/dbhome_2/oui/bin/
 [oracle@myclusterdb01 bin]$ ./runInstaller -clone -waitForCompletion ORACLE_HOME="/u01/app/oracle/product/12.1.0.2/dbhome_2" ORACLE_HOME_NAME="OraDB12Home2" "ORACLE_BASE=/u01/app/oracle" "CLUSTER_NODES={myclusterdb01,myclusterdb03,myclusterdb04}" "LOCAL_NODE=myclusterdb01" -silent -noConfig -nowait
- On node 2
[oracle@myclusterdb01]$ cd /u01/app/oracle/product/12.1.0.2/dbhome_2/oui/bin/
 [oracle@myclusterdb02 bin]$ ./runInstaller -clone -waitForCompletion ORACLE_HOME="/u01/app/oracle/product/12.1.0.2/dbhome_2" ORACLE_HOME_NAME="OraDB12Home2" "ORACLE_BASE=/u01/app/oracle" "CLUSTER_NODES={myclusterdb01,myclusterdb03,myclusterdb04}" "LOCAL_NODE=myclusterdb02" -silent -noConfig -nowait
etc.. on all the other nodes
Note here that what changes in the command line to clone the OH are the CLUSTER_NODES and LOCAL_NODE parameters.
- Apply the patch on this new OH following paragraph 3.5.2
-
- Stop the database you want, restart it with the new OH and apply the post-install steps following paragraph 3.5.4
 -- On each node, copy the init, the passwordfile to the new home, any configuration file you would also use
  [oracle@myclusterdb01]$ cp /u01/app/oracle/product/12.1.0.2/dbhome_1/dbs/init${ORACLE_SID}.ora /u01/app/oracle/product/12.1.0.2/dbhome_2/dbs/.
  [oracle@myclusterdb01]$ cp /u01/app/oracle/product/12.1.0.2/dbhome_1/dbs/orapw${ORACLE_SID}.ora /u01/app/oracle/product/12.1.0.2/dbhome_2/dbs/.

  -- On each node, check and update your LDAP configuration if you have one

  -- On each node, update /etc/oratab and/or the script you use to switch between the database environments
  #MYDB:u01/app/oracle/product/12.1.0.2/dbhome_1:N
  MYDB:u01/app/oracle/product/12.1.0.2/dbhome_2:N

  -- One one node, modify the ORACLE_HOME in the cluster configuration
  [oracle@myclusterdb01]$ srvctl modify database –d -o /u01/app/oracle/product/12.1.0.2/dbhome_2 -- 11g
  [oracle@myclusterdb01]$ srvctl modify database –db -oraclehome /u01/app/oracle/product/12.1.0.2/dbhome_2 -- 12c

  -- One one node, modify the spfile configuration in the cluster configuration (if your spfile is not stored under ASM)
  [oracle@myclusterdb01]$ srvctl modify database –d -p /path_to_your_shared_spfile/spfile${ORACLE_SID}.ora -- 11g
  [oracle@myclusterdb01]$ srvctl modify database –db -spfile /path_to_your_shared_spfile/spfile${ORACLE_SID}.ora -- 12c

  -- Bounce the database
  [oracle@myclusterdb01]$ srvctl stop database -d -o 'immediate' -- 11g
  [oracle@myclusterdb01]$ srvctl start database -d

  [oracle@myclusterdb01]$ srvctl stop database -db -stopoption 'immediate' -- 12c
  [oracle@myclusterdb01]$ srvctl start database -db

  -- If you use OEM, you will have to manually update the new OH in the target configuration
Note that here only the last step requires a downtime of 15 - 20 minutes (the time to bounce the database and run the post install steps), all the previous steps can be done earlier during a regular weekday. Another point to add is that you can chose which database to patch when you want (which makes this way of working very flexible). If you reached that point, it means that you are done with your Exadata patching!
Oracle Database Consulting Services
Ready to optimize your Oracle Database for the future?
On this page
Share this
Share this
More resources
Learn more about Pythian by reading the following blogs and articles.
How to patch an exadata (part 1) - introduction and prerequisites


How to patch an exadata (part 1) - introduction and prerequisites
Mar 28, 2017 12:00:00 AM
9
min read
How to patch an exadata (part 5) - troubleshooting
![]()
How to patch an exadata (part 5) - troubleshooting
Mar 28, 2017 12:00:00 AM
3
min read
How to patch an exadata (part 2) - cells, IB and DB servers


How to patch an exadata (part 2) - cells, IB and DB servers
Mar 28, 2017 12:00:00 AM
8
min read
Ready to unlock value from your data?
With Pythian, you can accomplish your data transformation goals and more.
