How to build a cost-effective serverless blogging platform on GCP - Part 1
- It needed to be free (or as inexpensive as possible - not counting the domain costs).
- Accessible over HTTPS only (https is the new normal, why stick with anything less?). Let's Encrypt SSL/TLS certificates are available for free!
- The implementation should be scalable (not that I'd require it at the moment, but I want to build it future-proof). :)
- Use some of the modern DevOps things I've been learning too (git, serverless, continuous deployment, Docker, etc).
- No maintenance overhead for the services that I use (no manual updates).
- Posting a new blog post should be painless and simple (without activities like "connect there, do this, then check that, …")
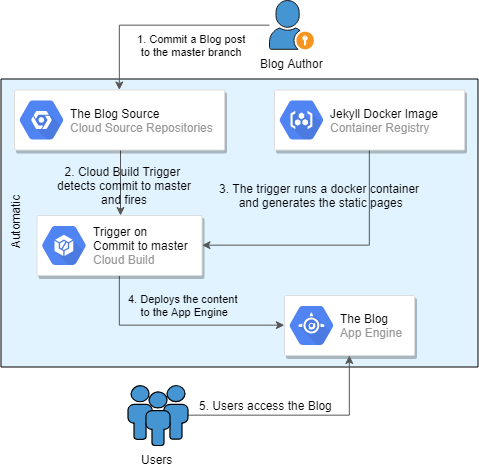 The workflow for a blog post publishing[/caption] The rest of this article will go through the configuration details, hopefully in sufficient detail for you to follow and set up your own blogging platform!
Blog as Code
Even when I had a Wordpress blog, I used a text editor instead of the WYSIWYG editor. I frequently ran into formatting issues with the latter and would switch to the text editor to have more control over what was going on. I discovered Markdown later and really liked the cleanliness of the text files that could be translated into HTML. I even installed some Wordpress plugins to support Markdown for blogging. Having already familiarized myself with Markdown, the next logical step to take was "Blog as Code." The main idea was to keep everything that's required for rendering the whole blog in a Git repository. It makes a lot of sense to me not only for the usual benefits Git provides (you can google " why should I use Git" to discover more about it), but also because if this worked, I'd be able to get rid of the database backend and the heavier application tier (Wordpress), which would simplify everything a lot.Jekyll - A Static Site Generator
There are many different options for static site generators, but Jekyll is the most popular at the moment, which is why I chose it. It's quite simple to set up locally, but since I'm going to use a Docker container later, it makes sense to start using it now. I'll be using the jekyll/jekyll:latest Docker image.- Setting up Docker is out of scope for this article, but it needs to be done before continuing.
- Download the latest Jekyll image and create an empty folder for the source code.
$ docker pull jekyll/jekyll
 $ mkdir tempblog.me-dba.com
 $ cd tempblog.me-dba.com
- Start a container and obtain an interactive bash session, and create the initial blog site structure by running
jekyll new, then runjekyll serveto test the blog. Notice that the current location (tempblog.me-dba.com) is attached as "/srv/jekyll" to the container, and the created files will be located outside the container.jekyll newwill install all the required dependencies, ruby gems and themes, so this might take a while.$ docker run --rm --publish 4000:4000 --volume="$PWD:/srv/jekyll" --privileged -it jekyll/jekyll:latest bash $ jekyll new /srv/jekyll $ jekyll serve
- At this point, the blog should be accessible on the Docker host ip, port 4000. In my case the IP was 192.168.33.13, so the following two URLs served the demo pages included in the new blog structure (in your case the IP may differ): https://192.168.33.13:4000/ is the front page of your blog.
- We'll use this moment to commit the container changes to the image from another session on our Docker host machine. Thus, all the downloaded items will be added as a new layer to the Jekyll's Docker image, and they won't need to be downloaded again when we start a container next time. Note: the container ID will be different in your case.
# from another session
 $ docker ps
 CONTAINER ID IMAGE COMMAND CREATED STATUS PORTS NAMES
 04418b39cec7 e220e1251707 "/usr/jekyll/bin/ent…" 23 minutes ago Up 23 minutes 0.0.0.0:4000->4000/tcp, 35729/tcp laughing_benz

 # Use the ID from the previous output
 $ docker commit -m "created by adding all Gems" 04418b39cec7 jekyll/jekyll:latest
 sha256:9667c6cbe572e78a8d3b552286b21eb0e34f8264c6c3c7c2b63850680b6cc891
- Next, switch back to the first session, and use
Ctrl-Cto terminate thejekyll servefollowed byexitto exit and remove the container.
$ find .
 .
 ./.gitignore
 ./.sass-cache
 ./.sass-cache/04702c00cd9fa60073a601ea6f7a61c45d2d95af
 ./.sass-cache/04702c00cd9fa60073a601ea6f7a61c45d2d95af/minima.scssc
 ./.sass-cache/2644ddacc47d466a8fd18366436f273677dc9e09
 ./.sass-cache/2644ddacc47d466a8fd18366436f273677dc9e09/_base.scssc
 ./.sass-cache/2644ddacc47d466a8fd18366436f273677dc9e09/_layout.scssc
 ./.sass-cache/2644ddacc47d466a8fd18366436f273677dc9e09/_syntax-highlighting.scssc
 ./404.html
 ./_config.yml
 ./_posts
 ./_posts/2019-01-21-welcome-to-jekyll.markdown
 ./about.md
 ./index.md
 ./Gemfile
 ./Gemfile.lock
 ./_site
 ./_site/404.html
 ./_site/about
 ./_site/about/index.html
 ./_site/index.html
 ./_site/assets
 ./_site/assets/main.css
 ./_site/assets/minima-social-icons.svg
 ./_site/feed.xml
 ./_site/jekyll
 ./_site/jekyll/update
 ./_site/jekyll/update/2019
 ./_site/jekyll/update/2019/01
 ./_site/jekyll/update/2019/01/21
 ./_site/jekyll/update/2019/01/21/welcome-to-jekyll.html
Only the highlighted files are the source code of the blog. The _site directory is the generated version of the static pages, and .sass-cache is some caching mechanism that Jekyll uses. Both of these locations are excluded in .gitignore. This is a good point to edit the _config.yml to customize the blog - change the theme of the blog, add plugins and adjust other configurables. Having completed the modifications, test them with jekyll serve again (note: the correct use of whitespace indentation is critical in YAML files):
$ cat _config.yml | grep -v "^ *#"

 title: My Awesome Serverless Blog on GCP
 email: elsins@pythian.com
 description: >- # this means to ignore newlines until "baseurl:"
  This is the example blog created by Maris Elsins in 2019 to support the article named
  "Building a Cost Efficient Serverless Blogging Platform on GCP".
 baseurl: "" # the subpath of your site, e.g. /blog
 url: "https://tempblog.me-dba.com"
 twitter_username: MarisDBA

 markdown: kramdown
 theme: minima
 plugins:
  - jekyll-feed

 $ docker run --rm --publish 4000:4000 --volume="$PWD:/srv/jekyll" --privileged -it jekyll/jekyll:latest jekyll serve
Disqus - Adding Comments to the Blog Posts
Native support for the Disqus comment platform will depend on the theme you choose for your blog. In this case, I used the default theme called minima-2.5.0 that already includes the required code to add the Disqus comment threads. I think many themes already include this code, but it's not really complicated to customize other themes to add the required code too. Before adding the comment sections to the blog posts, the new site needs to be registered in the Disqus platform. Go to https://disqus.com/admin/create/ (register a new user if you don't have one yet), and follow these steps to register your new site:- Choose a name for your site, note the unique Disqus URL as its first part is the Disqus shortname that will be required later in Step 4 (in this case it's "tempblog-me-dba-com"): [caption id="attachment_106243" align="aligncenter" width="1518"]
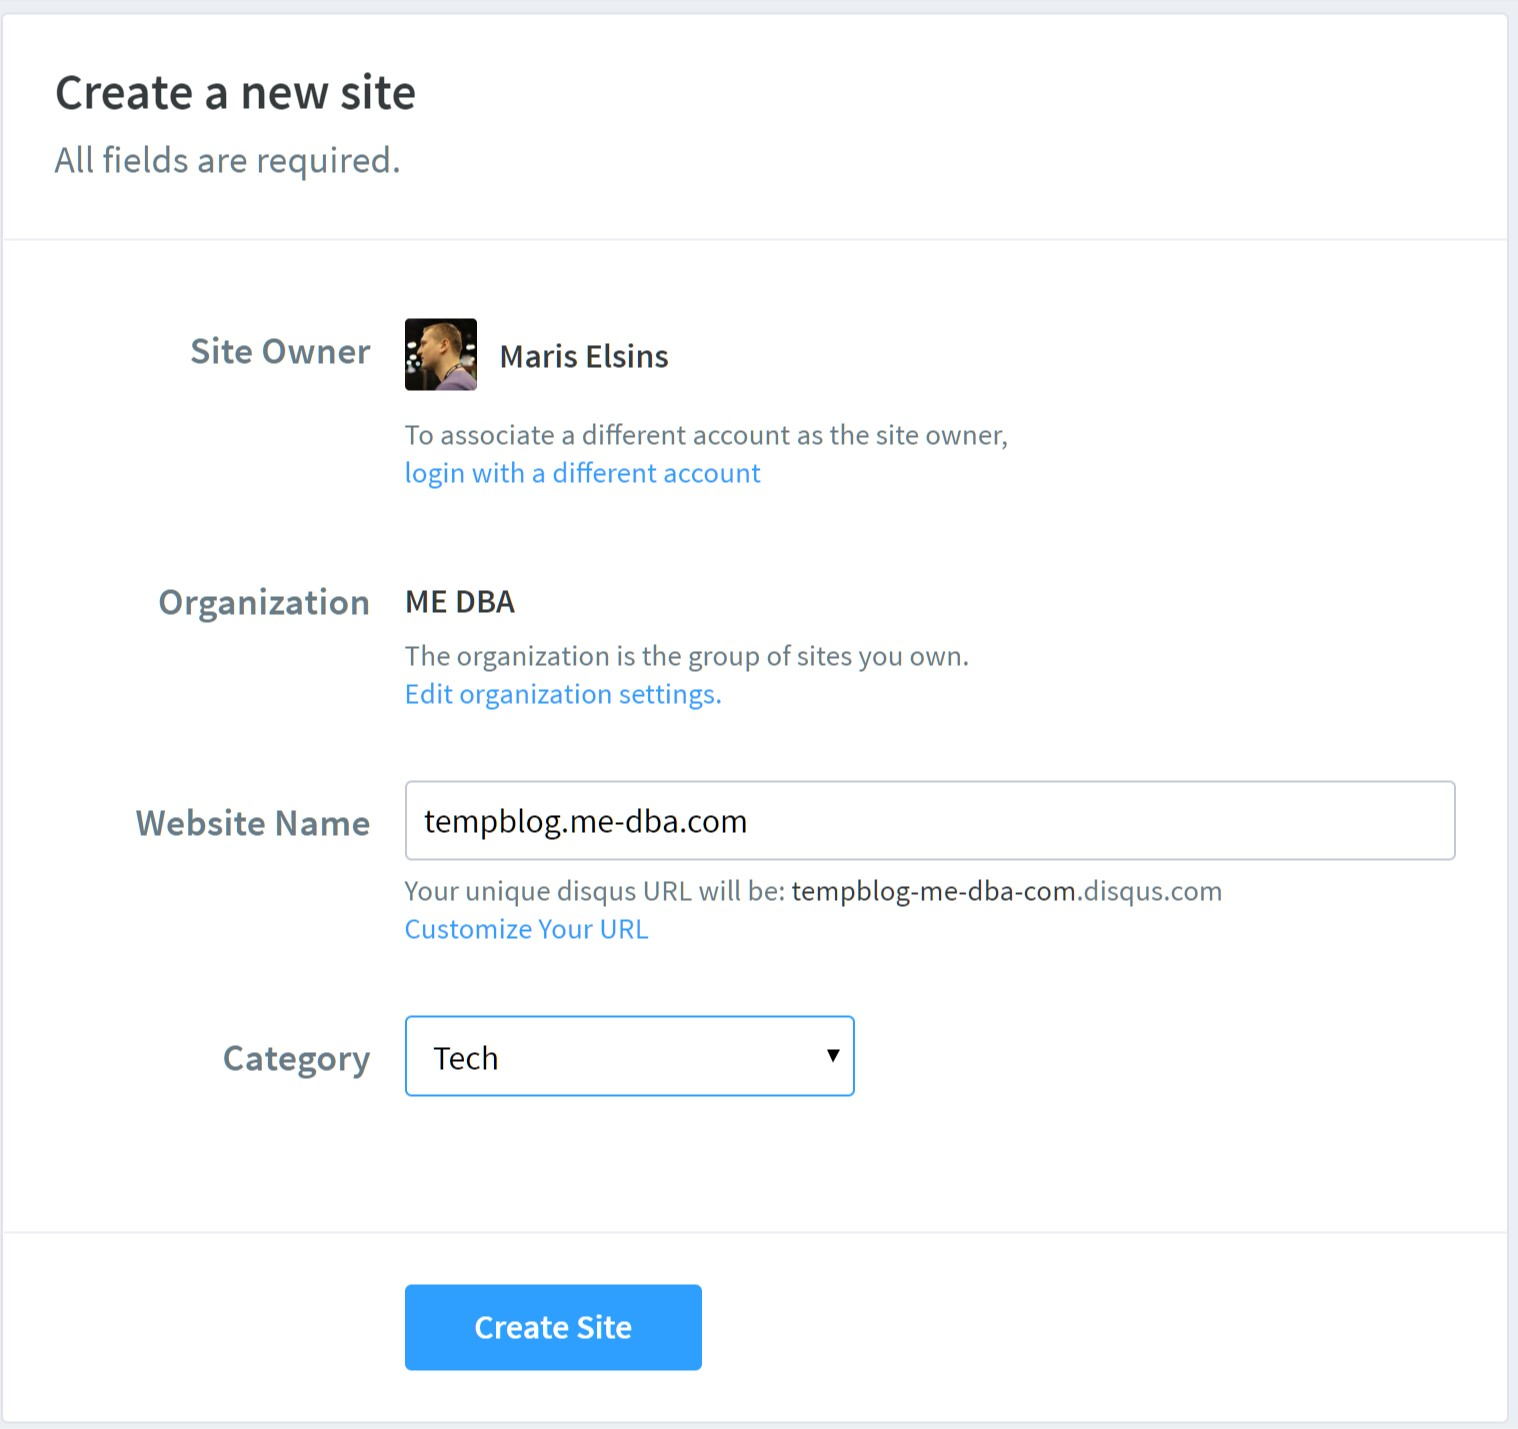 Register the new site on Disqus[/caption]
 - If you're presented with the choice, pick "Jekyll" as the blogging platform.
- Change the configuration of the site based on your preference, make sure you set the blog URL correctly to your production URL (that still doesn't serve anything at this moment): [caption id="attachment_106242" align="aligncenter" width="1600"]
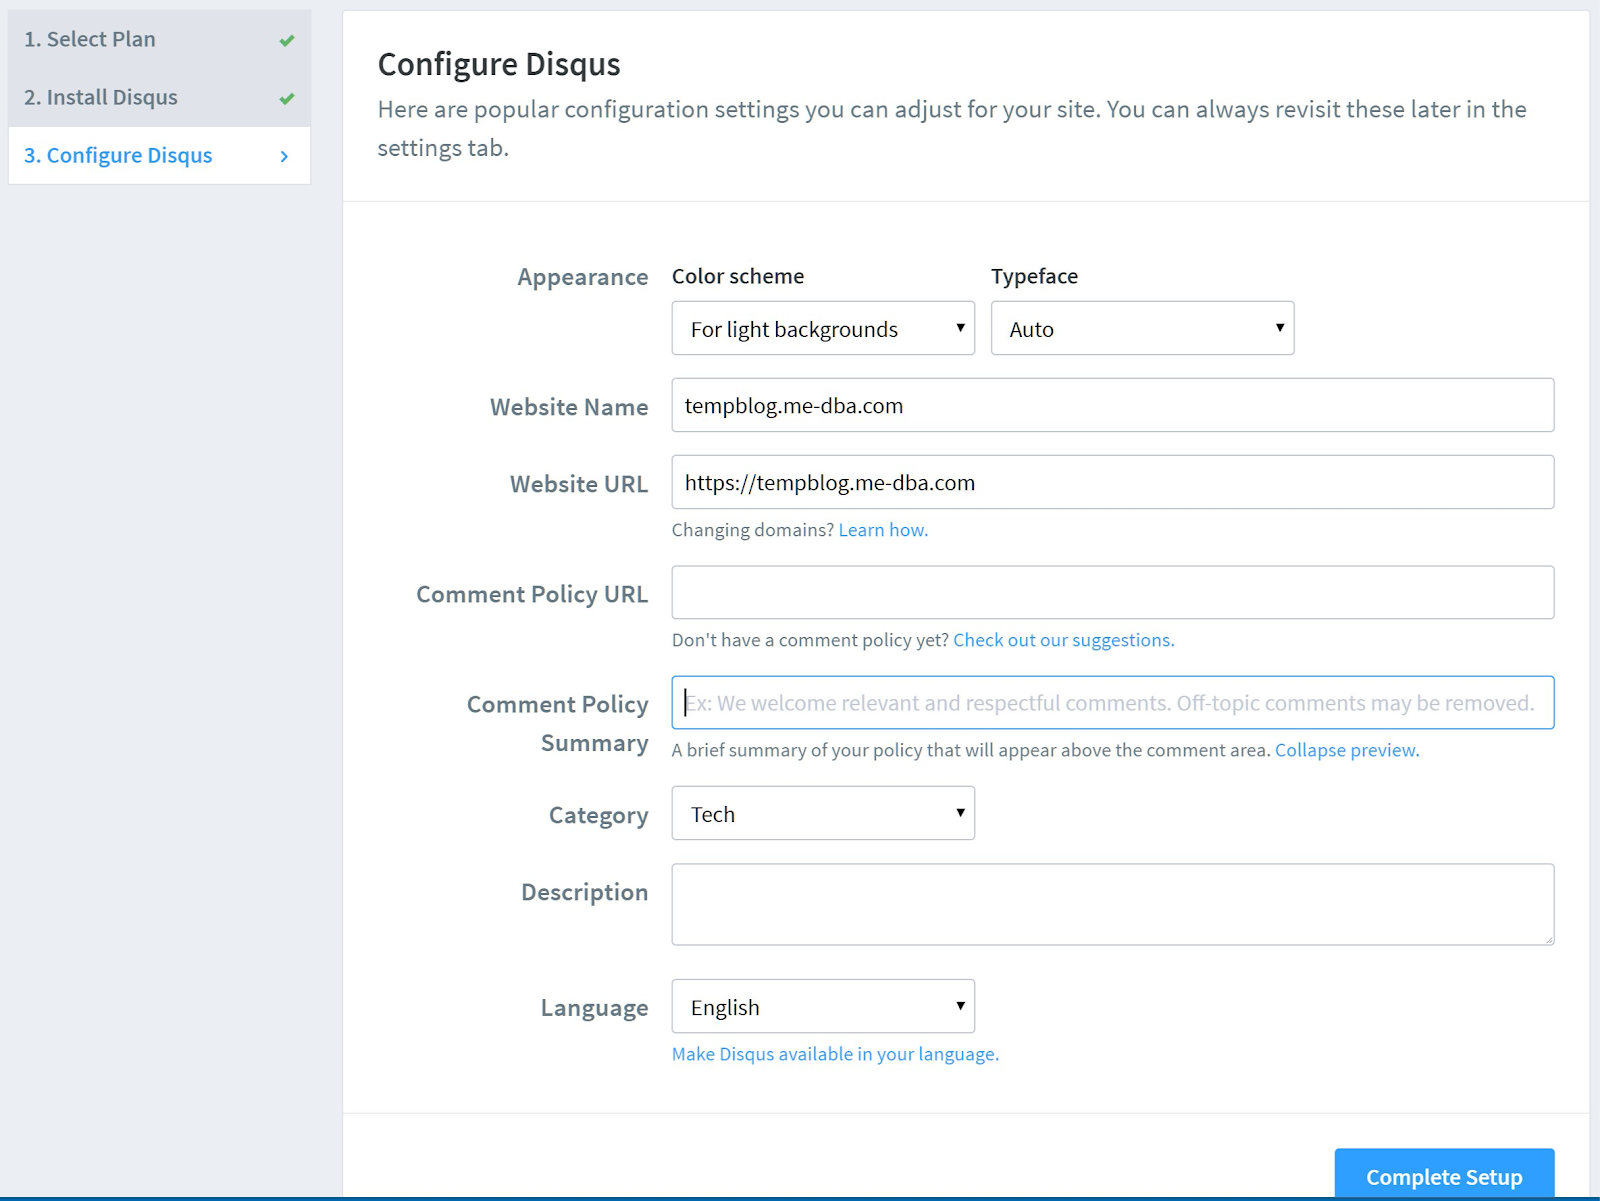 Configure Disqus[/caption]
_config.yml:
disqus:
  shortname: tempblog-me-dba-com
As instructed in the theme's README.md, the site needs to be regenerated in "production mode" by setting the JEKYLL_ENV=production before running jekyll serve or jekyll build like this:
$ docker run --rm --publish 4000:4000 --volume="$PWD:/srv/jekyll" --privileged -it jekyll/jekyll:latest bash -c "JEKYLL_ENV=production jekyll serve"
And that's it. The comments section should already be rendered correctly, like this, which means we've completed setting up the initial version of the blog's source code: [caption id="attachment_106241" align="aligncenter" width="1600"] 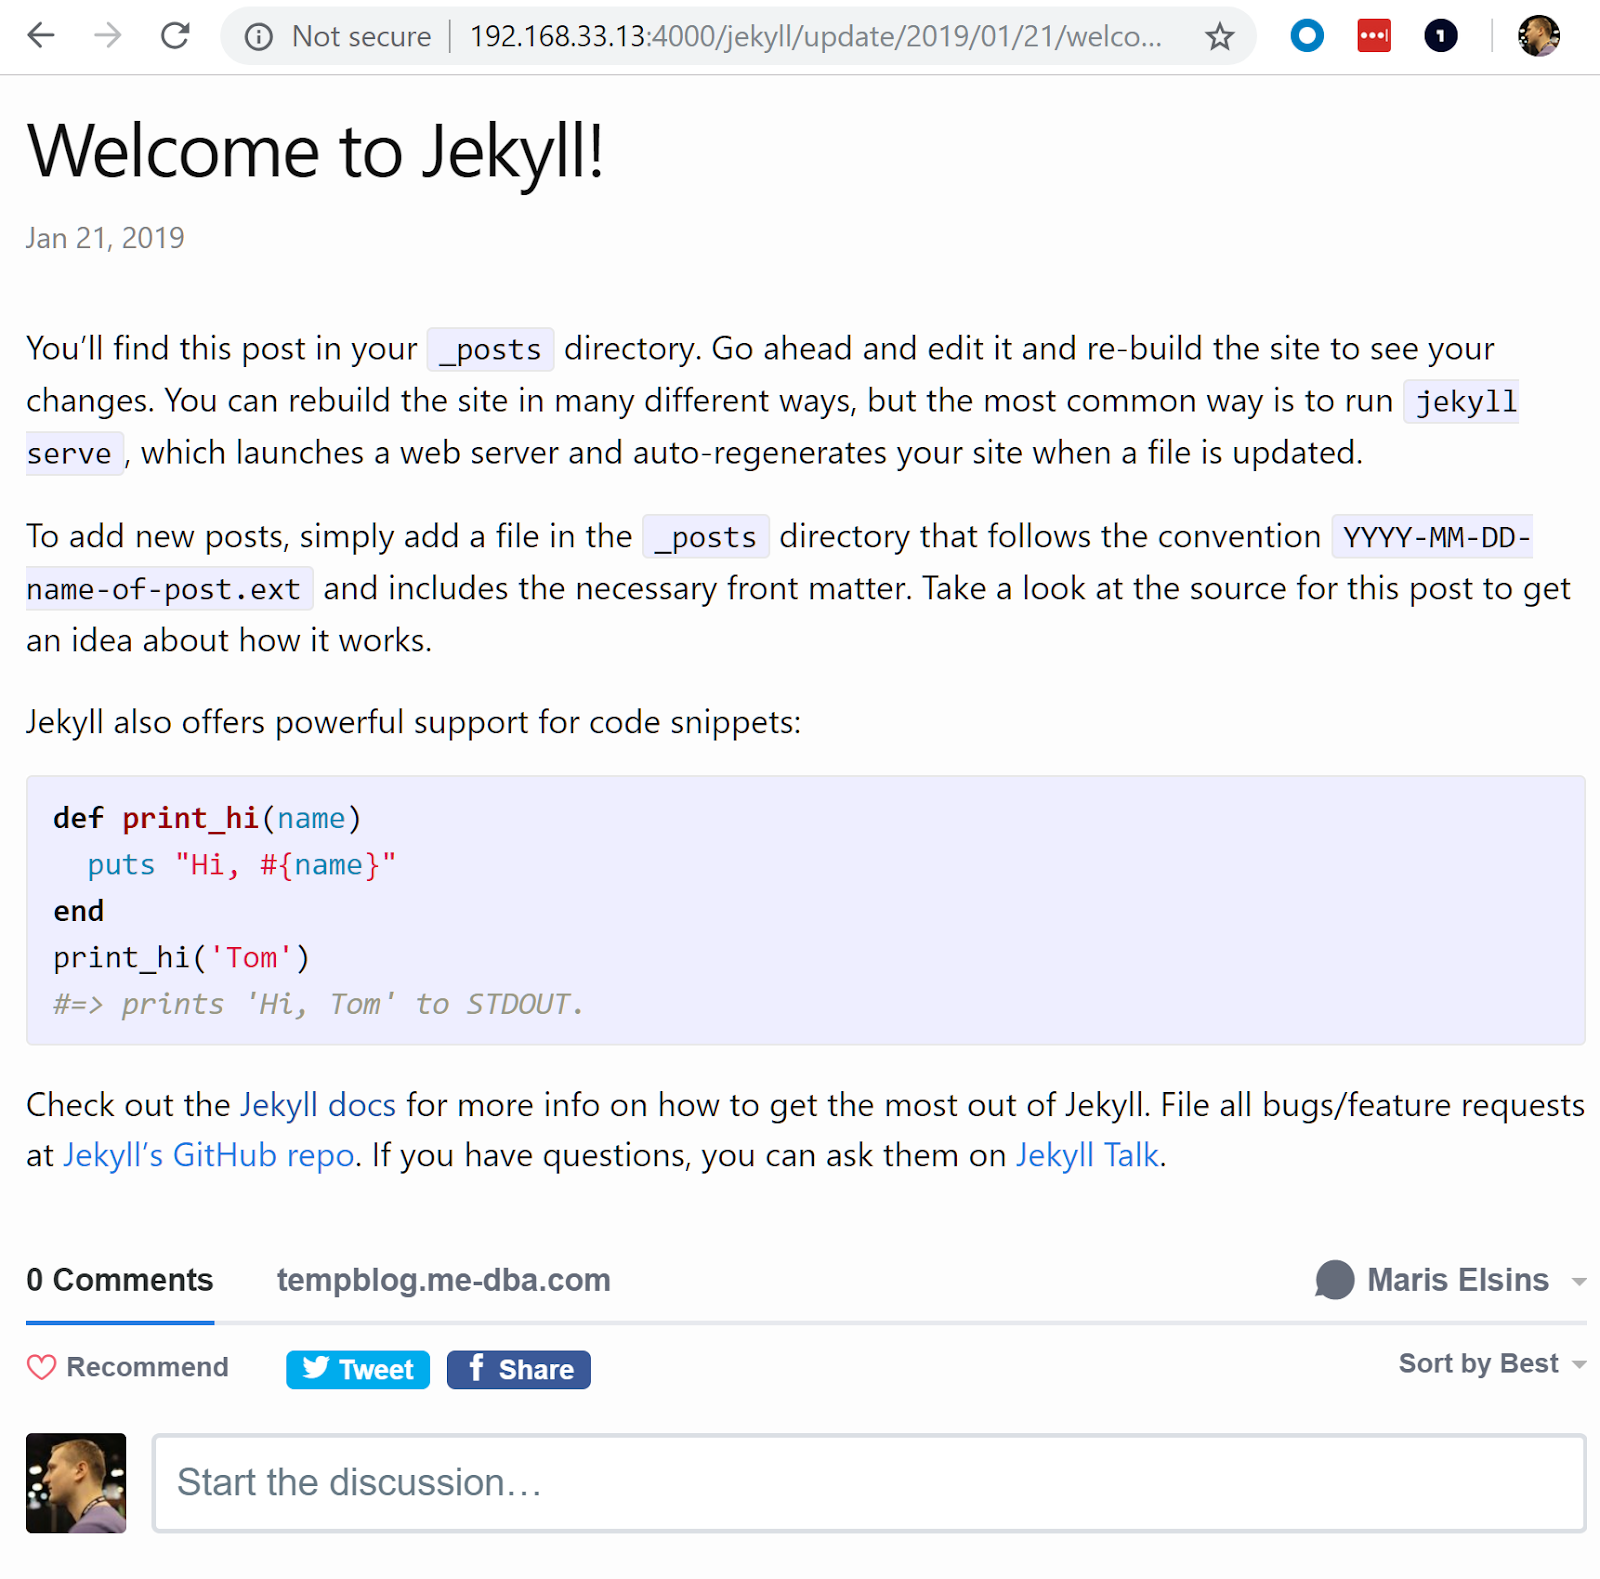 Example of a working comments section[/caption]
GCP Source Repository
For the purposes of this demonstration, I'll store the blog's code in GCP Source Repositories. Technically, Github would work too, but later I would be required to grant access privileges to all my repositories to GCP Cloud Builder to automate the deployment of the new blog posts. In my case, I have a few private GitHub repositories which I don't want to grant this access to, so I use the GCP Source Repository. Let's create the repository and commit our code to it! This requires several steps:- Create a GCP Project, or use an existing project. In my case the name of the project is
tempblog-me-dba. - Install Google Cloud SDK on the machine where your source code is located.
- Initialize the configuration of the SDK by running
gcloud init, log on as your user and set the newly created project as the default.$ gcloud init ... $ gcloud config list [core] account = Maris.Elsins@me-dba.com disable_usage_reporting = True project = tempblog-me-dba ...
- Create the source repository from the command line:
$ gcloud source repos create tempblog-me-dba-repo
 API [sourcerepo.googleapis.com] not enabled on project [520897212625].
  Would you like to enable and retry (this will take a few minutes)?
 (y/N)? y

 Enabling service [sourcerepo.googleapis.com] on project [520897212625]...
 Waiting for async operation operations/acf.6999a26b-ba23-42d3-b1f0-b97ddced5057 to complete...
 Operation finished successfully. The following command can describe the Operation details:
  gcloud services operations describe operations/tmo-acf.6999a26b-ba23-42d3-b1f0-b97ddced5057
 API [sourcerepo.googleapis.com] not enabled on project [520897212625].
  Would you like to enable and retry (this will take a few minutes)?
 (y/N)? y

 Created [tempblog-me-dba-repo].
 WARNING: You may be billed for this repository. See https://cloud.google.com/source-repositories/docs/pricing for details.
- Install
gitif you haven't done it yet. I recommend using version 2.0.1+ as it supports Authentication for GCP better. My code was stored on a Centos Machine, so I followed https://tecadmin.net/install-git-2-0-on-centos-rhel-fedora/ to set it up. - Clone the empty repository from GCP to your workstation:
$ cd
 $ gcloud source repos clone tempblog-me-dba-repo
 Cloning into '/home/vagrant/tempblog-me-dba-repo'...
 Checking connectivity... done.
 warning: remote HEAD refers to nonexistent ref, unable to checkout.

 Project [tempblog-me-dba] repository [tempblog-me-dba-repo] was cloned to [/home/vagrant/tempblog-me-dba-repo].
- Copy all the source files from the original location into the cloned repository (it would have been more efficient to create the repository in the beginning). :)
$ cd ~/tempblog.me-dba,com
 $ cp -vrp ./* ../tempblog-me-dba-repo/
 $ cp -vrp .gitignore ../tempblog-me-dba-repo/
 $ cp -vrp .sass-cache ../tempblog-me-dba-repo/
- Commit the new files to the master and push them to the remote repository.
$ git add -A
 $ git status
 On branch master

 Initial commit

 Changes to be committed:
  (use "git rm --cached ..." to unstage)

  new file: .gitignore
  new file: 404.html
  new file: Gemfile
  new file: Gemfile.lock
  new file: _config.yml
  new file: _posts/2019-01-21-welcome-to-jekyll.markdown
  new file: about.md
  new file: index.md
 $ git commit -m "initial commit"
 ...
 $ git push origin master
 Counting objects: 11, done.
 Delta compression using up to 2 threads.
 Compressing objects: 100% (10/10), done.
 Writing objects: 100% (11/11), 3.90 KiB | 0 bytes/s, done.
 Total 11 (delta 0), reused 0 (delta 0)
 To https://source.developers.google.com/p/tempblog-me-dba/r/tempblog-me-dba-repo
  * [new branch] master -> master
Summary
We've come to the end of the first part of the article. We've set up all the required tools to generate a static html-based blog site with the help of Jekyll, and we've also configured Disqus for the only dynamic content that there is - the comments. This implementation doesn't require any database behind it so all the configuration and the blog posts itself can be easily stored in a source repository. We've also started up the blog locally by using thejekyll serve from a Docker instance we used in the process. Of course, these are only the preparation tasks. We still need to set up all the infrastructure on GCP to serve the blog and make it available to the public. That's the story for the second part of this series. See you soon in Part 2!
On this page
Share this
Share this
More resources
Learn more about Pythian by reading the following blogs and articles.
How to build a cost-effective serverless blogging platform on GCP - Part 2
![]()
How to build a cost-effective serverless blogging platform on GCP - Part 2
Mar 14, 2019 12:00:00 AM
12
min read
How to deploy a Cockroach DB Cluster in GCP? Part II

How to deploy a Cockroach DB Cluster in GCP? Part II
Dec 9, 2022 12:00:00 AM
16
min read
Apache beam pipelines with Scala: part 1 - template
![]()
Apache beam pipelines with Scala: part 1 - template
Dec 12, 2017 12:00:00 AM
3
min read
Ready to unlock value from your data?
With Pythian, you can accomplish your data transformation goals and more.
