Building SQL server failover cluster instances in the Cloud with Windows server 2016 storage Spaces Direct
Storage Spaces Direct (S2D) is a new feature of Windows Server 2016 that takes the 'software-defined storage' concept to the next level. The value proposition is that instead of deploying expensive SAN hardware, similar results can be achieved by pooling commodity storage and controlling it with commodity Windows Servers. Whereas the 2012 Storage Spaces release required SATA or SAS connected disks or JBOD enclosures, this new 2016 release can work with local-attached SATA, SAS and NVMe drives to each node in the cluster.
This means that not only can cheap storage be used but it also means that we can deploy this feature with Virtual Disks in the cloud! The value here is that we have a cluster with non-shared storage that acts like a shared storage one, all using Microsoft software end to end. And with this capability in place, we can then put a cluster-aware application like SQL Server on top of it and have a Failover Cluster Instance in the cloud.
This scenario hasn't been supported before without the use of 3rd party products like SIOS DataKeeper. Mixing SQL Server and Storage Spaces Direct has been referenced by Microsoft on this blog post where it mentions that it is indeed planned to support this configuration. I hope down the line they will update the SQL Server support in Azure KB article to add support for S2D as well as SIOS.
Doing Failover Clustering in the cloud opens new deployment possibilities like providing SQL Server HA for databases like the distribution database on a replication topology or providing local HA while protecting the entire instance instead of the databases-only approach of Availability Groups.
I believe that this same setup can be duplicated in AWS, however this example will be for building this type of cluster in Azure. With the disclaimer out of the way, let's get started!
Section I: Base infrastructure and Machines
First, I built this infrastructure from scratch with a new resource group and storage account. Then proceeded with the following:
1- Created Virtual Network - 10.0.0.0\16 (65K addresses) and one Subnet 10.0.0.0/24 (256 addresses). On a Prod environment you would likely have one Public Subnet with a jumpbox and a Private Subnet with the actual SQL Cluster but for demo simplicity I have only one Public Subnet.
2- Created a Windows Server 2016 Standard D1V2 VM, this will be our Active Directory VM. Nothing too powerful since it's not really needed for an AD and DNS VM.
3- Added a disk to the AD VM
4- Formatted the disk to an NTFS volume F:
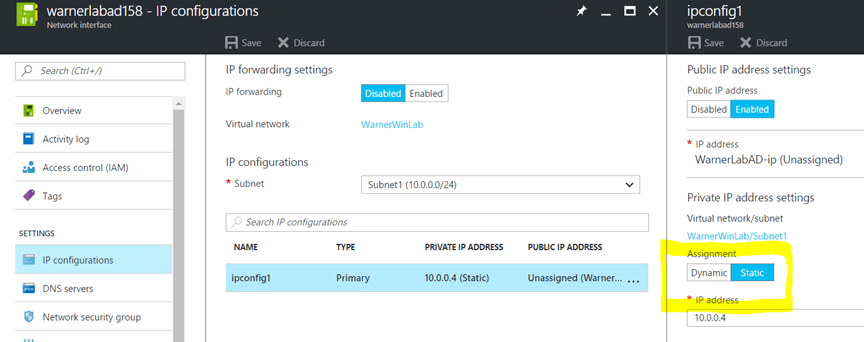
5- Changed the IP for the AD to be static - 10.0.0.4. We can use the portal or Powershell to make a NIC with a static IP.
Here's a PowerShell example (you will need to install the Powershell Azure SDK):
 #setup your account
 Login-AzureRmAccount

 #verify your subscriptions
 Get-AzureRmSubscription

 #set your default Subscription
 Get-AzureRmSubscription -SubscriptionName "Visual Studio Ultimate with MSDN" | Select-AzureRmSubscription

 $nic=Get-AzureRmNetworkInterface -Name warnerlabad158 -ResourceGroupName WarnerWinLab
 $nic.IpConfigurations[0].PrivateIpAllocationMethod = "Static"
 $nic.IpConfigurations[0].PrivateIpAddress = "10.0.0.4"
 Set-AzureRmNetworkInterface -NetworkInterface $nic
In the Portal, this is found under the NIC configuration of the VM:
6- Next, on the AD machine, go to "Add server roles and features".
7- Add AD Services and DNS, go through the installer. I created a domain called lab.warnerlab.com.
8- Restart.
If you need a more detailed guide to setting up your domain, you can do that on your own following a guide like THIS ONE.
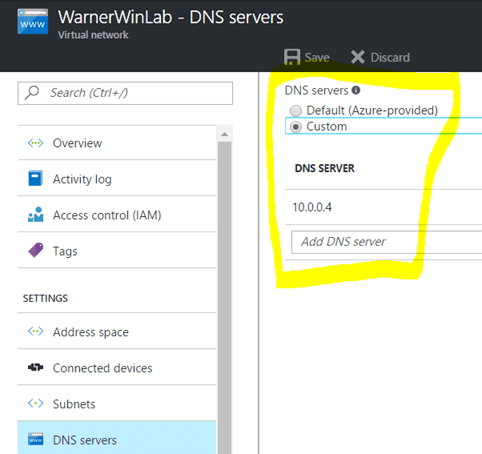
8- Once the domain is up and running, go back to the VirtualNetwork in the Portal and assign the DC as the DNS server.
Before we go into the steps for creating the SQL cluster node VMs there is one major thing I want to point out. I used DV2 machines and regular HDD storage for the disks. I did this because I'm setting this up as a DEMO and don't want to break my Azure bank. In a real production scenario I would recommend people use DSV2 or GSV2 VMs so that they can use Premium Storage. Then you can pool SSD disks for high performance cluster storage or mix some HDD in there as well for archive filegroups or whatever your workload demands.
I assume some familiarity with working with Azure so I'm not going to walk step by step on how to create the SQL VMs. Here are the high level steps for the SQL node machines:
1- Created a new D2V2 VM called sqlfcinode1.
2- Add it to the virtual network and subnet we created previously.
3- Add it to an availability set called sqlfci (2 fault and 2 update domains). This will protect our cluster VMs from simultaneous failures.
4- Add two disks to the VM to be part of the cluster storage pool. S2D requires at least 3 disks for a pool, so I'm putting 2 on each node. Again, I'm using 2 HDD for DEMO, on a real Production deployment you could have more and use SSD. Only attach them to the VM, do not format them! S2D will not add to a pool drives that have already been formatted.
5- Set the NIC of this node to be STATIC - 10.0.0.5.
6- On the VM, go to Server Manager – Local Server - Workgroup – Change the server to be joined to the LAB domain.
6- Repeat the steps above for a second node: sqlfcinode2 - 10.0.0.6.
Section B: Setting up the Cluster and Storage Spaces Direct
At this point, we have our virtual network, DNS, Active Directory and two Windows Server VMs with two data disks on each. It's time to tie this all together into the actual cluster, enable S2D and create the storage pool and Cluster Shared Volumes we will use for the SQL instance! I will be doing some steps in PowerShell and others on the Windows GUI. These can be run on either node but for consistency, I'm running all the configuration from node 1 and only switch to node 2 as necessary. If something needs to be done on BOTH nodes it will say so as well. Let's start:
1- On both nodes we need to enable the Clustering and File Services roles:
Install-WindowsFeature –Name File-Services, Failover-Clustering –IncludeManagementTools
2- On Failover Cluster Manager, Run Validate Configuration including these categories:
Storage Spaces Direct, Inventory, Network and System Configuration
Validation should pass (though it warns about only one network path between nodes).
3- Create the cluster:
New-Cluster -Name sqlfcicluster -Node sqlfcinode1,sqlfcinode2 -StaticAddress 10.0.0.10 -NoStorage
Note that I'm using a static address for the cluster itself as well as specifying that there is no storage to pull in as available drives at the moment.
4- We have a two-node cluster so we need a witness to have a Node Majority with Witness Quorum. I will take advantage of this opportunity to try out the new Azure cloud witness as well!
On Failover Cluster Manager, connect to the cluster. Go to More Actions on the right panel.
Go to Configure Cluster Quorum Wizard – Select the quorum witness. 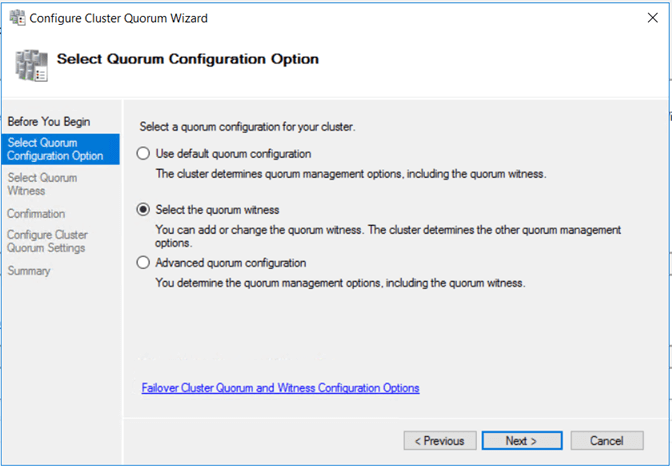
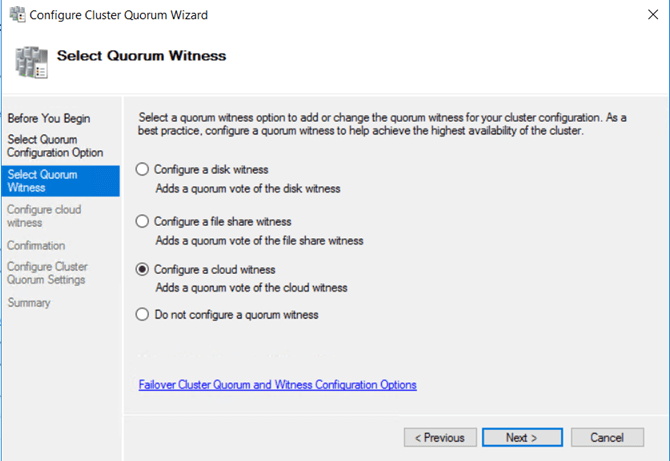
Then we can select to configure a cloud witness.
You will need your azure storage account name and access key, you can get them from the portal.
5- Now we have a functioning cluster, it's time to setup Storage Spaces Direct:
Enable-ClusterS2D
As a note of Warning, this cmdlet will fail if you have less than 3 disks on the cluster nodes. In this scenario I have two per node for a total of 4.
Once it completes, it will create a storage pool in the cluster, which you can see on the Failover Cluster Manager GUI.
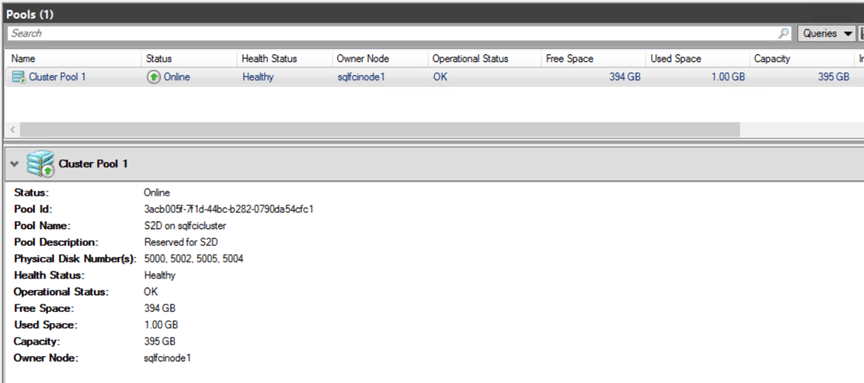
You can also verify it with Powershell:
Get-StorageSubsystem Clus* | Get-PhysicalDisk
In our example, I get the 4 virtual disk drives as the members:

A small note on S2D storage options. It offers both two way and three way mirror, by default two-way will be selected unless specified otherwise. This can be done through the PhysicalDiskRedundancy or the NumberofDataCopies parameters. A two way mirror leaves more space available but can only sustain the loss of one disk, whereas 3-way can sustain the loss of two drives at the cost of more storage used.
There is also the option of disk parity vs mirroring. Parity can be more efficient with space but will use more compute, parity also requires 3 servers for single parity and 4 for dual parity. The whole gamut of options for configuring your storage tier using S2D is well beyond the scope of this guide, I will however refer you to this great blog post.
6- Now, we can create a couple of cluster shared volumes on these drives:
New-Volume -StoragePoolFriendlyName S2D* -FriendlyName SQLDataDisk1 -FileSystem CSVFS_NTFS -AllocationUnitSize 65536 -Size 100GB -ProvisioningType Fixed -ResiliencySettingName Mirror
 New-Volume -StoragePoolFriendlyName S2D* -FriendlyName SQLLogDisk1 -FileSystem CSVFS_NTFS -AllocationUnitSize 65536 -Size 40GB -ProvisioningType Fixed -ResiliencySettingName Mirror
I'm creating two volumes, one for data and one for logs. I'm using the usual best practice of 64KB allocation unit size, fixed provisioning and using NTFS. SQL 2016 supports also using REFS however I still haven't seen any definitive documentation that recommends REFS over NTFS for SQL Server workloads.
We can verify the cluster shared volumes were created in the FCM GUI

You can also verify with PowerShell:
Get-ClusterSharedVolume
7- The CSV disks will show in Windows as two mountpoints under C:\ClusterStorage called Volume1 and Volume2.
We can rename them to something more friendly:
 Rename-Item C:\ClusterStorage\Volume1 C:\ClusterStorage\SQLData
 Rename-Item C:\ClusterStorage\Volume2 C:\ClusterStorage\SQLLogs
Note that this is a Cluster Shared Volume managed by S2D, so when I run the rename commands above, it automatically reflects the changes even if I'm viewing the volumes from node #2.
At this point, we're good to go on the cluster and storage side. Time to install SQL Server!!
Section C: Installing the SQL Server Failover Cluster Instance
With all the clustering and storage pieces in place, the SQL FCI installation is pretty much the same with a few exceptions that I will note below. Let's see:
1- From node sqlfcinode1, downloaded the media for SQL 2016 SP1.
2- Start the setup and select the install Failover cluster option.
3- You can go through the installation in the same way, with only some minor differences. I will be creating a SQL Network Name called SQLFCI.
4- On the validation, it will complain about the cluster validation having some Warnings, this is expected.
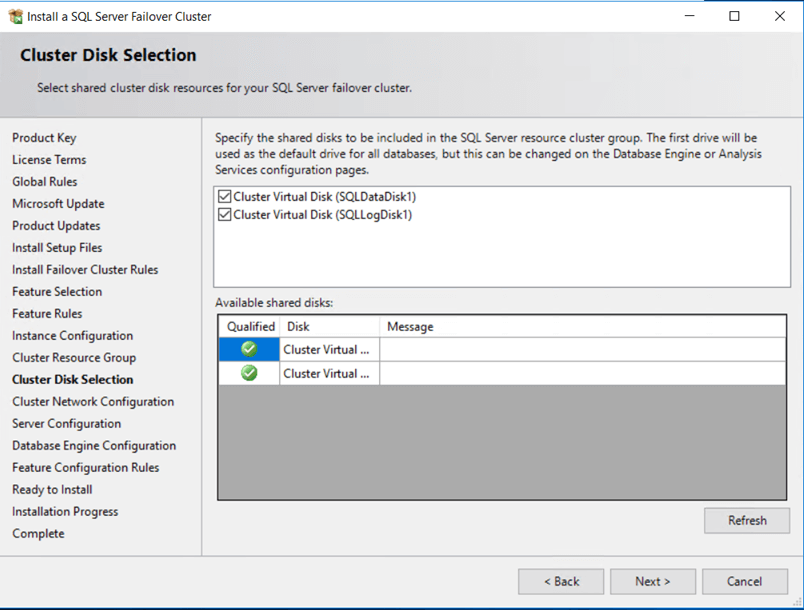
5- On the cluster disk selection, we select both data and log disks to be part of this SQL instance resource group.
6- On the network configuration, specify a non-used IP and note it down. I'm using 10.0.0.11.

This IP will be used later to create the Internal Load Balancer for the SQL cluster name.
7- The next thing that is worth noting is the data, log and tempdb directories. For data and logs, verify that they are using the CSV mountpoints we created before.
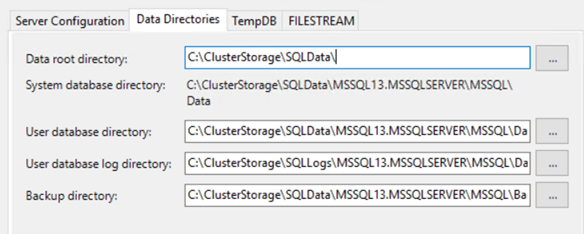
8- For tempdb I tried using the local temporary D drive with the installer but failed with permission errors.
So to be able to complete the install I just put tempdb on the CSV data mountpoint and then after the install we can move it to the D drive.
If you do want tempdb on that D drive then there are two options:
a) Make a folder and a script on both nodes as referenced here: https://blogs.technet.microsoft.com/dataplatforminsider/2014/09/25/using-ssds-in-azure-vms-to-store-sql-server-tempdb-and-buffer-pool-extensions/
b) Make the SQL service account a local admin on both nodes and move the files to the root of D.
Like I said, the installation failed for me when I tried to do this right from the installer, so I recommend using the data drive for tempdb and then moving them after if you want.
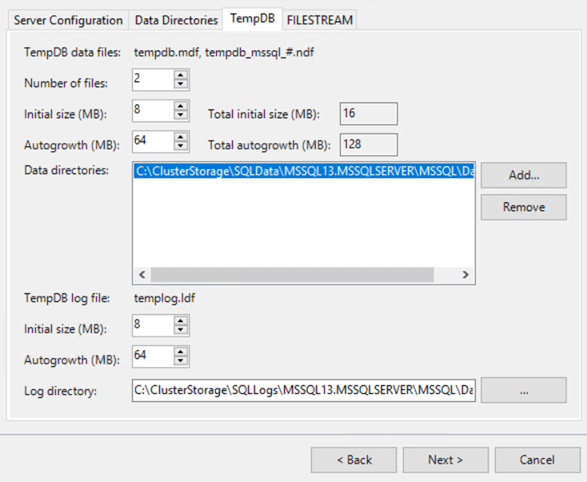
9- At this point you can finish going through the installer and finish the installation for sqlfcinode1.
10- Once installation completed on this node, I moved on and ran the installer from node 2.
11- In this case we select the option of adding a node to an existing Failover cluster instance. For node 2 there are no differences from a regular cluster install.
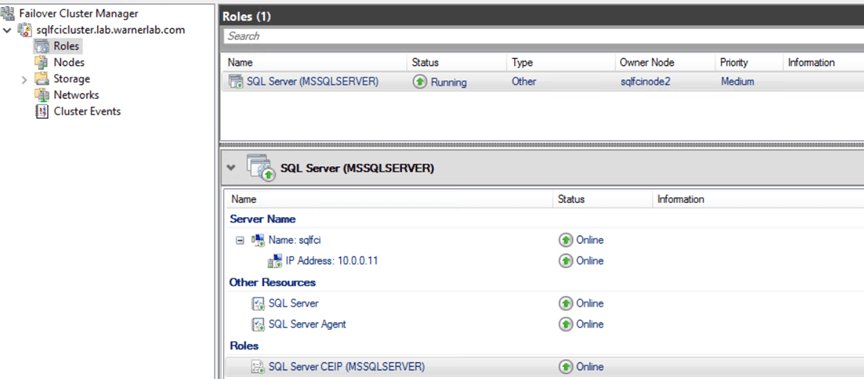
Once node 2 has been installed we're ALMOST done. This is what it looks like with a SQL name of SQLFCI on Failover Cluster Manager:
Section D: SQL Cluster Name Connectivity
The final step is to make sure connectivity works and we have an Internal Load Balancer setup to be the SQL cluster name endpoint.
Because of the way Azure networking is done (no Gratuitous ARP), the ILB is required, otherwise clients will not be able to connect through the SQL cluster name after a failover.
To create the Internal Load Balancer, we can follow the instructions Microsoft has for creating an ILB for an Availability Groups Listener on this documentation page. To adapt to our use case, simply replace the Listener information with the information of the SQL cluster name (in our case the IP for SQLFCI is 10.0.0.11).
Here are the steps for the creation of the ILB:
1- Create the ILB resource.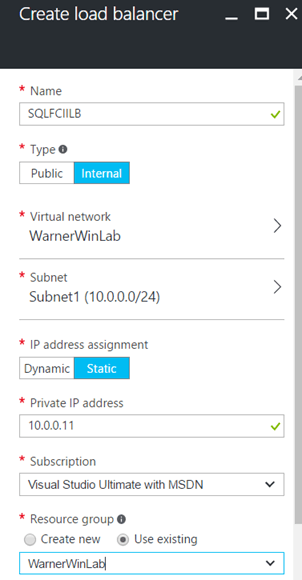
We're obviously placing the ILB on the same Virtual Network and Subnet. Also, we're creating it with the same IP we used for the SQL Cluster name (10.0.0.11) and we are setting the IP assignment to be STATIC.
2- Adding a backend pool to the ILB:
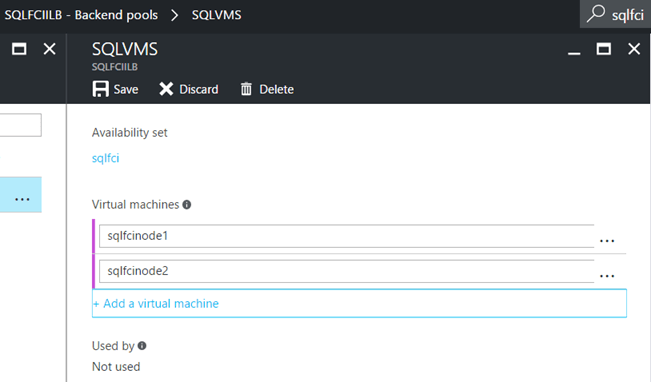
Here we make sure to add the Availability Set and the two VMs in our cluster.
3- Adding the health probe to the ILB (note this is NOT the SQL port, it's a generic unused port number). In this case, we just use port 59999:
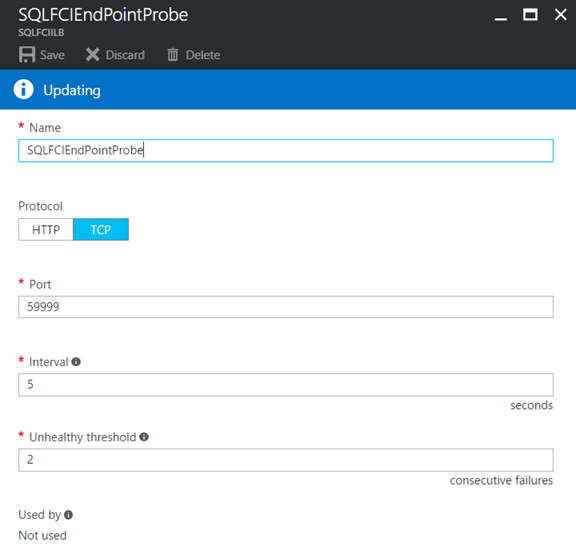
This health probe is used by the ILB to determine if a machine that is part of the backend pool is not healthy any more.
4- Then add a Load Balancing Rule to the ILB (note this one IS the SQL port). Make sure you enable direct server return:
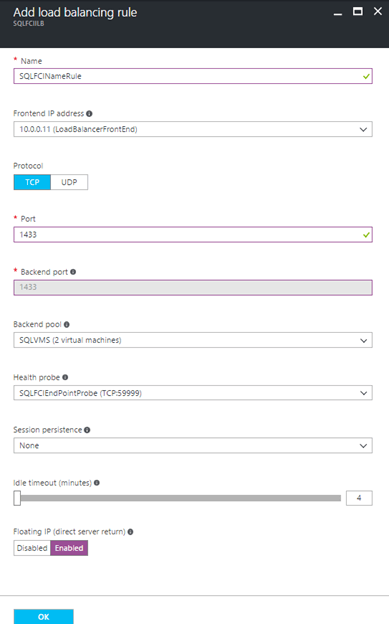
The ILB rule ties the ILB IP, the backend pool and the health probe together. Direct server return also allows the servers to continue working directly with the client once the ILB has done the job of doing the routing.
5- At this point, we need to run one final piece of PowerShell to configure the cluster to use the load balancer IP address.
 $ClusterNetworkName = "Cluster Network 1"
 $IPResourceName = "SQL IP Address 1 (sqlfci)" # the IP Address resource name, you can get it from Cluster Manager
 $ILBIP = "10.0.0.11" # the IP Address of the Internal Load Balancer (ILB). This is the static IP address for the load balancer you configured in the Azure portal.
 Import-Module FailoverClusters
 Get-ClusterResource $IPResourceName | Set-ClusterParameter -Multiple @{"Address"="$ILBIP";"ProbePort"="59999";"SubnetMask"="255.255.255.255";"Network"="$ClusterNetworkName";"EnableDhcp"=0}
6- After running this command, we get this message:
WARNING: The properties were stored, but not all changes will take effect until SQL IP Address 1 (sqlfci) is taken offline and then online again.
So on Failover Cluster Manager, take the IP resource down and back up. This will also cause your SQL Server to go down because of the dependency, you can bring it back up as well.
7- There's one more security layer that needs to be opened and that is the Windows Firewall on each node of the cluster. We need to open access to TCP 1433 (SQL Server) and TCP 59999 (the load balancer probe). If these are not opened, you will run into a 'Network Path Not Found' error when trying to connect from other machines on the same Virtual Network other than the active node.
Section E: Testing our SQL Server Failover
We got the infrastructure, SQL Server FCI and connectivity configured. Finally we are ready to test!!
Here's the test:
1- I downloaded and restored the new sample Wide World Importers database for SQL 2016 and restored it on the instance. This is the RESTORE statement I used, notice that there's nothing special about it, it's just doing a MOVE of the files to the CSV mountpoint:
 USE [master]
 RESTORE DATABASE [WideWorldImporters] FROM DISK = N'C:\ClusterStorage\SQLData\MSSQL13.MSSQLSERVER\MSSQL\Backup\WideWorldImporters-Full.bak' WITH FILE = 1,
 MOVE N'WWI_Primary' TO N'C:\ClusterStorage\SQLData\MSSQL13.MSSQLSERVER\MSSQL\DATA\WideWorldImporters.mdf',
 MOVE N'WWI_UserData' TO N'C:\ClusterStorage\SQLData\MSSQL13.MSSQLSERVER\MSSQL\DATA\WideWorldImporters_UserData.ndf',
 MOVE N'WWI_Log' TO N'C:\ClusterStorage\SQLLogs\MSSQL13.MSSQLSERVER\MSSQL\Data\WideWorldImporters.ldf',
 MOVE N'WWI_InMemory_Data_1' TO N'C:\ClusterStorage\SQLData\MSSQL13.MSSQLSERVER\MSSQL\DATA\WideWorldImporters_InMemory_Data_1',
 NOUNLOAD, STATS = 5
Under the covers, S2D will replicate the data over to the second node of the cluster and work transparently with SQL Server.
2- I'm connected from SSMS from another VM.
3- I start a workload and leave it running.
4- I stop the active node from the Azure Portal to simulate a node going down.
5- As expected, we lose connection on our current session, however, we can easily retry and we reconnect once SQL is online on the other node.
On the videos below you can see the failover testing recording. First test was moving the SQL resource gracefully like it was a patching maintenance and the second one I just stop the active node VM from the Azure portal like it was a lost VM.
Final Thoughts
There you have it. SQL Server 2016 Failover Cluster instance running on Windows Server 2016 on Azure, no 3rd party products.
The caveat here of course is that Storage Spaces Direct is a Windows Server DataCenter Edition feature and thus it will be quite a bit more expensive than regular Windows Server Standard.
If you do require SQL Server Failover Clustering then the choice to make is to either go with SIOS DataKeeper which will likely be less expensive or pay for Windows DataCenter and keep all the software stack and support under the Microsoft umbrella. In all fairness, S2D has other features that I didn't explore that make it attractive on its own. For example, you could use the tiered storage capability of S2D to keep hot data on expensive P30 Premium Storage volumes and cold data on P10 or regular HDD volumes. You could also create larger pools of storage with Scale-Out File Server and create SQL data files through an SMB interface.
Regardless what the case may be, it's very cool to see new technology synergies between the Server 2016 product and SQL 2016 and expand the reach of both tools.
I hope you found the guide helpful, until next time, cheers!
Share this
Share this
More resources
Learn more about Pythian by reading the following blogs and articles.
SQL Server AlwaysOn Availability Groups on Google Kubernetes Engine
Running SQL Server 2019 on Google Kubernetes Engine
Best practices for SQL Server instances
Ready to unlock value from your data?
With Pythian, you can accomplish your data transformation goals and more.
